Installation Guide
The Installation Guide provides step-by-step instructions for deploying Sandbox Studio into your AWS environment. It covers an overview of the solution’s architecture, including how the platform integrates with AWS to provision, manage, and clean up sandbox accounts.
You will learn how to prepare your environment, configure necessary AWS services, and apply the required permissions and security settings. This guide will take you through the installation process from start to finish, ensuring that Sandbox Studio is deployed correctly and ready to use.
- Solution overview
- Architecture overview
- Solution Architecture
- AWS services in this solution
- Security & Compliance
- Roles deployed by the solution
- Secrets & Encryption keys
- Data stored (and where)
- Plan your deployment
- Prerequisite Skills and Specialised Knowledge
- Installation Prerequisites
- Choosing your region(s)
- Choosing the hub account
- Understand running costs
- Creating sandbox accounts
- External identity provider setup (Optional)
- Deploy the Solution
- Deploy the Solution Manually
- Before you start...
- Overview of what you'll do
- AWS CloudFormation templates
- Step 1: Deploy the AccountPool stack
- Step 2: Deploy the IDC stack
- Step 3: Deploy the Network stack
- Step 4: Deploy the Data stack
- Step 5: Deploy the Compute stack
- Step 6: Deploy the API stack
- Post-deployment configuration tasks
- Create an IAM Identity Center application
- Add initial users
- Update AWS AppConfig
- Update AWS Secrets Manager
- Logging into the web UI
- Setup a custom domain (Optional)
- Manage your subscription
- Uninstall
Solution overview
The overview describes the Features and Benefits, Use cases and concept and definitions.
Overview
What is Sandbox Studio?
Sandbox Studio is a web-based solution that helps cloud administrators manage temporary AWS sandbox environments. It automates the enforcement of security policies, governance rules, budget controls, and account recycling settings — all through an easy-to-use web interface.
The solution allows organisations to give teams a safe space to experiment, learn, and prototype with AWS services in production-isolated AWS accounts that are cleaned and recycled after use.
Key Capabilities
Sandbox Studio automatically configures a sandbox Organizational Unit (OU) in AWS Organizations. This OU is preloaded with AWS best practices for workload isolation and governance. When deployed, it applies a standard set of policies, guardrails, and controls to all sandbox accounts.
The platform provides:
-
Automated cost controls
-
Sends alerts when spending approaches budget limits.
-
Can trigger automated actions (e.g., resource shutdowns) when limits are reached.
-
-
Account recycling
-
Allows accounts to be used for a fixed duration or until a spend threshold is met.
-
Cleans and resets accounts at the end of the sandbox period.
-
-
Security restrictions
-
Limits access to expensive or sensitive AWS actions within sandbox accounts.
-
Common Use Cases
Sandbox Studio supports a wide range of scenarios where teams need safe, temporary AWS environments. These environments can be pre-configured, budget-limited, and automatically cleaned up — making them ideal for experimentation, learning, and short-term projects. Below are some of the most common ways organisations use Sandbox Studio.
Development and Innovation Experiments
Typical users: Developers, product engineers
Create small-scale, temporary AWS setups to try out new services or features before committing to a production build. Teams can quickly explore possibilities, validate technical approaches, and demonstrate value without the overhead of a full deployment pipeline.
Train and Test GenAI Models
Typical users: Machine learning engineers, data scientists
Work with pre-configured environments to train and fine-tune generative AI models. Sandbox Studio makes it easy to run experiments with different training datasets, apply reinforcement learning techniques, and monitor outcomes in a safe, isolated space.
Test Environments
Typical users: QA/test engineers
Spin up a clean, disposable environment for thorough application testing. These sandboxes are ideal for verifying integrations, reproducing defects, running regression suites, and testing API updates — all without risking production stability.
Higher Education Training Labs
Typical users: Professors, lecturers, academic department heads
Set up classroom-ready AWS accounts for students to explore cloud computing hands-on. Instructors can control spending, reset environments between sessions, and ensure each student gets a fresh workspace for assignments or exams.
Research and Development (R&D)
Typical users: University researchers, enterprise R&D teams
Provide a controlled cloud platform for research teams to run experiments and gather data. These sandboxes make it possible to test hypotheses, simulate real-world conditions, and analyse results without long-term infrastructure commitments.
Employee Onboarding and Training
Typical users: Training leads, HR onboarding teams
Launch short-lived AWS environments to give new hires or existing staff practical experience with tools, workflows, or new technologies. Ideal for structured training sessions, internal workshops, or skills refreshers.
Hackathons
Typical users: Enterprise IT teams
Run organisation-hosted hackathons in AWS accounts you own and control. This enables participants to work on real challenges while keeping sensitive or proprietary data inside your security boundaries.
Demo Environments
Typical users: Engineers, solution architects
Set up temporary environments to showcase applications or solutions. These can be pre-loaded with sample data and configurations to deliver smooth, predictable demos to clients or stakeholders.
Software Vendor Trials
Typical users: Software vendors, sales engineers
Offer time-limited or budget-restricted AWS environments so customers can test your software. This ensures a consistent experience for every trial while keeping operational costs under control.
Who Should Use This Guide
This installation guide is designed for:
-
Solution architects
-
DevOps engineers
-
AWS account administrators
-
Cloud operations teams
It provides:
-
An architecture overview
-
Planning considerations before deployment
-
Step-by-step configuration instructions for launching Sandbox Studio in your AWS environment
Core Capabilities
Sandbox Studio provides a range of tools to make AWS sandbox account management fast, safe, and cost-effective. The table below explains the core capabilities of the platform, how it works, and the specific benefits it can bring to your teams.
| Capability | What It Does | Benefit |
|---|---|---|
| Instant Account Access |
|
|
| Stay on Budget |
|
|
| Simplified Account Cleanup |
|
|
| Built-in Security |
|
|
| Flexible Permissions |
|
|
| Ready-to-Launch Environments |
|
|
| Controlled Access |
|
|
| Easy Management |
|
|
Concepts and definitions
| Term / Concept | Description |
| Account Recycling | The process of cleaning and reusing sandbox accounts after they hit budget or time limits. This reduces AWS account sprawl, optimises resource use, and minimises administrative work by resetting accounts for new users. |
| Account Template | A preconfigured set of sandbox rules and settings that define how an account can be used. Templates can include approval requirements, budgets, alert thresholds, lease durations, and automatic enforcement actions. Admins and managers create templates, and users request new sandbox leases by selecting from the available templates. |
| AWS Nuke | An open-source automation tool that systematically deletes AWS resources across an account. It is used during account recycling to ensure no residual resources or configurations remain before reassigning the account. |
| Budget threshold | A predefined spending limit set by the customer. When spending reaches this threshold, Sandbox Studio can trigger automated actions such as sending alerts, stopping running resources, or blocking new deployments to prevent budget overruns. |
| Guardrails | Preventive and detective controls that help maintain security, compliance, and operational standards within sandbox accounts. Guardrails can include service restrictions, security configurations, and automated checks that detect or prevent policy violations. |
| Hub Account | A centralised AWS account used by Sandbox Studio to coordinate sandbox operations. The hub hosts shared resources, enforces configuration, and orchestrates automation across all sandbox accounts. |
| Lease | A temporary allocation of an AWS account to a user for a set time or budget. During the lease period, the user can run experiments or projects. When the lease expires, the account is reclaimed or recycled according to predefined rules. |
| Organisation Management Account | The management account is the top-level account in an AWS Organisation. It is automatically created when you set up the organisation and has full administrative control over all member accounts. |
| Organisational Unit (OU) | A logical grouping of AWS accounts within AWS Organisations that lets you organise accounts in a hierarchy and apply governance policies. Sandbox Studio creates separate OUs for active sandbox accounts and for recycled (cleaned and reusable) accounts, simplifying management and policy enforcement. |
| Permission set | A collection of IAM Identity Center permissions that define what a user can do within an AWS account. Permission sets are centrally managed and applied to users or groups to ensure consistent, controlled access. |
| Resource controls | Automated policies and mechanisms that manage the lifecycle of AWS resources. These controls enforce creation limits, modification rules, and automated cleanup based on budgets, time limits, and security requirements. |
| Sandbox environment | A controlled, isolated AWS environment that allows teams to experiment, test, and learn without affecting production systems. Sandboxes provide a safe space to try new services, prototype solutions, or run training exercises, with built-in limits and guardrails to prevent accidental overuse or security risks. |
| Service Control Policies (SCPs) | Organisation-wide permission boundaries that define the maximum available AWS permissions for accounts within an OU. SCPs are used to enforce consistent security, restrict high-risk services, and ensure sandbox accounts cannot bypass established rules. |
Architecture overview
The architecture of Sandbox Studio brings together multiple AWS services to deliver secure, temporary sandbox environments. At a high level, the solution uses a combination of managed services that each play a specific role — from provisioning accounts and handling authentication, to monitoring usage and cleaning up resources. These services work together through event-driven automation and serverless functions to ensure scale, reliability, and efficiency. Security and compliance are built into the design, with controls such as least-privilege access, encryption, service control policies (SCPs), and network isolation.
The following sections provide more detail on the overall solution design, the AWS services used, and the security model that underpins it.
Solution Architecture
Sandbox Studio solution is built entirely on AWS services, with each component playing a specific role in delivering, securing, and managing sandbox environments. The architecture uses managed services to ensure scalability, security, and automation.
The diagram below shows the main components and how they interact. Follow the numbered sections in this guide to understand the purpose and function of each component in the solution.

1. User Roles & Responsibilities
Sandbox Studio supports three types of users, each with distinct responsibilities:
1. Administrators
Responsible for configuring and maintaining Sandbox Studio for their organisation.
Key responsibilities include:
-
Setting global policies such as maximum budget thresholds and cleanup rules.
-
Managing AWS integration, including permissions and guardrails.
-
Provisioning new sandbox accounts when needed.
-
Overseeing security and governance settings.
2. Managers
Oversee day-to-day sandbox usage within a team or department.
Key responsibilities include:
-
Approving or rejecting sandbox requests.
-
Assigning account templates to users.
-
Tracking spending and activity for accounts under their supervision.
3. Sandbox Users
Request and use sandbox accounts for development, testing, training, or experimentation.
They must operate within:
-
Guardrails
-
Permissions
-
Budget limits
2. Authentication and Access
-
All users access Sandbox Studio via a SAML 2.0 application using AWS IAM Identity Center.
-
IAM Identity Center can:
-
Use its own internal user store, or
-
Integrate with external identity providers (e.g., Okta, Microsoft Entra ID).
-
-
Most organisations with an existing AWS Organisation use an external provider for centralised identity management.
3. Application Entry Point
-
The web UI is accessed through Amazon CloudFront, which serves as a single entry point for:
-
The static web UI (hosted in Amazon S3).
-
API endpoints (via Amazon API Gateway).
-
4. UI Hosting
-
Amazon S3 hosts static assets such as HTML, CSS, and JavaScript files.
5. API Protection
-
AWS WAF protects API Gateway from common exploits, bots, and resource abuse.
6. API Gateway
-
The web UI communicates with Amazon API Gateway REST APIs to:
-
Fetch data
-
Update configuration and status information
-
-
AWS Lambda functions authorize requests using role-based access control based on IAM Identity Center groups.
7. Backend
AWS Lambda is used throughout Sandbox Studio to run backend logic, including:
8. Database
-
AWS Lambda functions read and write configuration and status data to a PostgreSQL database deployed using Amazon Relational Database Service (RDS).
-
The RDS database runs inside a VPC in the sandbox hub account.
9. Networking
The Amazon Virtual Private Cloud (VPC) hosts the PostgreSQL RDS database used by Sandbox Studio.
Key characteristics include:
-
Private subnets for hosting the RDS database securely.
-
VPC-enabled Lambda functions to allow direct database access.
-
Network isolation from other AWS resources to protect sensitive configuration and status data.
10. Account Lifecycle Management
- AWS Step Functions coordinate the lifecycle of sandbox accounts, including:
- Onboarding new accounts
- Terminating leases
- Cleaning up accounts for reuse
- Step Functions move accounts between Organizational Units (OUs) based on their current status.
- Onboarding or termination events trigger dedicated cleanup workflows. These workflows can invoke other AWS services, such as AWS CodeBuild, to run resource deletion tools like AWS Nuke, ensuring all user-created resources are removed before the account is returned to the available pool.
11. Event-Driven Automation
-
Amazon EventBridge routes lifecycle events such as
-
Lease budget breaches
-
Lease duration breaches
-
-
When triggered, these events can:
-
Send email notifications
-
Invoke Lambda functions and Step Functions to manage lifecycle actions
-
12. Sandbox Account Access
-
Users can access assigned AWS sandbox accounts via:
-
AWS IAM Identity Center Access Portal (console access)
-
Programmatic access using generated credentials
-
-
The Sandbox Studio web UI provides SSO links for direct AWS console login.
13. Licensing Server
-
Sandbox Studio regularly queries the Sandbox Studio Software Licensing Service to confirm the customer's entitlement. That service will also query the AWS Marketplace.
Note: a number of other supporting AWS services are used by Sandbox Studio. Please see AWS services in this solution for the full list.
AWS services in this solution
Sandbox Studio uses a combination of AWS managed services to securely deliver, manage, and clean up sandbox environments. The table below describes the core AWS services used in the solution.
| AWS Service | Description |
|---|---|
| Amazon CloudFront | Acts as the entry point into the application. It fronts both the static website (hosted in Amazon S3) and the API Gateway, ensuring secure and efficient content delivery. |
| AWS IAM Identity Center | Manages all user access to the solution. Every user has an account in IAM Identity Center, where access permissions and group memberships are defined. |
| AWS AppConfig | Stores global limits and application settings, allowing configuration updates without code changes. Used across multiple parts of the solution. |
| AWS Organisations | Hosts all organisational units (OUs) used to manage sandbox accounts. The solution places accounts in different OUs depending on their state in the sandbox lifecycle. |
| Amazon RDS | Provides a PostgreSQL database for storing structured data such as account templates and lease records. |
| AWS Secrets Manager | Securely stores private keys for authentication and database credentials used by the application. |
| AWS Lambda | Runs all backend compute for the application using a serverless architecture, avoiding the need for containers or virtual machines. |
| AWS CodeBuild | Runs pre-launch tasks (such as deploying resources into new accounts) and cleanup tasks (such as deleting resources after a sandbox lease expires). |
| Amazon S3 | Hosts the main static website for the application. |
| AWS Key Management Service (AWS KMS) | Uses customer-managed keys to encrypt various elements of the solution. |
| Amazon Simple Queue Service (Amazon SQS) | Handles asynchronous events such as bulk account setup or cleanup operations. |
| AWS Systems Manager | Uses AWS Systems Manager Parameter Store to store installation-time configuration variables that need to be shared across different CloudFormation stacks in the solution. |
| Amazon CloudWatch | Captures all application logs and system metrics, allowing administrators to monitor system health and troubleshoot issues. |
Security & Compliance
This page provides an overview of the security model used by Sandbox Studio. It explains how the solution is deployed, the controls in place, and how it aligns with enterprise security, compliance, and governance requirements.
Deployment Model
-
Customer-owned deployment – Sandbox Studio is deployed into your own AWS Organisation or Landing Zone. It is not SaaS.
-
Full control – You retain complete ownership of AWS accounts, configurations, and network boundaries.
-
Account isolation – Sandbox accounts are provisioned into dedicated Organisational Units (OUs) with Service Control Policies (SCPs) applied to enforce guardrails.
Data Protection
-
No production data ingestion – Sandbox Studio does not ingest, store, or process production workloads unless specifically configured to do so.
-
Local metadata – Configuration data, logs, and monitoring outputs remain within your AWS accounts unless explicitly shared.
-
Encryption standards:
-
In transit – All communication uses TLS 1.2 or higher.
-
At rest – All persistent data is encrypted with AWS KMS (customer-managed where appropriate).
-
-
Credential handling – No AWS credentials are stored outside your environment.
Identity & Access Management
IAM Roles
-
Multiple IAM roles are deployed to run Sandbox Studio and discover resources within AWS accounts.
-
Roles follow least privilege principles, granting only the minimal permissions required for each function.
-
Separation of duties is enforced across deployment, lifecycle automation, and monitoring components.
IAM Identity Center & SAML
-
AWS IAM Identity Center (formerly AWS SSO) provides centralised authentication.
-
Sandbox Studio integrates with SAML 2.0 identity providers (e.g., Okta, Microsoft Entra ID) for seamless single sign-on.
-
Users sign into the Sandbox Studio web UI with existing corporate credentials, eliminating the need for local passwords.
Role-based Access
-
Access levels are defined by permission sets:
-
End users – Request and operate sandbox accounts.
-
Managers – Approve requests, define templates, and oversee usage.
-
Administrators – Configure global settings, guardrails, and integrations.
-
-
SCP enforcement prevents privilege escalation, service misuse, or bypassing of governance controls.
Network Security
Sandbox Studio backend services run inside a dedicated VPC with a layered subnet model to enforce isolation.
-
Three subnet tiers:
-
Public subnet – Only for CloudFront distribution and API Gateway.
-
Private application subnets – Run AWS Lambda functions with controlled outbound-only egress for required API calls.
-
Private database subnets – Host PostgreSQL RDS, with no inbound or outbound internet access.
-
-
No direct internet exposure – Backend compute and storage remain fully private.
-
AWS WAF protection – A regional WAF ACL secures API Gateway endpoints using four AWS managed rule groups and two custom rules.
-
Separation of duties – Network boundaries ensure web entry points, compute, and data tiers are isolated.
Core Security Services
AWS Key Management Service (KMS)
-
Sandbox Studio creates four Customer Managed Keys (CMKs), one per stack (AccountPool, IDC, Data, Compute).
-
Each CMK encrypts AWS resources such as:
-
CloudWatch Logs
-
Amazon SQS queues
-
EventBridge event buses
-
AWS Secrets Manager secrets
-
AWS CodeBuild projects
-
Amazon RDS database
-
-
CMKs follow separation of concerns, limiting key scope and permissions per stack.
AWS WAF
-
Web Application Firewall (WAF) protects API Gateway endpoints.
-
Rules include managed protections (e.g., SQLi, XSS, bot control) and two custom allowlists.
-
Default behaviour blocks any request failing rule evaluation.
Amazon CloudFront
-
Serves the Sandbox Studio web UI hosted in Amazon S3.
-
Configured with TLS 1.2+ for all sessions.
-
Adds HTTP security headers to viewer responses.
-
For stricter TLS enforcement, a custom certificate can be applied to require TLS 1.2 or TLS 1.3.
Amazon RDS
-
All user data stored in Amazon RDS (Relational Database Service) is encrypted at rest with AWS KMS CMKs.
AWS Lambda
-
All backend logic runs on serverless Lambda functions.
-
Each function uses the most recent stable runtime.
-
No secrets are logged, and IAM roles are isolated per function.
-
Functions operate with least-privilege permissions and scoped network access.
Lifecycle Management
-
Pre-configured templates – Sandboxes are provisioned with security guardrails and governance baked in.
-
Automated teardown – On expiry, AWS Nuke ensures accounts are cleaned and reset before reuse.
-
Flexible expiry options – Accounts may expire based on time or budget thresholds. Logs are retained for audit purposes.
Logging, Monitoring & Governance
-
AWS-native monitoring is fully supported. Customers are able to use the following native AWS services and are encouraged to do so to increase their security posture:
-
AWS CloudTrail – Comprehensive audit logging.
-
AWS Config – Compliance and drift detection.
-
Amazon GuardDuty – Continuous threat detection.
-
Amazon CloudWatch – Metrics, alarms, and application insights.
-
-
Governance enforcement – SCPs and automation to prevent insecure patterns (e.g. public S3 buckets).
Compliance Alignment
While Sandbox Studio itself is not independently certified, it is built entirely on AWS services that hold stringent compliance certifications. This means Sandbox Studio inherits the trusted compliance foundation of AWS.
Key AWS Certifications in Scope
AWS services underpinning Sandbox Studio have been audited against major frameworks, including:
-
SOC 1, SOC 2, SOC 3
-
PCI DSS
-
HIPAA / HITECH
-
ISO 27001, ISO 27017, ISO 27018
-
FedRAMP
-
GDPR
-
FIPS 140-3 (for AWS KMS)
Compliance Certifications for Core Services
| Service | Certifications |
|---|---|
| Amazon CloudFront | SOC 1, SOC 2, SOC 3, PCI DSS, HIPAA, ISO 27001/17/18, FedRAMP |
| AWS IAM Identity Center | SOC 1, SOC 2, SOC 3, PCI DSS, HIPAA, IRAP, ISO 27001/17/18 |
| AWS AppConfig | SOC 1, SOC 2, SOC 3, PCI DSS, HIPAA, ISO 27001/17/18, FedRAMP |
| AWS Organizations | SOC 1, SOC 2, SOC 3, PCI DSS, HIPAA, ISO 27001/17/18 |
| Amazon RDS | SOC 1, SOC 2, SOC 3, PCI DSS, HIPAA/HITECH, ISO 27001/17/18, FedRAMP, GDPR |
| AWS Secrets Manager | SOC 1, SOC 2, SOC 3, PCI DSS, HIPAA, ISO 27001/17/18, ISO 9001 |
| AWS Lambda | SOC 1, SOC 2, SOC 3, PCI DSS, HIPAA, FedRAMP, ISO 27001/17/18 |
| AWS CodeBuild | SOC 1, SOC 2, SOC 3, PCI DSS, HIPAA, FedRAMP, ISO 27001/17/18 |
| Amazon S3 | SOC 1, SOC 2, SOC 3, PCI DSS, HIPAA/HITECH, ISO 27001/17/18, FedRAMP, GDPR |
| AWS Key Management Service (KMS) | SOC 1, SOC 2, SOC 3, PCI DSS, HIPAA, FedRAMP, ISO 27001/17/18, FIPS 140-3 |
| Amazon Simple Queue Service (SQS) | SOC 1, SOC 2, SOC 3, PCI DSS, HIPAA, ISO 27001/17/18, FedRAMP |
| AWS Systems Manager | SOC 1, SOC 2, SOC 3, PCI DSS, HIPAA, FedRAMP, ISO 27001/17/18 |
| Amazon CloudWatch | SOC 1, SOC 2, SOC 3, PCI DSS, HIPAA, FedRAMP, ISO 27001/17/18 |
For official audit reports and current scope, use AWS Artifact or consult the AWS Services in Scope by Compliance Program documentation.
Summary
Sandbox Studio is designed with security-first principles and built on compliant AWS services. Key assurances include:
-
Complete customer control of data, identity, and network boundaries.
-
End-to-end encryption, least-privilege IAM roles, and enforced SCP guardrails.
-
Defence-in-depth VPC design with layered subnets and strict egress rules.
-
Strong network protection via AWS WAF and CloudFront TLS enforcement.
-
Automated account lifecycle management with auditable teardown.
-
Monitoring and governance integrated with AWS-native services.
-
Foundation aligned with ISO 27001, SOC 2, PCI DSS, HIPAA, and FedRAMP-certified AWS services.
This model provides security officers and auditors confidence that sandbox environments are isolated, compliant, and tightly governed — enabling safe innovation in AWS without introducing enterprise risk.
Roles deployed by the solution
Sandbox Studio installs multiple roles in your environment, each serving different purposes
| Role name | Account created in | Purpose | Can be assumed by |
|
OrgMgtRole - SandboxStudio-{Namespace}-OrgMgtRole |
Management Account | For operations on the org management account (Move accounts between OUs, etc.) | IntermediateRole in Hub Account |
|
IntermediateRole - SandboxStudio-{Namespace}-IntermediateRole |
Hub Account | For functions, step functions, etc to assume to then be able to assume the Org Management Role | Roles starting with SandboxStudio-Compute-* and SandboxStudio-API-* |
|
IdcRole - SandboxStudio-{Namespace}-IdcRole |
Management Account | For operations in Identity Center | IntermediateRole in Hub Account |
|
SandboxAccountRole - SandboxStudio-{Namespace}-SandboxAccountRole |
Member accounts | For Hub Accounts to control member accounts | IntermediateRole in Hub Account |
|
CodeBuildDeployRole
|
Member accounts | To allow launch templates in member accounts | Step function to create launch templates |
| LaunchTemplateExternalAccessRole | Hub Account | Allows access to S3 buckets in external accounts | CodeBuildDeployRole |
More info on LaunchTemplateExternalAccessRole
This role is a bit particular in the sense that it is created with the following policy:
{
    "Version": "2012-10-17",
    "Statement": [
        {
            "Condition": {
                "StringNotEquals": {
                    "aws:ResourceAccount": "<HUB ACCOUNT ID>"
                }
            },
            "Action": [
                "s3:GetObject",
                "s3:ListBucket"
            ],
            "Resource": "*",
            "Effect": "Allow"
        }
    ]
}
This gives the role permissions to list buckets and get objects in every buckets that are NOT the Hub Account (The account where the role is created).
The purpose of this is to allow you to grant this role access to your own bucket should you have resources in other accounts.
For example, let's say you want to launch a template in a Sandbox Account with resources coming from an external S3 bucket (resources, CloudFormation templates, ...). You can grant access to your external bucket to this role through Bucket policy.
The codebuild task running your launch template will assume this role which in turn can access your resources in a secure manner.
Secrets & Encryption keys
Secrets
Sandbox Studio creates 4 secrets in AWS Secrets Manager:
|
Secret name
|
Description
|
Rotated?
|
|---|---|---|
|
/SandboxStudio/Sandbox/Auth/IdpCert
|
IAM Identity Center Certificate of the Sandbox Studio SAML 2.0 custom app
|
No
|
|
/SandboxStudio/Sandbox/Auth/JwtSecret
|
The secret for JWT used by Sandbox Studio
|
Automatically, every 30 days
|
|
/SandboxStudio/Sandbox/RDS/Credentials
|
Credentials for RDS PostgreSQL instance for SandboxStudio
|
Not automatically - Planned for next Sandbox Studio releases
|
|
/SandboxStudio/Sandbox/SMTP/Credentials
|
SMTP Credentials for Sandbox Studio (Only use if Sandbox Studio is configured to send notifications using SMTP)
|
No
|
Sandbox Studio uses JWT Token for authentication mechanism. As part of the solution, and to ensure higher standards of security, the JWT Secret is rotated every 30 days.
Encryption keys
Sandbox Studio creates the following KMS keys:
|
Aliases
|
Key type
|
Key spec
|
Key usage
|
|---|---|---|---|
|
-
|
Symmetric
|
SYMMETRIC_DEFAULT
|
Encrypt and decrypt
|
|
SandboxStudio/Sandbox/Sandbox-SandboxStudio-Data
|
Symmetric
|
SYMMETRIC_DEFAULT
|
Encrypt and decrypt
|
|
-
|
Symmetric
|
SYMMETRIC_DEFAULT
|
Encrypt and decrypt
|
|
SandboxStudio/Sandbox/Sandbox-SandboxStudio-Compute
|
Symmetric
|
SYMMETRIC_DEFAULT
|
Encrypt and decrypt
|
|
SandboxStudio/Sandbox/Sandbox-SandboxStudio-API
|
Symmetric
|
SYMMETRIC_DEFAULT
|
Encrypt and decrypt
|
Sandbox Studio S3 Buckets use Amazon-Managed server-side encryption.
Data stored (and where)
Overview
Sandbox Studio provisions a single-AZ database by default (db.t4g.micro). You can modify the database size according to your requirements.
Data Storage
The database stores the following types of data:
- User display names and internal Identity Center identifier
- Email addresses
- Cost information
This information comes from the first user login from AWS Identity Center user.
Security
Network Isolation: The database resides in a private subnet with:
- No egress access
- No external ingress access
Personal Information: The only personally identifiable information (PII) stored consists of user display names and email addresses. This data remains isolated within the secured private subnet.
Plan your deployment
This section describes the Regions, cost, security, and other considerations prior to deploying the solution.
Prerequisite Skills and Specialised Knowledge
Overview
This solution requires foundational knowledge of AWS and specific AWS services. The level of expertise needed depends on the user's role and responsibilities within the deployment.
General Requirements (All Users)
AWS Fundamentals
Users deploying or utilising this solution should have:
- Basic familiarity with AWS services and the AWS Management Console
- Understanding of AWS accounts and regions
- Knowledge of IAM basics and user permissions
Administrator Requirements (Installation and Setup)
Administrators responsible for deploying and configuring this solution require specialized knowledge in the following AWS services:
AWS Organizations
- Understanding of organizational structure and how to manage multiple AWS accounts
- Ability to navigate the Organizations console
- Knowledge of service control policies (SCPs) and their impact on deployments
AWS Identity Center (formerly AWS SSO)
- Configuration and management of Identity Center
- Creating and assigning permission sets
- Managing user and group access across AWS accounts
- Understanding federated access patterns
AWS CloudShell
- Launching and using CloudShell from the AWS Management Console
- Executing CLI commands and scripts within the CloudShell environment
- Basic troubleshooting of CloudShell connectivity and permissions
- Familiarity with AWS CLI commands for automating deployment tasks
CloudWatch
All users analyzing solution outputs should be comfortable with:
Summary
For End Users: AWS fundamentals
For Administrators: AWS fundamentals + Organizations + Identity Center + CloudShell + AWS CLI basics
Installation Prerequisites
Before installing Sandbox Studio, it is important to confirm that the required prerequisites are in place. Most enterprise organisations that already run a multi-account AWS environment will typically have these prerequisites met. However, it is still essential to verify them before starting the installation to avoid any delays or configuration issues later in the process.
1. AWS Organisations
Ensure you have enabled AWS Organisations in your AWS environment before you deploy Sandbox Studio.
AWS Organisations helps you centrally manage and govern your environment as you grow and scale your AWS resources. [1]
Why Sandbox Studio needs it: Sandbox Studio creates and manages sandbox accounts dynamically. AWS Organisations provides the framework to programmatically create new accounts, apply consistent policies, and maintain governance across all sandbox environments.
Please refer to this link to learn how to use AWS Organisations:
https://docs.aws.amazon.com/organizations/latest/userguide/orgs_tutorials_basic.html
2. Service Control Policies (SCPs)
Ensure you have enabled Service Control Polices within your AWS Organisation.
Service control policies (SCPs) are a type of organisation policy that you can use to manage permissions in your organisation. SCPs offer central control over the maximum available permissions for the IAM users and IAM roles in your organisation. SCPs help you to ensure your accounts stay within your organisation’s access control guidelines. SCPs are available only in an organisation that has all features enabled. SCPs aren't available if your organisation has enabled only the consolidated billing features. For instructions on enabling SCPs, see Enabling a policy type. [1]
Why Sandbox Studio needs it: SCPs allow setting up guardrails and security boundaries for sandbox accounts, preventing users from accessing restricted services or regions and maintain a safe experimentation environment.
Refer to this page to learn how to enable SCPs:
https://docs.aws.amazon.com/organizations/latest/userguide/orgs_manage_policies.html
3. AWS IAM Identity Center
Ensure you have enabled AWS IAM Identity Center in your AWS Organisation.
Note: Sandbox Studio requires an Organization instance of IAM Identity Center to be configured in your AWS environment.
IAM Identity Center is built on top of AWS Identity and Access Management (IAM) to simplify access management to multiple AWS accounts, AWS applications, and other SAML-enabled cloud applications. In IAM Identity Center, you create, or connect, your workforce users for use across AWS. You can choose to manage access just to your AWS accounts, just to your cloud applications, or to both. You can create users directly in IAM Identity Center, or you can bring them from your existing workforce directory. With IAM Identity Center, you get a unified administration experience to define, customize, and assign fine-grained access. Your workforce users get a user portal to access their assigned AWS accounts or cloud applications. [1]
Why Sandbox Studio needs it: Users need seamless access to their assigned sandbox accounts. Identity Center provides single sign-on capabilities and centralised user management, allowing Sandbox Studio to grant and revoke access to sandbox environments automatically.
Refer to this page to learn how to enable IAM Identity Center:
https://docs.aws.amazon.com/singlesignon/latest/userguide/enable-identity-center.html
4. Resource Access Manager (RAM)
Enable resource sharing in your AWS organisation using AWS Resource Access Manager (RAM).
AWS Resource Access Manager (AWS RAM) helps you securely share your resources across AWS accounts, within your organization or organizational units (OUs) in AWS Organizations, and with IAM roles and IAM users for supported resource types. You can use AWS RAM to share resources with other AWS accounts. This eliminates the need to provision and manage resources in every account. When you share a resource with another account, that account is granted access to the resource and any policies and permissions in that account apply to the shared resource. [1]
Why Sandbox Studio needs it: Sandbox Studio needs to share common resources (like SSM Parameters) across multiple sandbox accounts efficiently, reducing duplication and management overhead.
Refer to this page to learn how to enable Resources Sharing within your AWS organisation:
https://docs.aws.amazon.com/ram/latest/userguide/getting-started-sharing.html#getting-started-sharing-orgs
5. CloudFormation StackSets
Ensure you have activated trusted access for CloudFormation Stack sets.
AWS CloudFormation StackSets extends the capability of stacks by allowing you to create, update, or delete stacks across multiple accounts and AWS Regions with a single operation. Using an administrator account, you define and manage a CloudFormation template, and use the template as the basis for provisioning stacks into selected target accounts across specified AWS Regions. [1]
Why Sandbox Studio needs it: Sandbox Studio uses StackSets to deploy consistent infrastructure templates across multiple sandbox accounts simultaneously, enabling standardised environment provisioning and updates.
Refer to this page to learn how to activate trusted access for StackSets with AWS Organisations:
https://docs.aws.amazon.com/AWSCloudFormation/latest/UserGuide/stacksets-orgs-activate-trusted-access.html
6. Cost Explorer
Ensure that you have enabled Cost Explorer in your organisation management account.
AWS Cost Explorer has an easy-to-use interface that lets you visualise, understand, and manage your AWS costs and usage over time. [1]
Why Sandbox Studio needs it: Sandbox Studio requires cost monitoring to track spending across sandbox accounts, implement cost controls, generate usage reports, and trigger cleanup actions when cost thresholds are exceeded.
Refer to this page to learn how to enable Cost Explorer:
https://docs.aws.amazon.com/cost-management/latest/userguide/ce-enable.html
7. Lambda Concurrency Limit
Ensure that your AWS Lambda concurrency limit is adequate; most accounts default to 1000 (which is usually more than sufficient), but in new accounts this limit may be set to 10, in which case you should raise a service quota request to increase it via AWS Service Quotas.
Note: This limit increase should be applied to the Hub Account.
Concurrency is the number of in-flight requests that your AWS Lambda function is handling at the same time. For each concurrent request, Lambda provisions a separate instance of your execution environment. As your functions receive more requests, Lambda automatically handles scaling the number of execution environments until you reach your account's concurrency limit. By default, Lambda provides your account with a total concurrency limit of 1,000 concurrent executions across all functions in an AWS Region. To support your specific account needs, you can request a quota increase and configure function-level concurrency controls so that your critical functions don't experience throttling. [1]
If the Applied quota value is less than 1000, select the Request quota increase button to request an increase to this value to at least 1000 before deploying the solution. [2]
Refer to this page to learn how to request the quota increase for the concurrency limit.
https://repost.aws/knowledge-center/lambda-concurrency-limit-increase
Choosing your region(s)
When setting up Sandbox Studio, choosing the correct AWS Regions is an important step. The regions you select determine where the solution is deployed, which regions users can access, and how accounts are cleaned up.
1. Identify Your Home Region
In an AWS Organisation setup, IAM Identity Center (IDC) is enabled in one specific Region.
This Region becomes your home Region and must be used for deploying Sandbox Studio:
-
Organisation Management Account – deploy into this Region.
-
Hub Account – deploy into this same Region.
All core solution stacks (AccountPool, IDC, Network, Data, SES, Compute, API) must be deployed in the same home region.
2. Select Managed Regions
During installation, you specify which AWS Regions Sandbox Studio will manage. This has two main effects:
a. Service Control Policies (SCPs)
-
SCPs are applied at the Organisational Unit (OU) level.
-
They restrict users to the Regions you whitelist.
-
Users cannot deploy resources into Regions outside of this list.
-
Some AWS services (e.g. IAM, CloudFront) are considered global services and are not restricted by SCPs.
b. Account Clean-Up
-
When a sandbox account expires, a clean-up job is triggered.
-
This job scans only the whitelisted Regions.
-
More Regions = longer scan and clean-up time.
-
Limiting Regions speeds up recycling while maintaining governance.
Best Practices
-
Keep your managed Regions list small – choose only the Regions your teams genuinely need.
-
Consider compliance requirements – some organisations must restrict usage to specific Regions (e.g. EU-only).
-
Balance flexibility with efficiency – more Regions provide flexibility but increase clean-up time.
Available Regions
Sandbox Studio on AWS is available in the following AWS Regions. Learn more about enabling regions.
| Region Name | Region Code |
|---|---|
|
US East (Ohio) |
us-east-2 |
|
US East (N. Virginia) |
us-east-1 |
|
US West (N. California) |
us-west-1 |
|
US West (Oregon) |
us-west-2 |
|
Africa (Cape Town) |
af-south-1 |
|
Asia Pacific (Hong Kong) |
ap-east-1 |
|
Asia Pacific (Tokyo) |
ap-northeast-1 |
|
Asia Pacific (Seoul) |
ap-northeast-2 |
|
Asia Pacific (Osaka) |
ap-northeast-3 |
|
Asia Pacific (Mumbai) |
ap-south-1 |
|
Asia Pacific (Hyderabad) |
ap-south-2 |
|
Asia Pacific (Singapore) |
ap-southeast-1 |
|
Asia Pacific (Sydney) |
ap-southeast-2 |
|
Asia Pacific (Jakarta) |
ap-southeast-3 |
|
Asia Pacific (Melbourne) |
ap-southeast-4 |
|
Canada (Central) |
ca-central-1 |
|
Europe (Frankfurt) |
eu-central-1 |
|
Europe (Zurich) |
eu-central-2 |
|
Europe (Stockholm) |
eu-north-1 |
|
Europe (Milan) |
eu-south-1 |
|
Europe (Spain) |
eu-south-2 |
|
Europe (Ireland) |
eu-west-1 |
|
Europe (London) |
eu-west-2 |
|
Europe (Paris) |
eu-west-3 |
|
Middle East (UAE) |
me-central-1 |
|
Middle East (Bahrain) |
me-south-1 |
|
South America (São Paulo) |
sa-east-1 |
Choosing the hub account
Sandbox Studio requires multiple AWS accounts to function. These accounts follow a hub-and-spoke model, where a central hub account manages a pool of sandbox accounts. The organisation management account also plays a key role, as certain AWS services can only be controlled from this top-level account.
There are three types of AWS accounts involved:
Organisation Management Account
-
This is the top-level account in an AWS Organisation.
-
It is automatically created when you set up the organisation.
-
It has full administrative control over all member accounts.
-
AWS recommends avoiding workloads in this account; instead, use it primarily for governance and management (e.g. running AWS Control Tower).
Why Sandbox Studio needs this account
Sandbox Studio requires limited components to be deployed into the organisation management account because:
-
Organisational Units (OUs) and Service Control Policies (SCPs):
Only the management account can create and manage OUs and SCPs. Sandbox Studio uses these to organise accounts and enforce guardrails. Accounts are automatically moved between OUs during their lifecycle (e.g. from “Active” to “Cleanup”). -
Identity setup:
The initial set of IAM Identity Center roles and groups for Sandbox Studio is created in the management account. These are used for authentication and authorisation of users. -
Cost management:
The management account provides access to consolidated billing and Cost Explorer data. Sandbox Studio uses this to query costs for sandbox accounts in bulk, reducing overhead compared to querying accounts individually.
Important: Two of the seven CloudFormation stacks must be installed in the organisation management account. See CloudFormation templates section for more details.
Hub Account
-
A dedicated member account used to host most of the Sandbox Studio solution.
-
Acts as the central hub that manages sandbox accounts (the “spokes”).
-
Runs shared infrastructure, automation, and orchestration services.
Benefits of using a hub account
-
Keeps the organisation management account clean and reserved for governance only.
-
Separates operational workloads from core AWS Organisation functions.
-
Provides a secure, centralised place for automation and account lifecycle management.
Sandbox Accounts
-
These are the accounts actually handed out to users.
-
They are recycled and reused through an automated lifecycle.
-
Administrators create a pool of accounts, then onboard them into Sandbox Studio.
-
Once onboarded, the accounts are considered managed by Sandbox Studio.
The system controls their lifecycle by:
-
Assigning them to OUs (e.g. “Active” or “Cleanup”).
-
Applying SCPs and guardrails.
-
Resetting and recycling them after a lease expires.
Note: Sandbox accounts are intended for non-production use. If your users are looking for ways to provision production ready accounts, consider alternative solutions.
Deployment Options
You have two choices when deploying Sandbox Studio:
-
Deploy everything into the organisation management account
-
Simplifies the setup.
-
Not recommended by AWS, as it mixes governance functions with workloads.
-
-
Split the deployment between management and hub accounts (recommended)
-
Management account runs only the required governance components.
-
Hub account runs the main solution.
-
Provides better alignment with AWS best practices for multi-account security and governance.
-
Understand running costs
Running Sandbox Studio does involve some ongoing AWS costs, but these are generally modest and reflect the standard services needed to keep things running securely and reliably. You can think of them as the “behind-the-scenes” charges for the hub account that coordinates all of your sandbox activity, plus whatever your team chooses to spend in the sandbox accounts themselves.
There are three areas to be aware of:
-
Hub account running costs
-
Sandbox account usage costs
-
Sandbox Studio licensing
1. Hub Account Running Costs
The hub account is where Sandbox Studio itself lives. It runs the background services that make the platform work—things like APIs, databases, and networking.
Some typical monthly costs you might see:
a) Core compute services
These are the serverless AWS services that power the application — Lambda, API Gateway, Step Functions, CloudFront, Amazon S3, KMS, and SES.
- Typical spend → USD $30 – $60 per month.
b) Web Application Firewall (WAF)
Helps protect your Sandbox Studio web interface from unwanted traffic.
- Typical spend → USD $10–$12 per month.
c) AWS Cost Explorer API
Used to fetch the latest spend data from your sandbox accounts (so you can see usage and enforce limits). Sandbox Studio checks once an hour, which works out to:
- USD $7.20 per month.
d) Database (Amazon RDS)
Stores all the information about accounts, budgets, and leases. The default setup uses a lightweight t4g.micro PostgreSQL instance to keep things cost-effective.
- Typical spend → USD $35–$45 per month.
You can upgrade the database for extra reliability (e.g. Multi-AZ, larger instance, automated backups), but that will naturally add to the monthly cost.
e) Networking (VPC, NAT Gateways, VPC Endpoints)
Provides secure private networking for the database and functions. By default, this includes 2 NAT gateways and 4 VPC endpoints.
- Typical spend → about USD $125 per month.
If you want to reduce network costs, you can customise the networking — for example, by using a NAT instance, routing traffic through a shared networking account, or dropping VPC endpoints in favour of internet access.
See: AWS services in this solution for the full list of services involved.
2. Sandbox Account Usage Costs
Each sandbox account has its own AWS bill, which depends entirely on how people use it.
-
You control this by setting budgets and thresholds in account templates.
-
Sandbox Studio automatically enforces these budgets, but be aware that AWS Cost Explorer data can be delayed by up to 8 hours.
This means actual spend might go slightly over the set budget before the system notices. To stay safe, we recommend setting your budget a little below your maximum acceptable spend.
In short, sandbox account costs are your choice—you decide the budgets, and Sandbox Studio helps keep them under control.
3. Sandbox Studio Licensing
Licensing is straightforward:
-
Free Tier: Manage up to 3 AWS accounts at no cost.
-
AWS Marketplace Upgrade: If you want to manage more than 3 accounts, you can upgrade directly through AWS Marketplace.
-
Education Discounts: Heavily reduced rates are available for educational use — contact us for details.
See: Free Tier and Upgrading.
Creating sandbox accounts
Sandbox Studio works by managing a pool of AWS accounts. These accounts are pre-provisioned by your organisation and then handed out to users as sandboxes when requested. Sandbox Studio does not create new AWS accounts itself; instead, it manages the lifecycle of accounts that you provide.
Account Pool and Lifecycle
When a user requests a sandbox:
-
An AWS account is allocated from the pool.
-
Sandbox Studio applies the correct policies, budgets, and permissions.
-
The user is granted access to the account.
-
Sandbox Studio continuously monitors usage, including:
-
Duration (how long the account has been leased)
-
Costs (how much has been spent)
-
When a lease expires or a budget limit is reached:
-
The account is revoked from the user.
-
All resources in the account are cleaned up using the configured cleaner settings (by default, AWS Nuke is used).
-
The account is returned to the pool for future use (recycled).
Provisioning New Accounts
Sandbox Studio does not provision AWS accounts directly. It is the responsibility of administrators to create new accounts before onboarding them into Sandbox Studio.
You can use any existing organisational process to provision accounts, including:
-
AWS Control Tower
-
Landing Zone Accelerator
-
Terraform or other automation tools
-
Manual account creation in AWS Organisations
Note: Sandbox Studio is agnostic of how you provision new AWS accounts. It does not dictate how you create accounts; it only requires that the accounts are onboarded to be managed by Sandbox Studio.
Onboarding Accounts
Before Sandbox Studio can manage accounts, they must be onboarded. Onboarding ensures Sandbox Studio can take full lifecycle control of the account.
Onboarding involves:
-
Moving the account into the designated Sandbox OU within AWS Organisations.
-
Sandbox Studio configures this OU during installation.
-
It applies guardrails and policies to all accounts inside it.
-
-
Registering the account inside the Sandbox Studio console.
-
Use the AWS Accounts page in the administrator view.
-
Select the account to onboard and confirm management by Sandbox Studio.
-
Once onboarded, the account becomes fully managed. Sandbox Studio will:
-
Assign and track leases
-
Monitor budgets and thresholds
-
Clean and recycle the account at the end of each lease
Capacity Planning
As an IT administrator, you are responsible for ensuring there are enough accounts in the pool to meet demand. Consider:
-
Number of active users – how many developers, students, or testers will need accounts at once.
-
Expected workloads – training, hackathons, or workshops may need dozens of accounts at short notice.
-
Recycling time – accounts are not available again until after cleanup completes.
Best practice is to provision slightly more accounts than your peak expected demand to avoid user delays.
External identity provider setup (Optional)
Many organisations, particularly those running a multi-account AWS environment, use AWS IAM Identity Center with an external identity provider such as Microsoft Active Directory, Microsoft Entra ID, or Okta. This allows centralised identity management, where one platform governs access across multiple enterprise systems.
If your organisation uses an external identity platform (for example, Entra), you will need to align its group setup with Sandbox Studio’s IAM Identity Center groups.
Default Groups in IAM Identity Center
When you install Sandbox Studio, the solution automatically provisions three groups in IAM Identity Center. These groups control access based on role type:
1. Administrators
Responsible for configuring and maintaining Sandbox Studio. Administrators are responsible for:
-
Setting global policies (e.g. maximum budgets and cleanup rules).
-
Provisioning new sandbox accounts and monitoring the sandbox account pool.
-
Overseeing security and governance settings.
2. Managers
Oversee day-to-day sandbox usage within a department or team. Managers are responsible for
-
Approving or rejecting sandbox requests within their team/department.
-
Creating and managing account templates including budgets, pre-provisioned resources and permissions.
-
Tracking spending and activity for supervised accounts.
3. Sandbox Users
Login to sandbox accounts and use them for development, testing, training, or experimentation.
Group Naming
The default names created by Sandbox Studio are:
-
<namespace>_SsAdminsGroup -
<namespace>_SsManagersGroup -
<namespace>_SsUsersGroup
You can change these names during installation.
Important: You must create groups in your external identity platform (e.g. Entra, Okta) with the exact same names you configure in Sandbox Studio.
Linking External Identity Provider Groups
-
Create Groups in Your Identity Platform
-
Create groups in Entra/Okta/AD that match the IAM Identity Center group names.
-
Example: If your namespace is
Acme, createAcme_SsAdminsGroup,Acme_SsManagersGroup, andAcme_SsUsersGroup.
-
-
Assign Users to Groups in Your Identity Platform
-
Add users to the relevant group based on their role.
-
Example: Developers should be added to the
SsUsersGroup, team leads toSsManagersGroup, and central admins toSsAdminsGroup.
-
-
Synchronisation with IAM Identity Center
-
IAM Identity Center automatically syncs external groups.
-
Once a user is added to the external group, they will inherit the corresponding Sandbox Studio role and permissions.
-
Deploy the Solution
To help streamline the setup of Sandbox Studio, we’ve provided an installation script that checks your environment for the necessary prerequisites and guides you through deploying the solution step by step. This is our recommended installation method, as it simplifies the process and reduces the chance of configuration issues. However, if you prefer to install the solution manually, please refer to the manual installation documentation or contact our support team for assistance.
Running the Installation Wizard
Introduction
This wizard has been created to facilitate the installation and deployment of the Sandbox Studio solution in your environment. It automates as many steps as possible and checks for prerequisites before the installation.
Running the wizard
- Login to your AWS Organisation Management account.
- Open a new CloudShell console (a link to open CloudShell can be found in the bottom left corner of the AWS console).
- Ensure you are in the region where you want to install Sandbox Studio.
- Run the following command:
bash <(curl -s https://dist.sandboxstudiosoftware.com/install.sh)The following should display:
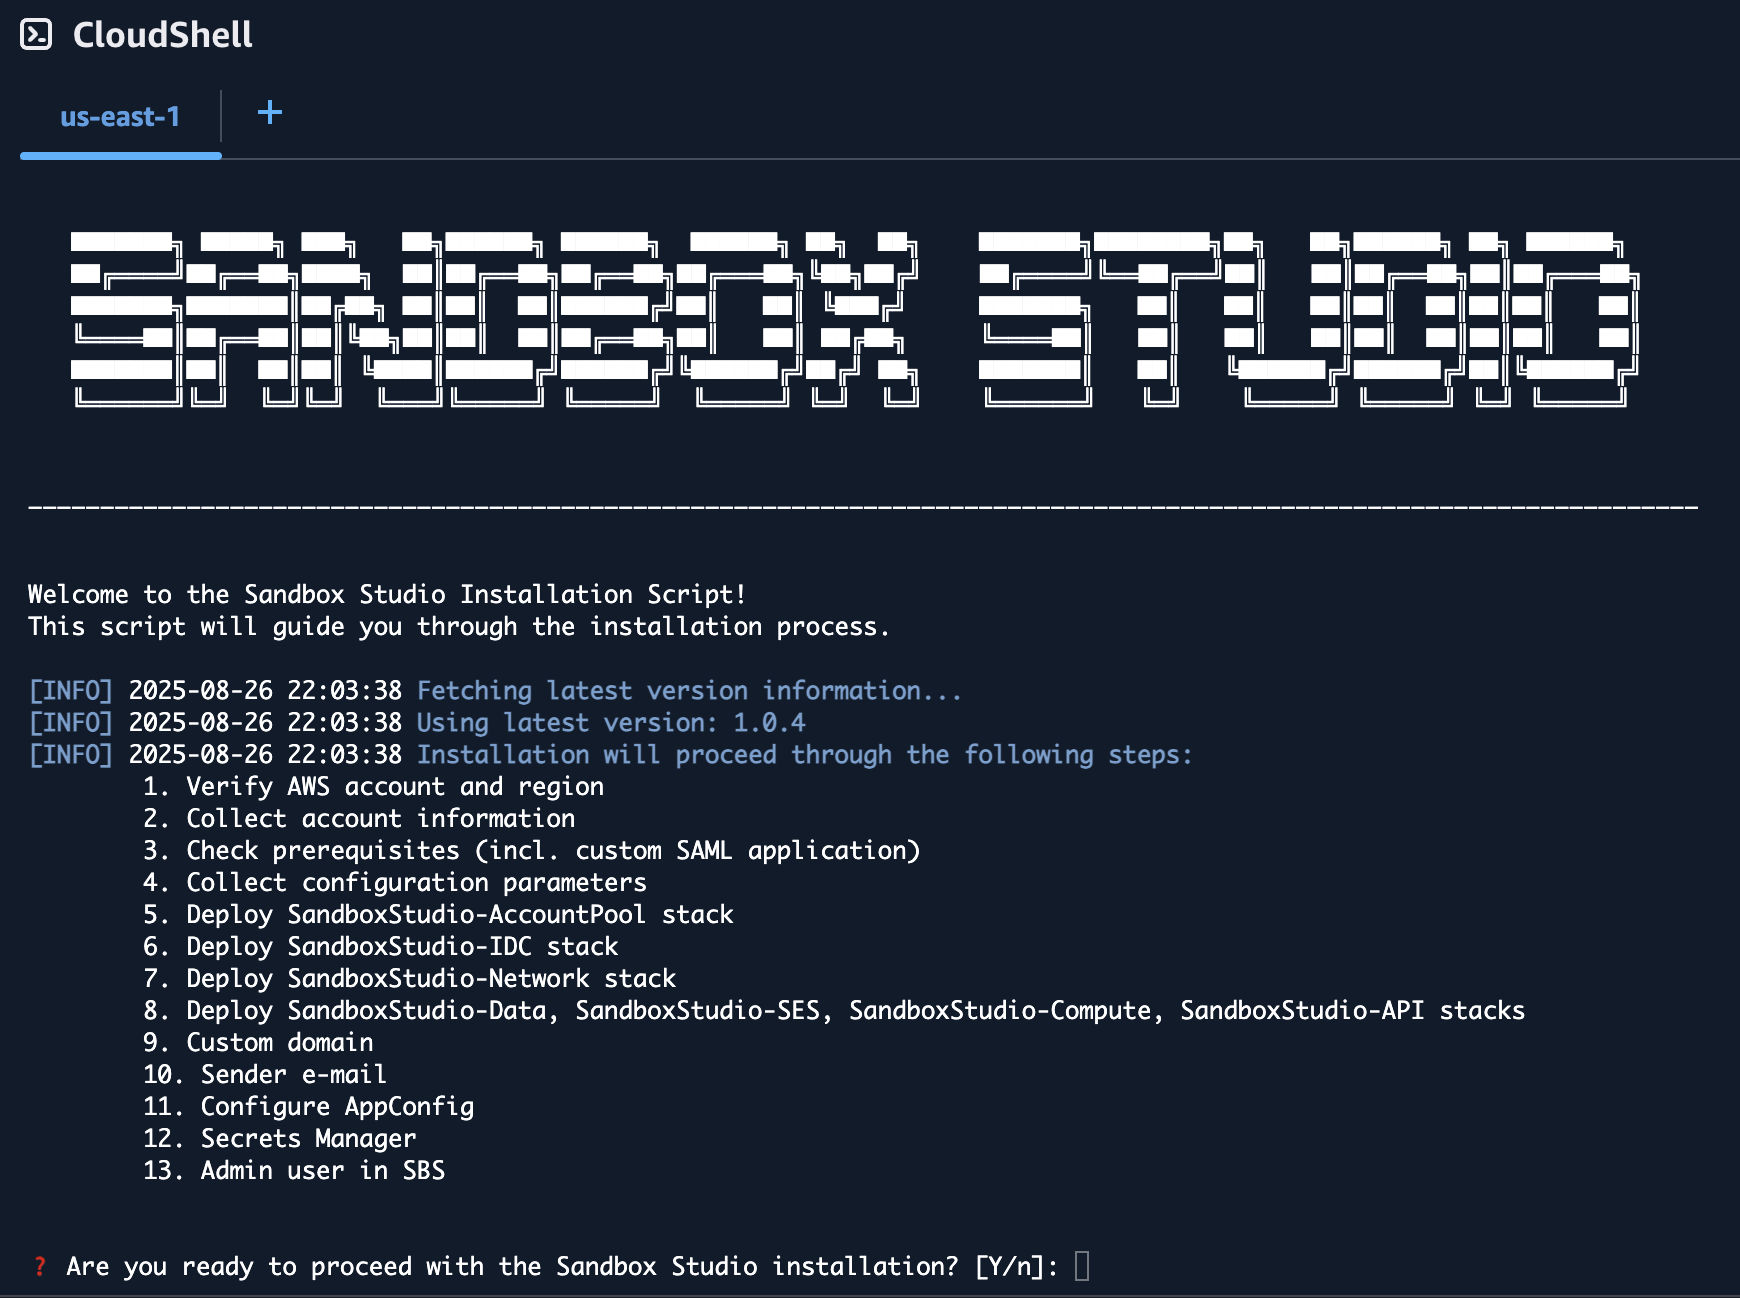
The wizard will guide you through the installation process.
Do not use your root account to run this script as it will fail and does not follow AWS best practices!
Prerequisites
The wizard will automatically check for prerequisites. If any of the prerequisites are not met, the wizard will display the URL to the right documentation to help you configure your environment. See Installation Prerequisites page for more details.
Inputs
The installation wizard will ask you to set/confirm a set of input parameters during the installation process:
| Input Variable | Description | Input or Confirm | Comments |
|---|---|---|---|
| Management Account ID | The AWS account ID of the management account (auto-detected by the script). | Confirm | During setup, you will be asked to confirm that you are indeed using the correct organisation management account. This ensures Sandbox Studio can set up organisation units and Service Control Policies. |
| Region | AWS region where Sandbox Studio will be deployed. | Confirm / Input | The script attempts to detect the region from AWS CLI config. If not found, you will be prompted to input one (default us-east-1). |
| Hub Account ID | The account ID that will host Sandbox Studio infrastructure (may be same as management account). | Input | Must be a 12-digit AWS account ID. If left empty, the management account ID will be used. See Choosing the hub account. |
| Parent OU ID | AWS Organisation Unit ID where Sandbox Studio OUs will be created. | Input | Defaults to the Root OU ID, but can be set to any valid parent OU so that Sandbox Studio's OU are created under that OU and inherit existing SCP's if required. |
| Namespace | Short prefix (3–8 alphanumeric characters) used to name Sandbox Studio resources. | Input | Example: MySs. Used as a unique identifier in stack names and IAM groups. |
| Managed Regions | List of AWS regions where Sandbox Studio should manage accounts/resources. | Input | Comma-separated values (e.g., us-east-1,eu-west-1). Defaults to the chosen region. See Choosing your region(s). |
| Admin Group Name | IAM Identity Center group name for Sandbox Studio administrators. | Input |
Defaults to If you are integrating with an external identity provider such as Microsoft Entra, see External identity provider setup (Optional). |
| Manager Group Name | IAM Identity Center group name for Sandbox Studio managers. | Input | Defaults to <Namespace>_SsManagersGroup.
This is the "Managers" group for users who oversee day-to-day sandbox usage within a department or team. If you are integrating with an external identity provider such as Microsoft Entra, see External identity provider setup (Optional). |
| User Group Name | IAM Identity Center group name for Sandbox Studio end users. | Input | Defaults to <Namespace>_SsUsersGroup. This is the "Users" group for users who login to sandbox accounts and use them for development, testing, training, or experimentation.
If you are integrating with an external identity provider such as Microsoft Entra, see External identity provider setup (Optional). |
| Identity Center Instance | The IAM Identity Center instance ARN and Identity Store ID used for Sandbox Studio integration. | Confirm | The wizard will list the detected Identity Center instance and ask you to confirm it is the correct one. |
| Custom Application in Identity Center | The SAML 2.0 application used by Sandbox Studio for authentication. | Confirm / Input | You can either select an existing Identity Center application or the wizard will help you create a new one. |
| Allowed IP Ranges | CIDR ranges of IP addresses allowed to access the Sandbox Studio API. | Input | Defaults to all IPs (0.0.0.0/1,128.0.0.0/1). Restrict to corporate ranges if needed. |
| Custom Domain | (Optional) A DNS domain for Sandbox Studio instead of the CloudFront URL. | Input | If used, must configure CloudFront and ACM with this domain, and update Identity Center ACS URL accordingly. |
| Email From Address | Email address Sandbox Studio will use to send system notifications. | Input | Must be a verified identity in SES. Example: sandboxstudio@example.com. |
| Admin Users | Initial set of users (by username) to be added to the Admin group in Identity Center. | Input | You will be prompted to enter usernames to grant them full Sandbox Studio admin rights. |
Deployment time
The deployment of the Sandbox Studio solution with the script should take around 1 hour.
Make sure your session timeout is at least 2 hours for during the installation of Sandbox Studio.
Update Sandbox Studio
Updating Made Simple
Updating Sandbox Studio is easier than ever. The update process uses the same installation script you used for the initial setup, making it straightforward and familiar.
How It Works
When you run the installation script on a environment with an existing Sandbox Studio installation, the script automatically:
- Detects the previous installation
- Gathers all required configuration information from your current setup
- Presents a summary of what will be updated
- Asks for confirmation before proceeding
Running the wizard
- Login to your AWS Organisation Management account.
- Open a new CloudShell console (a link to open CloudShell can be found in the bottom left corner of the AWS console).
- Ensure you are in the region where you want to install Sandbox Studio.
- Run the following command:
bash <(curl -s https://dist.sandboxstudiosoftware.com/install.sh)- The following should display:

Confirm existing values
The script will display your current installation details and the updates available. Review this information carefully to ensure everything is correct.
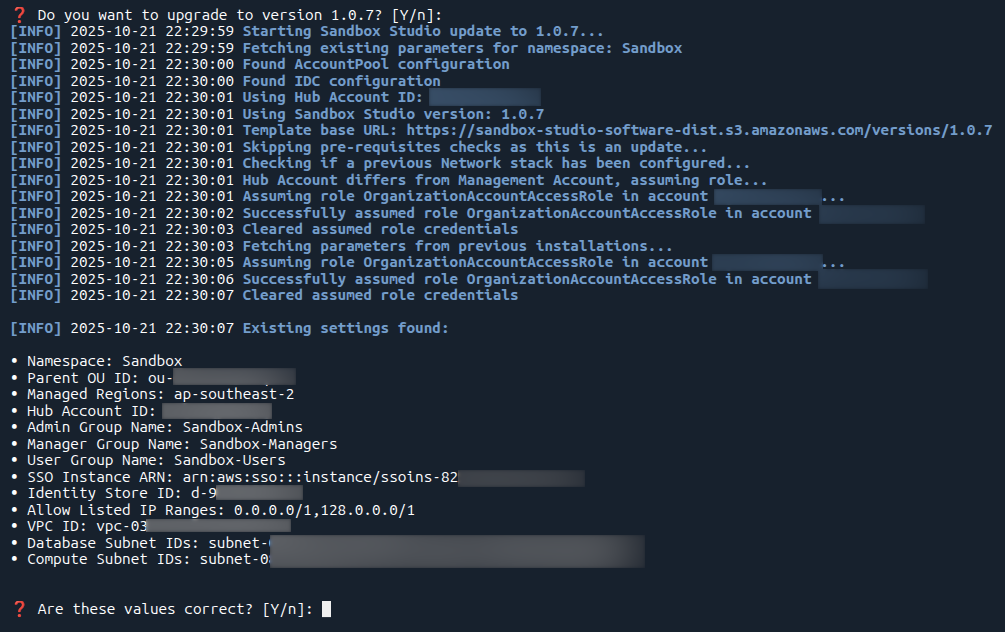
Select Stacks to Update
You'll be presented with a stack-by-stack selection interface. For each stack, you can choose whether to update it or skip it.
Best Practice: It is highly recommended to update all stacks to ensure compatibility and access to the latest features and security patches.

Note: During update process, the script does not modify your existing configuration (AppConfig), your Identity Center applications, or anything else than the CloudFormation stacks for Sandbox Studio. You can force a reinstall of the solution by adding the flag --reinstall true to the installation script
Support
If you encounter any issues during the update process, please contact your Sandbox Studio support team at support@sandboxstudiosoftware.com or go to https://support.sandboxstudiosoftware.com
Deploy the Solution Manually
Note: We strongly recommend using the installation script available here to deploy the Sandbox Studio.
Before you start...
Before you embark on this manual AWS CloudFormation adventure, let us remind you that we've poured countless hours (and several pots of coffee) into creating a beautiful, automated deployment wizard that handles all the CloudFormation templates, Identity Center custom SAML application setup, and custom application configurations for you. It's tested, reliable, and significantly less likely to result in you going back and forth between the AWS console, CloudFormation stacks, and custom application logs at 2 AM trying to figure out why your deployment failed. If you're here because you enjoy the thrill of manually configuring SAML attributes, debugging CloudFormation syntax errors, and the unique satisfaction of troubleshooting custom application integrations that could have been automated entirely, then welcome—you're in the right place!
But seriously, unless you have a very specific reason for going manual, please consider using our automated script. Your future self will thank you, and so will our support team.
Click here to see how to run the Installation Wizard instead
Overview of what you'll do
Installing Sandbox Studio manually follows three main stages. Each stage builds on the last, so it’s important to work through them in order.
1. Confirm Prerequisites
Before beginning the installation, you should confirm that your organisation meets all prerequisites.
Sandbox Studio relies on several AWS services and features being enabled in advance, including:
-
AWS Organisations with all features enabled
-
Service Control Policies (SCPs) for account guardrails
-
AWS Resource Access Manager (RAM) for resource sharing
-
CloudFormation StackSets trusted access
-
AWS Cost Explorer for spend tracking
-
IAM Identity Center (IdC) for centralised access control
-
AWS Service Quotas (e.g. Lambda concurrency, CodeBuild quotas)
For a full checklist of requirements, please see the Installation Prerequisites.
You will also need to collect configuration values in advance, such as:
-
AWS Region
-
Organisation and OU IDs
-
IAM Identity Center group names
-
IP allow-list ranges
2. Deploy the CloudFormation Stacks
Next, you will deploy the Sandbox Studio CloudFormation templates. Each stack must be launched in the correct AWS account and in a specific order.
-
Organisation Management account
-
Hub account
Each stack depends on outputs from earlier stacks. The next page, Deploying the Stacks provides the exact order and details.
3. Complete Post-Deployment Steps
Once the stacks are deployed successfully, you’ll need to carry out some manual configuration tasks. These ensure Sandbox Studio integrates with your organisation’s identity provider, DNS, and and your application settings are in sync with your environment.
At a high level, you will:
-
Set up a SAML 2.0 application in IAM Identity Center, and assign Sandbox Studio groups to it.
-
Configure DNS (optional) for a custom domain, and update the application ACS URL.
-
Update AWS AppConfig settings (IdP URLs, audience, web app URL, access portal, email “from” address).
-
Store the IdP certificate in AWS Secrets Manager (the API stack provides the secret ARN).
-
Add initial administrators to the Sandbox Studio Admin group in IAM Identity Center.
Each of these steps is explained in detail in the Post-Deployment Configuration section.
AWS CloudFormation templates
Sandbox Studio is packaged as a set of AWS CloudFormation stacks. If you decide to manually install Sandbox Studio, you must deploy them in the order shown below and into specific AWS accounts. This page explains each stack, where to deploy it, and why the order matters.
Stack Summary
| # | Stack | What it does | Deploy to | Key AWS Services | Depends on |
| 1 | Account Pool | Creates OUs to host sandbox accounts and applies SCPs to govern them. | Org Management Account | AWS Organisational Units (OU's), Service Control Policies (SCP's) | - |
| 2 | IDC | Sets up IAM Identity Center groups used by Sandbox Studio users. | Org Management Account | IAM Identity Center Groups | - |
| 3 | Network | Provisions a VPC with multiple subnets. Hosts the database in a private subnet and runs Lambda functions in private subnets with egress access. | Hub Account | Amazon VPC, VPC Endpoints | |
| 4 | Data | Deploys the application database that stores all Sandbox Studio data. Kept separate to simplify upgrades. | Hub Account | Amazon RDS | Network |
| 5 | SES | Creates email templates for alerts and notifications. | Hub Account | Amazon SES | - |
| 6 | Compute | Core back end components such as event driven Step Functions and CodeBuild tasks that are used to clean up and set up new accounts. | Hub Account | Event Bridge, Lambda, Step Functions, CodeBuild | Data, Network, SES |
| 7 | API | The front end compute stack including the API and user facing web application. | Hub Account | Lambda, API Gateway, S3, CloudFront | Compute |
Where to get the CloudFormation templates
All templates are published to S3. Choose the version you want and construct URLs as:
The stack names (filenames) are shown below:
-
SandboxStudio-AccountPool.template.json -
SandboxStudio-IDC.template.json -
SandboxStudio-Network.template.json -
SandboxStudio-Data.template.json -
SandboxStudio-SES.template.json -
SandboxStudio-Compute.template.json -
SandboxStudio-API.template.json
Find the latest version (optional): fetchhttps://dist.sandboxstudiosoftware.com/latest.json
and use its "version" value in place of <VERSION>.
Example: if latest.json says {"version":"1.2.3"}, the AccountPool template ishttps://sandbox-studio-software-dist.s3.amazonaws.com/versions/1.2.3/SandboxStudio-AccountPool.template.json.
Step 1: Deploy the AccountPool stack
Install the AccountPool CloudFormation stack in the organisation management account.
How to Install this Stack
- Login to the AWS Management Console using the Organisation Management Account.
- Navigate to the CloudFormation page.
- Click Create Stack and select With new resources (standard).
- For Template Source, select Amazon S3 URL and enter the CloudFormation Template URL shown below and click Next.
- On the Specify Stack page, enter the stack name 'SandboxStudio-AccountPool' and use the parameters shown below.
CloudFormation Template URL
https://sandbox-studio-software-dist.s3.amazonaws.com/versions/<VERSION>/SandboxStudio-AccountPool.template.jsonFor more information on how to find the latest version, click here.
Parameters
| Key | What to enter |
|---|---|
| Namespace | 3–8 chars, e.g. MySs |
| HubAccountId | 12‑digit Hub account ID |
| ParentOuId | OU ID to nest Sandbox OUs under (e.g. your root ID r-xxxx or a specific OU ID e.g. o-xxxx) |
| SsManagedRegions | Comma separated list of regions managed by Sandbox Studio, e.g. eu-west-2,us-east-1 |
About this Stack
Purpose
-
Creates multiple Organisational Units (OUs) to contain all sandbox accounts.
-
Applies Service Control Policies (SCPs) to those OUs to enforce guardrails.
Where to deploy
-
Organisation management account only. Creating OUs and attaching SCPs requires management‑account permissions.
What it creates
-
OU structure under your AWS Organisation or specific existing OU that you specify.
-
A set of SCPs applied to the OU(s).
Validation checks
-
New OUs are visible in AWS Organisations.
-
SCPs are attached to the target OUs and show as Active.
Tips
-
Review isntalled SCPs and enhance or relax as needed to suit your organisation's security requirements.
Step 2: Deploy the IDC stack
Install the IDC CloudFormation stack in the organisation management account.
How to Install this Stack
- Login to the AWS Management Console using the Organisation Management Account.
- Navigate to the CloudFormation page.
- Click Create Stack and select With new resources (standard).
- For Template Source, select Amazon S3 URL and enter the CloudFormation Template URL shown below and click Next.
- On the Specify Stack page, enter the stack name 'SandboxStudio-IDC' and use the parameters shown below.
CloudFormation Template URL
https://sandbox-studio-software-dist.s3.amazonaws.com/versions/<VERSION>/SandboxStudio-IDC.template.jsonFor more information on how to find the latest version, click here.
Parameters
| Key | What to enter |
|---|---|
| Namespace | Use the same namespace you used in step 1. |
| HubAccountId | 12‑digit Hub account ID |
| IdentityStoreId | From IAM Identity Center |
| SsoInstanceArn | From IAM Identity Center |
| AdminGroupName | Default: <Namespace>_SsAdminsGroup |
| ManagerGroupName | Default: <Namespace>_SsManagersGroup |
| UserGroupName | Default: <Namespace>_SsUsersGroup |
About this Stack
Purpose
-
Sets up IAM Identity Center groups, permissions and roles used by Sandbox Studio. You add users to these groups to grant role‑based access to the application.
Where to deploy
-
Organisation management account, even if you have delegated IAM Identity Center administration to another account.
What it creates
-
A set of IDC groups aligned to Sandbox Studio roles (for example: administrators, managers, end users).
Validation checks
-
Groups appear in IAM Identity Center.
-
Assigning a user to a group grants the expected application role after sign‑in.
Tips
-
Add test users to each group and confirm the correct level of access in the UI before onboarding wider teams.
Step 3: Deploy the Network stack
Install the Network CloudFormation stack in the hub account.
How to Install this Stack
- Login to the AWS Management Console using the Hub Account.
- Navigate to the CloudFormation page.
- Click Create Stack and select With new resources (standard).
- For Template Source, select Amazon S3 URL and enter the CloudFormation Template URL shown below and click Next.
- On the Specify Stack page, enter the stack name 'SandboxStudio-Network' and use the parameters shown below.
CloudFormation Template URL
https://sandbox-studio-software-dist.s3.amazonaws.com/versions/<VERSION>/SandboxStudio-Network.template.jsonFor more information on how to find the latest version, click here.
Parameters
| Key | What to enter |
|---|---|
| Namespace | Use the same namespace you used in step 1. |
About this Stack
Purpose
-
Creates the VPC foundation required by the application.
-
Provides private subnets for the database and private subnets with egress for Lambda functions that require outbound access.
Where to deploy
-
Hub account.
What it creates
-
One VPC with multiple subnets (at minimum: private subnets for RDS and for VPC‑attached Lambdas).
-
Route configuration to allow egress from private subnets (for example, via NAT or suitable endpoints).
- VPC endpoints for AWS services that support private routing.
- Internet Gateway and NAT Gateway for AWS services that do not support private routing.
Validation checks
-
VPC and subnets are visible in the VPC console.
-
Private subnets have no direct internet ingress and can reach required AWS endpoints for the application.
Tips
-
Adjust VPC after installation to suit your needs such as routing through enterprise firewalls if needed.
Step 4: Deploy the Data stack
Install the Data CloudFormation stack in the hub account.
How to Install this Stack
- Login to the AWS Management Console using the Organisation Management Account.
- Navigate to the CloudFormation page.
- Click Create Stack and select With new resources (standard).
- For Template Source, select Amazon S3 URL and enter the CloudFormation Template URL shown below and click Next.
- On the Specify Stack page, enter the stack name 'SandboxStudio-Data' and use the parameters shown below.
CloudFormation Template URL
https://sandbox-studio-software-dist.s3.amazonaws.com/versions/<VERSION>/SandboxStudio-Data.template.jsonFor more information on how to find the latest version, click here.
Parameters
| Key | What to enter |
|---|---|
| Namespace | Use the same namespace you used in step 1. |
About this Stack
Purpose
-
Deploys the Amazon RDS database that stores Sandbox Studio application data.
-
Isolated from other stacks so you can upgrade application components without touching data.
Where to deploy
-
Hub account.
Dependencies
-
Network stack must be in place to supply VPC and subnets for the database.
Validation checks
-
RDS instance/cluster appears in the RDS console and is placed in the private database subnets.
-
Security groups allow required access from application Lambdas.
Tips
-
Define and test backup/restore procedures appropriate to your organisation.
Step 5: Deploy the Compute stack
Install the Compute CloudFormation stack in the hub account.
How to Install this Stack
- Login to the AWS Management Console using the Hub Account.
- Navigate to the CloudFormation page.
- Click Create Stack and select With new resources (standard).
- For Template Source, select Amazon S3 URL and enter the CloudFormation Template URL shown below and click Next.
- On the Specify Stack page, enter the stack name 'SandboxStudio-Compute' and use the parameters shown below.
CloudFormation Template URL
https://sandbox-studio-software-dist.s3.amazonaws.com/versions/<VERSION>/SandboxStudio-Compute.template.jsonFor more information on how to find the latest version, click here.
Parameters
| Key | What to enter |
|---|---|
| Namespace | Use the same namespace you used in step 1. |
| OrgMgtAccountId | 12‑digit management account ID |
| IdcAccountId | 12‑digit management account ID |
About this Stack
Purpose
-
Deploys the core backend components that respond to events and orchestrate workflows such as new account setup and account cleanup.
Where to deploy
-
Hub account.
What it creates
-
Amazon EventBridge rules.
-
AWS Lambda functions that react to events and perform application logic.
-
Amazon SQS queues to drive asynchronous processing.
-
AWS Step Functions for multi‑step workflows.
-
AWS CodeBuild projects used during setup/cleanup tasks.
Dependencies
-
Requires Network (for VPC‑attached Lambdas) and Data (to read/write application state). If notifications are used, it may reference SES templates.
Validation checks
-
EventBridge rules are enabled.
-
Lambda functions deploy successfully and, where configured, attach to the VPC subnets.
-
SQS queues and Step Functions state machines are present.
Tips
-
Become familiar with logs/metrics produced by compute components in Amazon CloudWatch and monitor for errors.
Step 6: Deploy the API stack
Install the API CloudFormation stack in the hub account.
How to Install this Stack
- Login to the AWS Management Console using the Hub Account.
- Navigate to the CloudFormation page.
- Click Create Stack and select With new resources (standard).
- For Template Source, select Amazon S3 URL and enter the CloudFormation Template URL shown below and click Next.
- On the Specify Stack page, enter the stack name 'SandboxStudio-API' and use the parameters shown below.
CloudFormation Template URL
https://sandbox-studio-software-dist.s3.amazonaws.com/versions/<VERSION>/SandboxStudio-API.template.jsonFor more information on how to find the latest version, click here.
Parameters
| Key | What to enter |
|---|---|
| Namespace | Use the same namespace you used in step 1. |
| OrgMgtAccountId | 12‑digit management account ID |
| IdcAccountId | 12‑digit management account ID |
| AllowListedIPRanges | Comma separated CIDRs allowed to call the API (default “allow all”): 0.0.0.0/1,128.0.0.0/1 |
About this Stack
Purpose
-
Publishes the application’s public API and front‑end web experience.
Where to deploy
-
Hub account.
What it creates
-
Amazon API Gateway with Lambda integrations that expose Sandbox Studio APIs.
-
The end‑user web application for accessing Sandbox Studio.
Dependencies
-
Compute (backend logic) and Data (application database) must exist.
Validation checks
-
API endpoints return healthy responses.
-
The web UI loads and users can sign in via IAM Identity Center groups created by the IDC stack.
Tips
-
Capture the API base URL and distribute it to administrators and managers.
Post-deployment configuration tasks
Note: You only need to read this section if you have decided to deploy the solution manually.
Once the stacks are deployed successfully, you’ll need to carry out some manual configuration tasks. These ensure Sandbox Studio integrates with your organisation’s identity provider, DNS, and that other application settings are initialised.
At a high level, you will:
- Set up a SAML 2.0 application in IAM Identity Center, and assign Sandbox Studio groups to it.
- Configure DNS (optional) for a custom domain.
- Update AWS AppConfig settings (IdP settings, web app URL, access portal, email address).
- Store the IdP certificate in AWS Secrets Manager.
- Add initial users to Sandbox Studio groups in IAM Identity Center.
Create an IAM Identity Center application
-
Login to the AWS console and open IAM Identity Center.
-
Navigate to Applications → Add application.
- Select I have an application I want to setup and chose SAML 2.0.
-
Enter the following details
-
Display name:
Sandbox Studio(or your preferred name) -
Description: e.g.
Sandbox Studio allows users to access AWS sandbox accounts - Leave Application start URL and Relay state blank.
- Application Metadata
- Select Manually type your metadata values
-
Application ACS URL will be
https://<your-app-url>/api/auth/login/callback
(for now, use the CloudFrontDistributionUrl; if you later add a custom domain, come back and update this) -
Audience (Entity ID):
SandboxStudio - Submit.
-
- From the list of applications, choose the SAML application you just set up.
- Click Actions → Edit attribute mappings.
- Enter the following attributes:
User attribute in the application Maps to this value... Format Subject ${user:email} emailAddress ID ${user:AD_GUID} unspecified - Save changes.
- On the application, page click Assign users or groups.
- Assign the three groups created by the
SandboxStudio-IDCstack (Admin / Manager / User) to this application. - Done.
You have now successfully set up a custom IAM Identity Center Application.
Extract application details
Before proceeding to the next step, you will need to extract the following information which will be used in subsequent steps.
- Click Actions → Edit configuration.
- Take note of:
- IAM Identity Center sign-in URL
- IAM Identity Center sign-out URL
- Download the IAM Identity Center Certificate
- Also take note of the:
- Web App URL - this will be the same URL as the Application ACS URL in the previous step without the
/api/auth/login/callbackpart. - Audience (Entity ID) from the previous step.
- AWS Access Portal URL - this is always
https://<IdentityStoreId>.awsapps.com/start
- Web App URL - this will be the same URL as the Application ACS URL in the previous step without the
Keep these details handy as you will need them in one of the upcoming steps.
Add initial users
The IDC CloudFormation deployment creates three default groups in IAM Identity Center (you can customise their names when launching the SandboxStudio-IDC stack):
-
Admins Group — members of this group have full access to Sandbox Studio. They can configure settings, manage budgets, control permissions, and generally administer the platform. You should place only a small number of trusted users here.
-
Managers Group — managers can create and manage sandboxes for their teams but do not have full platform-wide administrative rights.
-
Users Group — standard users can request and use sandboxes but cannot configure or administer Sandbox Studio itself.
To set up your initial administrators:
-
Open the IAM Identity Center console.
-
Go to Groups, then select the Admins group (for example,
MySs_SsAdminsGroup). -
Choose Add users, search for the user accounts you want to designate as administrators, and assign them to this group.
-
Repeat the same process for Managers and Users if you want to prepare those groups now.
Update AWS AppConfig
AWS AppConfig is used by Sandbox Studio to store its runtime configuration. You will need to update this configuration after the CloudFormation stacks have been deployed so that Sandbox Studio knows how to authenticate users and where to route traffic.
If AppConfig is not updated correctly, users will not be able to log in or send/receive notifications.
-
Open AWS AppConfig
-
In the Hub account, go to the AWS Console.
-
Navigate to AWS AppConfig under Systems Manager.
-
-
Locate the Sandbox Studio configuration profile
-
The SandboxStudio-Data stack creates an AppConfig application and configuration profile.
-
Use the stack outputs to identify the:
-
Application ID
-
Environment ID
-
Configuration Profile ID
-
-
-
Edit the configuration
Update the following fields with values from your environment:Setting Description IdP Sign In URL The login URL from your Identity Center SAML application. IdP Sign Out URL The logout URL from your Identity Center SAML application. IDP Audience The SAML audience used when previously setting up the IAM Identity Center Application. Web App URL The URL for users to access Sandbox Studio (CloudFront URL or your custom DNS). AWS Access Portal URL The IAM Identity Center portal URL. Notification Email The “From” address Sandbox Studio uses to send emails (must be verified in SES). -
Deploy the configuration
-
Save the updated configuration.
-
Create a new hosted configuration version.
-
Deploy the configuration to the Sandbox Studio environment.
-
You're application config should look like the YAML configuration shown below.
Note: you should only update the auth and notification attributes and leave other attributes in place.
...
auth:
  idpSignInUrl: https://portal.sso.<region>.amazonaws.com/saml/assertion/<id>
  idpSignOutUrl: https://portal.sso.<region>.amazonaws.com/saml/logout/<id>
  idpAudience: SandboxStudio
  awsAccessPortalUrl: https://d-<id>.awsapps.com/start
  webAppUrl: https://<id>.cloudfront.net
  sessionDurationInMinutes: 60
notification:
  emailFrom: sandboxstudio@example.com
...Update AWS Secrets Manager
AWS Secrets Manager is used to store the SAML Identity Provider (IdP) certificate securely. The SandboxStudio-API stack creates a secret for this purpose. You must update it with the correct certificate from your Identity Center application.
If the certificate is missing or incorrect, Sandbox Studio will not be able to validate SAML assertions, and user login will fail.
-
Get the secret ARN
-
Check the outputs of the SandboxStudio-API CloudFormation stack.
-
Look for the output key IdpCertArn.
-
-
Retrieve the IdP certificate
-
Open the IAM Identity Center application you created for Sandbox Studio.
-
Download the SAML metadata XML or copy the signing certificate directly.
-
Ensure it is in PEM format (starts with
-----BEGIN CERTIFICATE-----).
-
-
Update the secret
-
In the Hub account, open AWS Secrets Manager.
-
Find the secret with the ARN from step 1.
-
Edit the secret value.
-
Paste in the IdP certificate.
-
-
Save and test
-
Save the new secret value.
-
Restart the login flow in Sandbox Studio to confirm that SAML authentication works.
-
Logging into the web UI
Once you have completed the installation of Sandbox Studio, you can log into the web user interface (UI).
Finding the Login URL
The login page is hosted behind an Amazon CloudFront distribution that was created during installation. To find the URL:
-
Sign in to the AWS Management Console for your Hub account.
-
Navigate to CloudFormation and open the stack created for Sandbox Studio.
-
Go to the Outputs tab.
-
Look for the output parameter named CloudFrontDistributionUrl.
-
The value of this parameter is the login URL for your Sandbox Studio environment.
Example:
Use this URL in your browser to access the Sandbox Studio login page.
What Happens Next
-
You will be redirected to the AWS IAM Identity Center (SSO) sign-in page.
-
Log in using your corporate or assigned credentials.
-
Once authenticated, you will land on the Sandbox Studio home page (User, Manager, or Administrator view depending on your role).
Setup a custom domain (Optional)
By default, Sandbox Studio is deployed behind an AWS CloudFront distribution. Users can access it using the CloudFront distribution URL that is output from the SandboxStudio-API stack.
However, in most organisations you will want to provide a more user-friendly, branded domain name (e.g. sandbox.example.com). This requires setting up a custom domain in CloudFront and updating your DNS provider to route traffic to Sandbox Studio.
1. Retrieve CloudFront distribution details
-
Go to the AWS Console in the Hub account.
-
Navigate to CloudFront.
-
Find the distribution created by the
SandboxStudio-APIstack. -
From the stack outputs, note:
-
CloudFrontDistributionUrl (e.g.
d12345abcdef.cloudfront.net) -
CloudFrontDistributionId (used if you need to update settings later)
-
2. Choose your custom domain
Decide on the domain name that will be used for Sandbox Studio. Examples:
-
sandbox.yourcompany.com -
studiosandbox.example.org
Make sure this domain is one you control in your DNS provider (such as Route 53, Cloudflare, or another registrar).
3. Update CloudFront distribution with Alternate Domain Name (CNAME)
-
In the CloudFront distribution settings, add your chosen domain under Alternate Domain Names (CNAMEs).
-
If you’re using the AWS Console:
-
Open your distribution → Settings → General → Alternate Domain Names.
-
Click Edit and add your custom domain name.
-
CloudFront requires an SSL/TLS certificate for custom domains.
4. Provision an SSL/TLS certificate in ACM
-
Go to the AWS Certificate Manager (ACM) in the us-east-1 region (required for CloudFront).
-
Request a certificate for your custom domain (e.g.
sandbox.example.com). -
Validate the certificate using DNS (preferred) or email validation.
-
Once validated, return to your CloudFront distribution and attach this ACM certificate under Custom SSL Certificate.
5. Update your DNS provider
-
In your DNS provider (e.g. Route 53), create a CNAME record:
-
Name: your custom domain (e.g.
sandbox.example.com) -
Value: the CloudFront distribution URL (e.g.
d12345abcdef.cloudfront.net)
-
-
Save the record.
It may take up to 30 minutes (or more depending on TTL settings) for DNS changes to propagate.
6. Update the ACS URL in Identity Center
Since the login flow depends on the correct Assertion Consumer Service (ACS) URL, you must update the Identity Center SAML application configuration:
-
Open IAM Identity Center in the management account.
-
Find the Sandbox Studio custom application.
-
Update the ACS URL to:
https://<your-custom-domain>/api/auth/login/callback
7. Update the Web App URL in Sandbox Studio
In your Sandbox Studio environment:
- Go to "Settings" > "Advanced Settings" and scroll to "Authentication Settings"
- Update the "Web App URL" value to your new domain (With no trailing slash)
Why This Matters
-
Using a custom domain makes Sandbox Studio easier for users to remember and access.
-
It allows branding (e.g., using your company’s domain).
-
Ensures smoother authentication flows by aligning the SAML ACS URL with the URL that users actually log in through.
Manage your subscription
Free Tier and Upgrading
Sandbox Studio's licensing is managed directly through the AWS Marketplace, ensuring a seamless and integrated experience with your existing AWS billing. Sandbox Studio software is licensed annually based on the number of AWS Accounts (sandboxes) you manage via the application.
Free Trial
-
Sandbox Studio is available through a Free Trial to manage up to 3 AWS accounts as sandboxes for up to 90 days.
-
This Free Trial is available through the AWS Marketplace.
The Free Tier provides full functionality. AWS infrastructure charges (for the services you run within those sandbox accounts) are billed directly to your own AWS account and remain your responsibility.
After the 90 day Free Trial expires, or for additional accounts beyond the initial three, an annual per-account license fee applies, which will be billed directly through your AWS account.
Purchasing Additional Accounts
If you wish to manage more than 3 sandbox accounts, you need to purchase additional capacity through AWS Marketplace. Your existing installation remains in place, no reinstallation is required.
Steps to Purchase
-
Go to the AWS Marketplace listing for Sandbox Studio.
-
Select Purchasing Options.
-
Enter the number of additional sandbox accounts you want to manage.
-
For example: To manage 20 sandbox accounts, purchase 17 additional licences (as 3 are already included in the free tier).
-
-
Complete the procurement process through AWS Marketplace.
-
Once payment is confirmed, AWS Marketplace will provide a link to set up your account and generate a unique API key.
Applying Your API Key
-
Log in to the Sandbox Studio UI.
-
Go to Settings → Subscription.
-
Select Update.
-
Paste your API key into the field provided.
-
Click Apply. Your subscription will be validated automatically. Your Sandbox Studio instance will then reflect the new licence limits and duration.
You can begin managing additional AWS sandbox accounts immediately.
Upgrading your licence
• At any time, you can increase the number of sandbox accounts purchased in AWS Marketplace.
• Reducing the number of accounts managed by the solution will only apply at the end of the yearly licence.
• Your API key will automatically stay in sync with AWS Marketplace, so Sandbox Studio always reflects your current licence level.
Licence Term and Renewal
• All paid Sandbox Studio licences are annual and billed through AWS Marketplace.
• The 12 month licence term begins on the date of purchase.
• You will receive notification from AWS Marketplace before renewal.
• Licences renew automatically unless cancelled before the renewal date.
• Reductions or cancellations take effect at the end of the current term.
For support or questions about licence management, please contact support@sandboxstudiosoftware.com
Key Notes
• Sandbox Studio licences cover software use only. AWS consumption costs remain separate and the responsibility of you, the customer.
• Licence validation and renewal are handled securely through AWS Marketplace.
• No reinstallation is required when upgrading or renewing.
• For institutional or bulk purchases (e.g., education, research, or enterprise use), contact your AWS account team, Sandbox Studio contact or email sales@sandboxstudiosoftware.com
End User Licence Agreement (EULA)
Sandbox Studio Software LTD
End User License Agreement (EULA)
Version: 1.0
Table of Contents
- Parties and Product
- License Grant and Scope
- Key Definitions
- Usage Restrictions
- Intellectual Property Rights
- Disclaimers and Liability
- Support and Maintenance
- Payments and Billing
- Termination
- Governing Law and Arbitration
- Software Updates
- Data Privacy and Security
- Acceptance of Terms
1. Parties and Product
This End User License Agreement (“Agreement”) is between Sandbox Studio Software LTD, based in UK, (“Licensor”) and the organisation or individual accepting this agreement (“Licensee”). It governs the use of the Sandbox Studio software application, which automates the creation and management of temporary AWS accounts and runs within the Licensee’s own AWS account.
2. License Grant and Scope
- Annual subscription model per AWS account.
- First 3 managed AWS accounts are free.
- Sandbox Studio Software LTD reserves the right to adjust pricing or the free account policy at any time.
- Pricing tiers exist for general customers and educational institutions (addendum available).
- License is for internal use only—no third-party managed services permitted.
3. Key Definitions
- “Sandbox Studio”: The software application licensed under this Agreement.
- “AWS Account”: An individual cloud tenant managed using the software.
- “License Period”: The active duration of the license.
- “Effective Date”: Date when license begins.
- “Performance Data” / “Usage Data”: Information collected about how the software is used.
4. Usage Restrictions
Licensee shall not:
- Resell or offer the solution as a service.
- Reverse engineer or modify the software.
- Distribute or sublicense the software.
- Manage more AWS accounts than licensed.
5. Intellectual Property Rights
- Licensor retains ownership of the software and all rights therein.
- Licensee retains ownership of all data within their AWS environment.
- Licensor may collect required usage data for licensing and performance. Optional data collection for product improvement is subject to explicit consent.
6. Disclaimers and Liability
- Software is provided “AS IS” with no warranties.
- Licensee bears all responsibility for AWS consumption costs and operating the software within AWS.
- Cost control mechanisms (budget alerts, automated shutdowns) are provided on a best-effort basis due to AWS billing delays.
- Licensor’s liability is limited to the amount paid. No liability for indirect, incidental, or punitive damages or AWS overspend.
7. Support and Maintenance
- Uniform support level.
- Issues reported via online ticketing system.
- Initial response provided within 24 hours.
8. Payments and Billing
- All purchases made via AWS Marketplace.
- Billing is handled directly by AWS; Licensor is not responsible for transaction processing.
9. Termination
- Either party may terminate in case of material breach or non-payment.
- Upon termination, Licensee must delete all software components from AWS accounts.
10. Governing Law and Arbitration
- Agreement is governed by laws of the United Kingdom.
- Disputes shall be resolved through binding arbitration.
11. Software Updates
- Quarterly updates are planned but not guaranteed.
- Updates are included with the annual license fee.
12. Data Privacy and Security
- Licensor encrypts data it holds at rest and in transit.
- Licensor does not store customer AWS data or any billing/payment information.
13. Acceptance of Terms
- Licensee administrators must accept these terms during installation and via AWS Marketplace.
- Administrators may configure End User Terms of Service within the application for internal user acceptance.
Uninstall
Uninstall Sandbox Studio
Introduction
This wizard has been created to facilitate the uninstallation of Sandbox Studio in your environment. It automates as many steps as possible and deletes the data managed by the solution.
Running the wizard
- Login to your AWS Organisation Management account.
- Open a new CloudShell console (a link to open CloudShell can be found in the bottom left corner of the AWS console).
- Ensure you are in the region where you want to install Sandbox Studio.
- Run the following command:
bash <(curl -s https://dist.sandboxstudiosoftware.com/install.sh) --uninstallThe following should display:
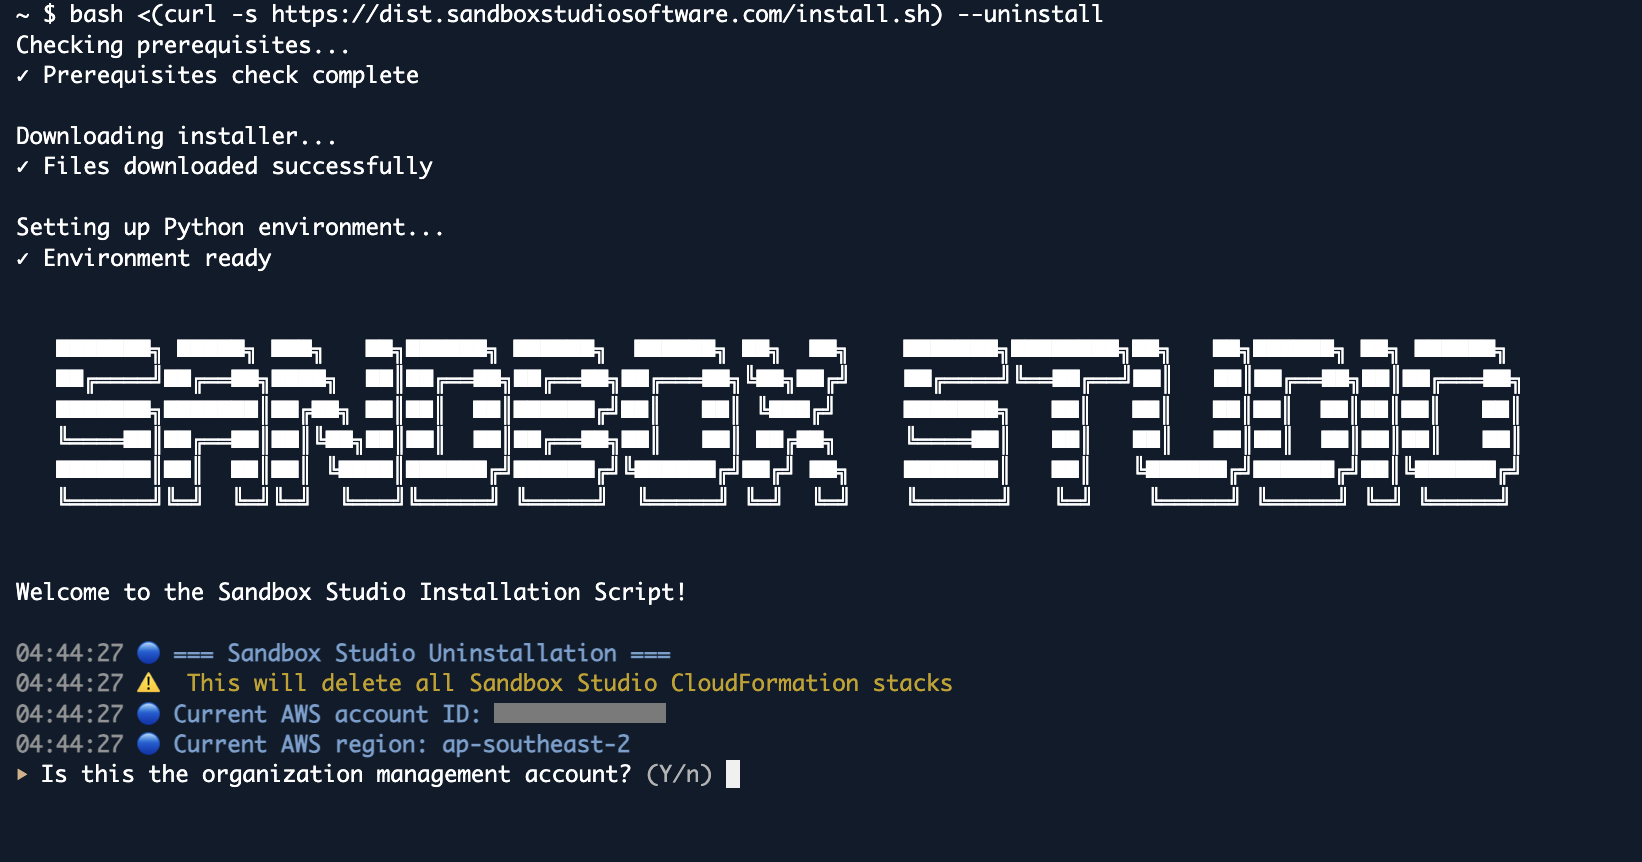
The wizard will guide you through the uninstallation process.
In some circumstances, some resources are not being deleted by CloudFormation. The uninstallation script will retry automatically. If after the retry the resources are still not being deleted, delete the resources manually before restarting the script.