Sandbox Studio does not include any predefined tags. The dropdown list is populated with tags that already exist in your environment.
You can addd as many tags as needed to help you filter accounts as required. In the example below you can see 3 different tags [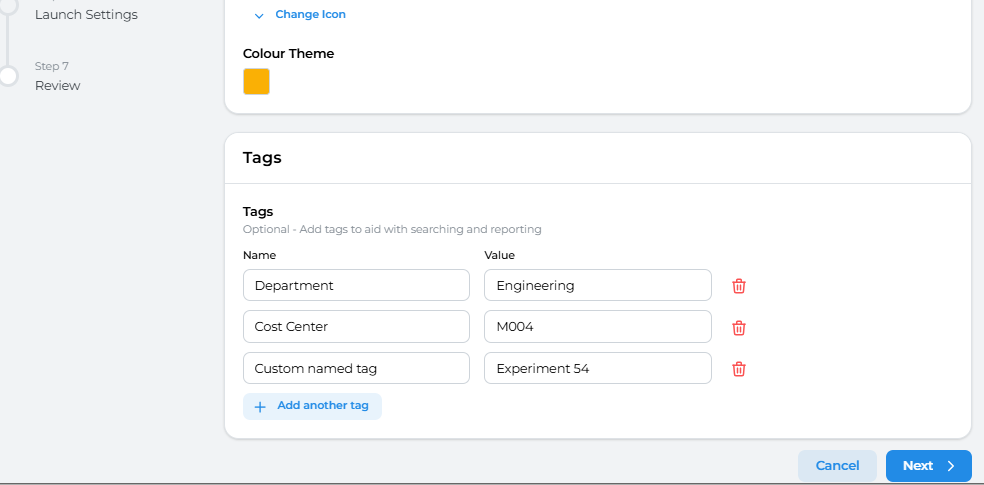](https://docs.sandboxstudiosoftware.com/uploads/images/gallery/2025-07/hsrimage.png) Having completed all the fields on the Basic Details page as needed, click on **Next** to move to [Account template creation - Budget](https://docs.sandboxstudiosoftware.com/books/manager-guide/page/account-template-creation-budget "Account template creation - Budget") # Account template creation - Budget This step defines the budget limits for leases using this template. [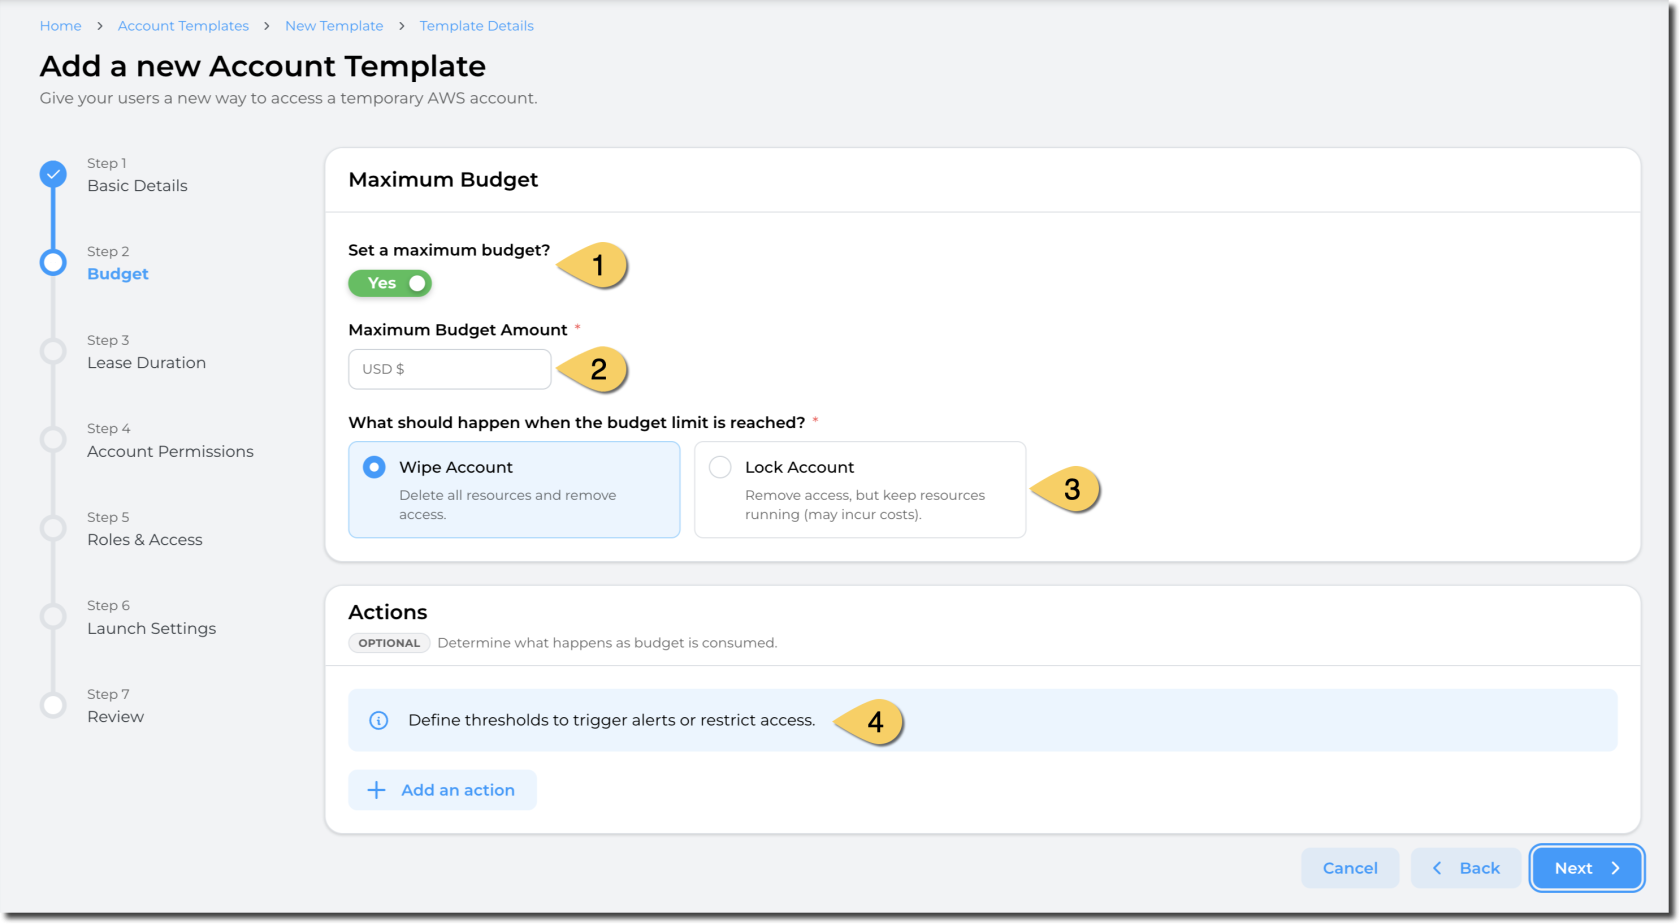](https://docs.sandboxstudiosoftware.com/uploads/images/gallery/2026-04/LsNimage.png) 1. Define if you want a **maximum budget to be enforced** for the leases. By default, this flag is optional *(You can define templates with no budget limits)*, but platform administrators can enforce this flag to be set to "Yes". *(e.g: Enforce maximum budget)* 2. Define the **maximum budget amount**. This value is in USD. 3. Define the **action when the budget is reached.** You can either: - **Wipe the account**: This delete all resources and remove access to the users. - **Pros**: Stop incurring cost - **Cons**: Some data may be lost as the resources will be deleted. - Lock account: Remove access to end users but keep the resources and data 1. **Pros**: Data and resources remain. Administrators and managers can access the account. 2. **Cons**: Resources still incur cost in the AWS account. 4. Define the actions to take based on the thresholds you define.Note: The maximum budget you can set is limited by the maximum budget set in the Global configuration set by the administrator of your Sandbox Studio environment.
##### Actions: Sandbox Studio can perform automatic actions if some thresholds are met. You can define those thresholds and actions in the "Actions" section: [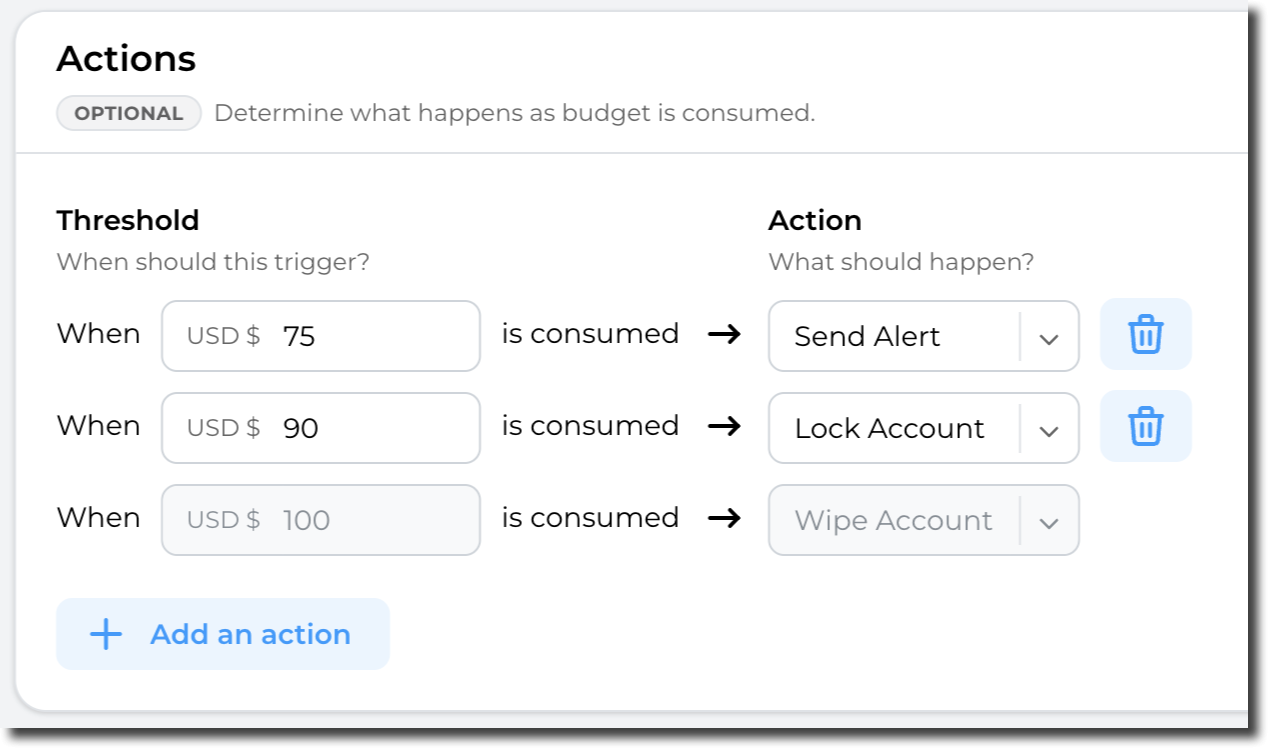](https://docs.sandboxstudiosoftware.com/uploads/images/gallery/2026-04/Mqbimage.png) Having completed all the fields on the Budget page as needed, click on **Next** to [Account template cre](https://docs.sandboxstudiosoftware.com/books/manager-guide/page/account-template-creation-duration "Account template creation - Duration")[ation - Duration](https://docs.sandboxstudiosoftware.com/books/manager-guide/page/account-template-creation-duration "Account template creation - Duration") # Account template creation - Duration This step defines the maximum duration for leases using this template. [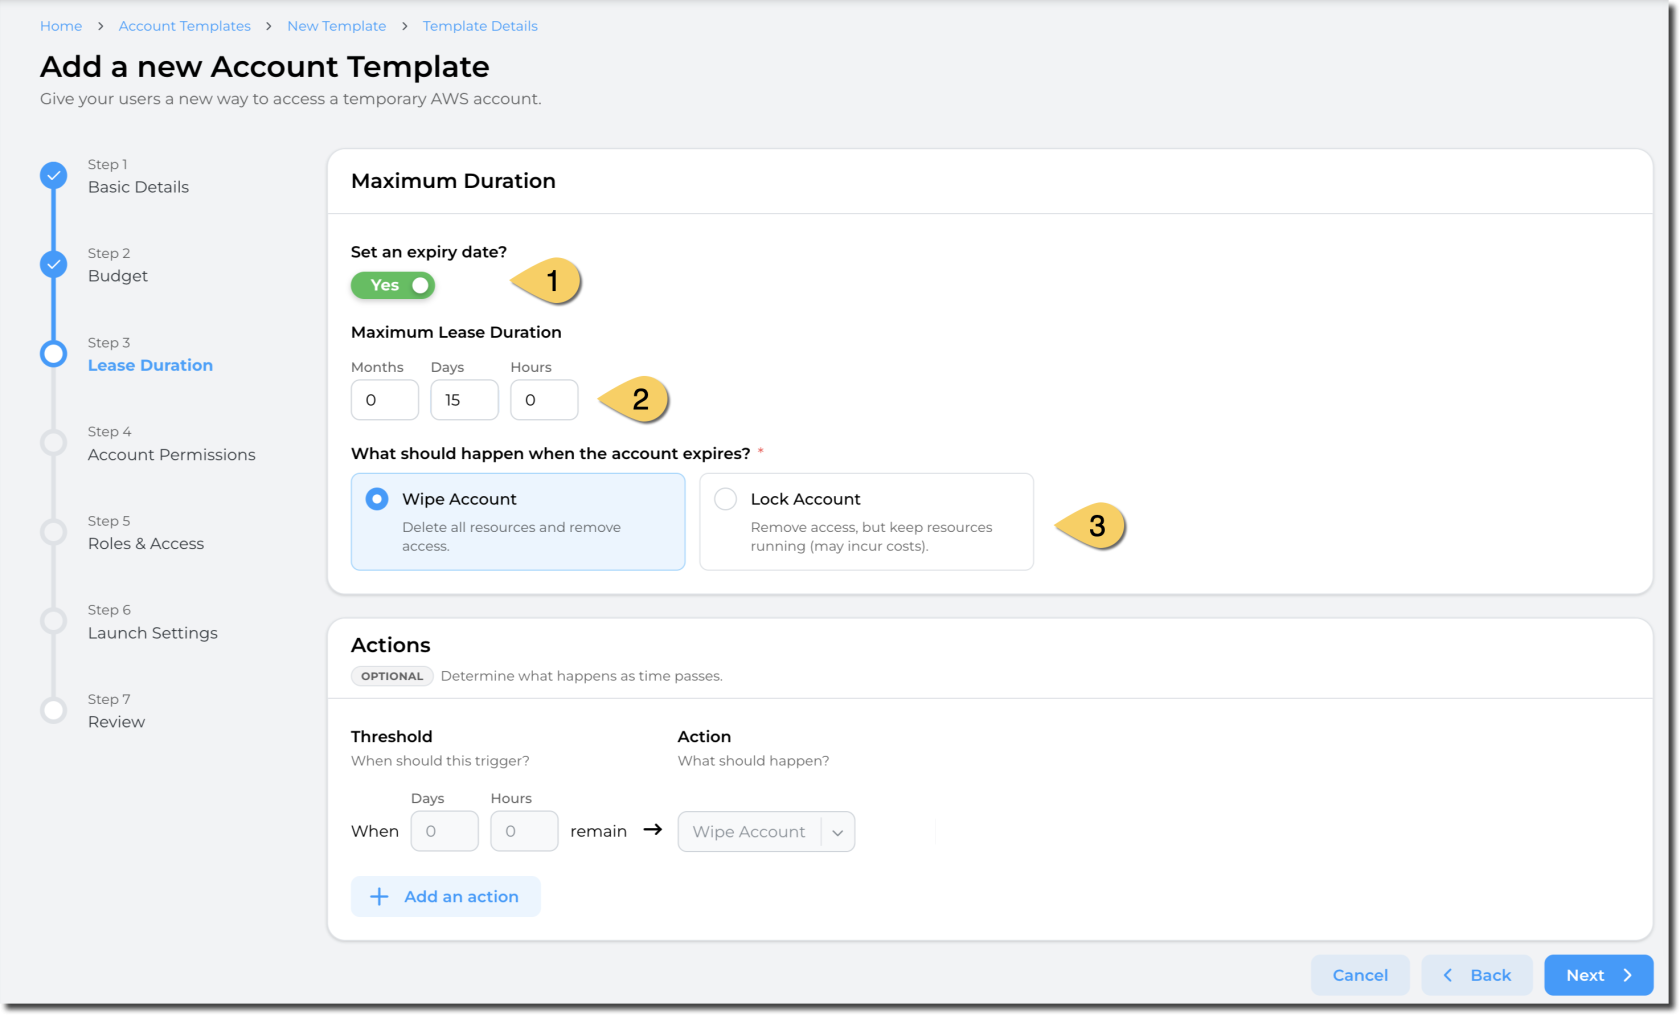](https://docs.sandboxstudiosoftware.com/uploads/images/gallery/2026-04/uoTimage.png) 1. Define if you want a **maximum duration to be enforced** for the leases. 2. If you select **Set an expiry date**, enter a value in **Maximum Lease Duration (in Months, Days or Hours)**. The duration configuration determines how long the account is available once leased to a user. 3. Define the **action when the lease expires.** You can either: - **Wipe the account**: This delete all resources and remove access to the users. - **Pros**: Stop incurring cost - **Cons**: Some data may be lost as the resources will be deleted. - **Lock account**: Remove access to end users but keep the resources and data 1. **Pros**: Data and resources remain. Administrators and managers can access the account. 2. **Cons**: Resources still incur cost in the AWS account. 4. Define the actions to take based on the thresholds you define.The countdown for a lease starts when the lease is created.
##### Actions: Sandbox Studio can perform automatic actions if some thresholds are met. You can define those thresholds and actions in the "Actions" section: [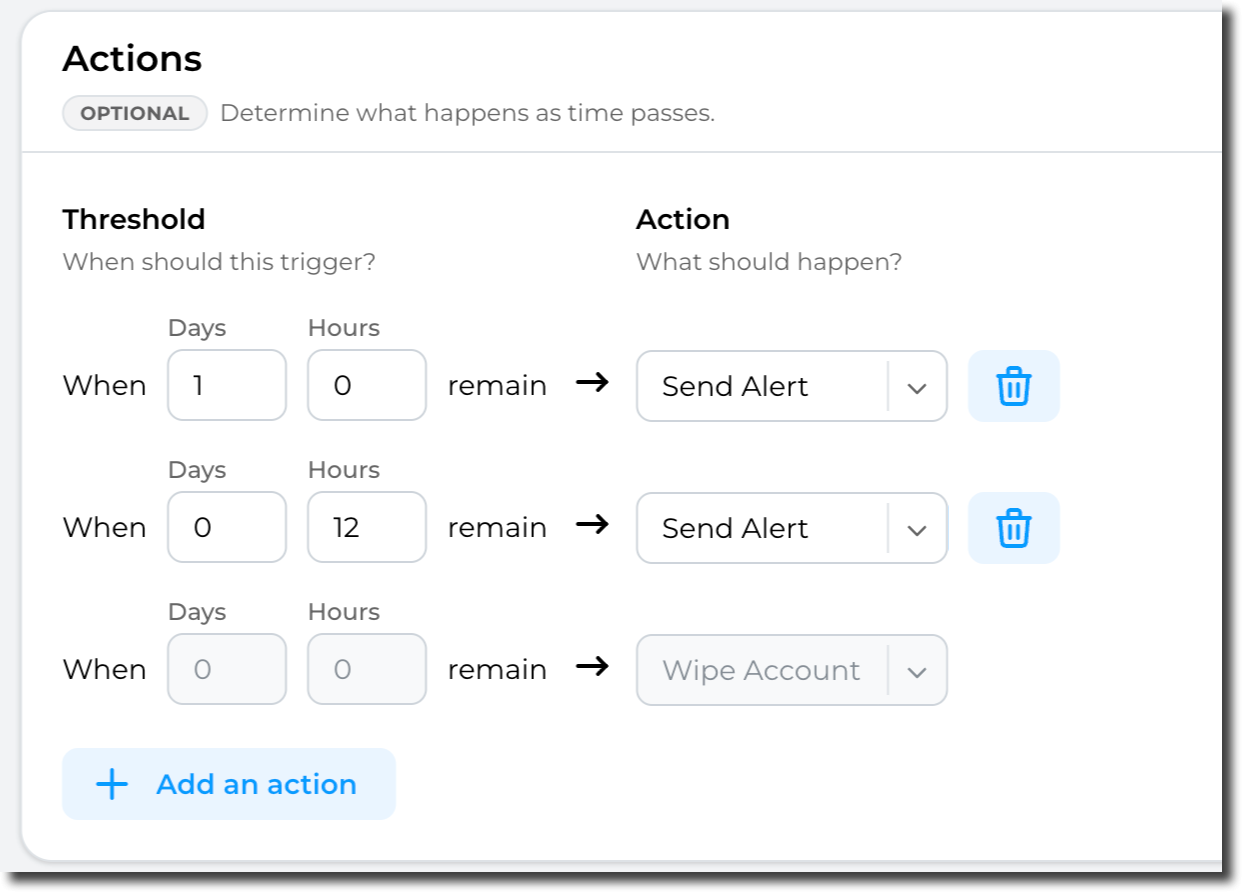](https://docs.sandboxstudiosoftware.com/uploads/images/gallery/2026-04/2sIimage.png)Important: The threshold’s actions are effectively a **count down** - and only trigger when a certain amount of time is left. e.g. 5 Days left, or 24 Hours to go or in the case of "Wipe" when the account has expired.
Having completed all the fields on the **Duration** page as needed, click on **Next** to [Account template creation - Permissions](https://docs.sandboxstudiosoftware.com/books/manager-guide/page/account-template-creation-permissions "Account template creation - Permissions") # Account template creation - Permissions Using Permissions, you can configure what the end users can and cannot do in their accounts.Sandbox Studio uses IAM Identity Center Permissions Sets for permissions. You can see more details explaining each of the sections of this page at https://docs.aws.amazon.com/singlesignon/latest/userguide/permissionsetcustom.html
##### Default permissions By default, "Administrator Access" is provided to end users.Service Control Policies (SCP) are still applied on the accounts and even with Administrator access, some resources and actions may be blocked by your Administrators.
If the default configuration suits your needs, proceed to the next step [Account template creation - Roles & Access](https://docs.sandboxstudiosoftware.com/books/manager-guide/page/account-template-creation-roles-access "Account template creation - Roles & Access") ##### Customise permissions For more granular permissions configuration, you can customise the permissions you provide to the end users by selecting **No, I want to customise permissions:** [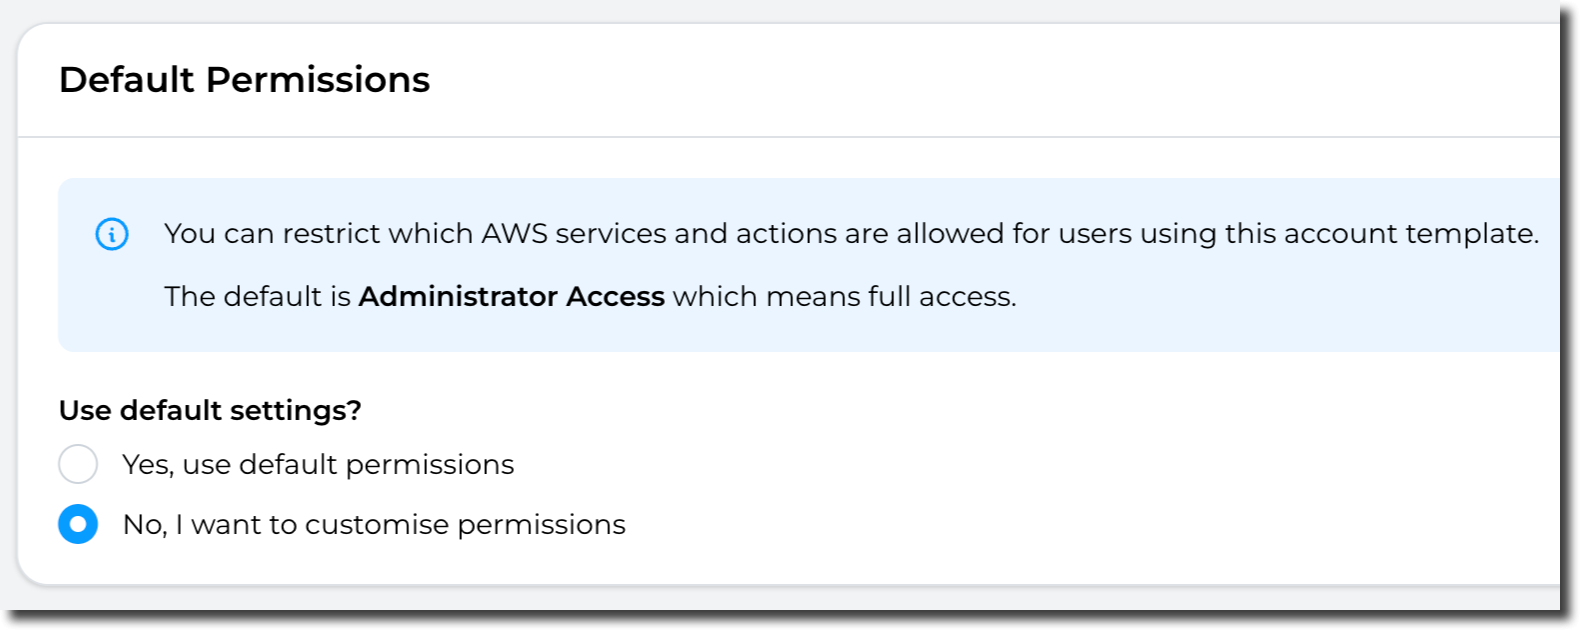](https://docs.sandboxstudiosoftware.com/uploads/images/gallery/2026-04/ZULimage.png) The following sections can be configured: [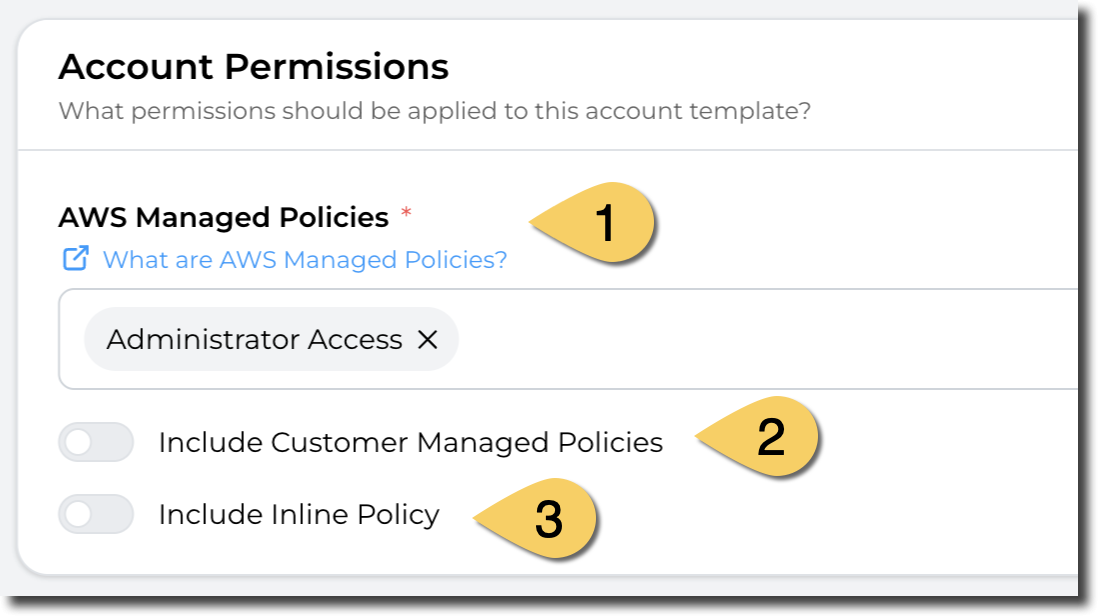](https://docs.sandboxstudiosoftware.com/uploads/images/gallery/2026-04/okpimage.png) 1. **AWS Managed Policies** By default, the Administrator Access policy is applied but you can select one or more policies from the list of AWS Managed policies. More details here about AWS Managed policies: [https://docs.aws.amazon.com/aws-managed-policy/latest/reference/about-managed-policy-reference.html](https://docs.aws.amazon.com/aws-managed-policy/latest/reference/about-managed-policy-reference.html) [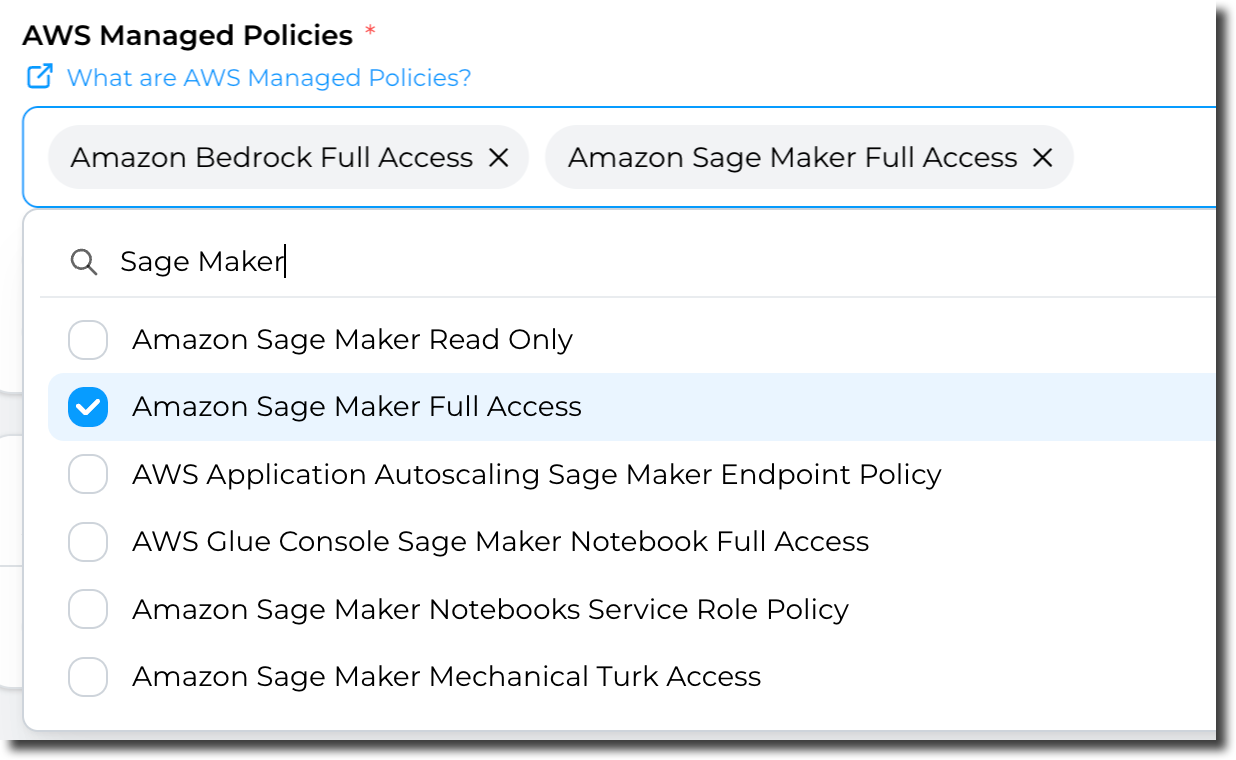](https://docs.sandboxstudiosoftware.com/uploads/images/gallery/2026-04/R6wimage.png) 2. **Customer Managed Policies** If you have pre-defined policies you manage, you can use them here. [More details about Customer managed policies](https://docs.aws.amazon.com/IAM/latest/UserGuide/access_policies_managed-vs-inline.html#customer-managed-policies) [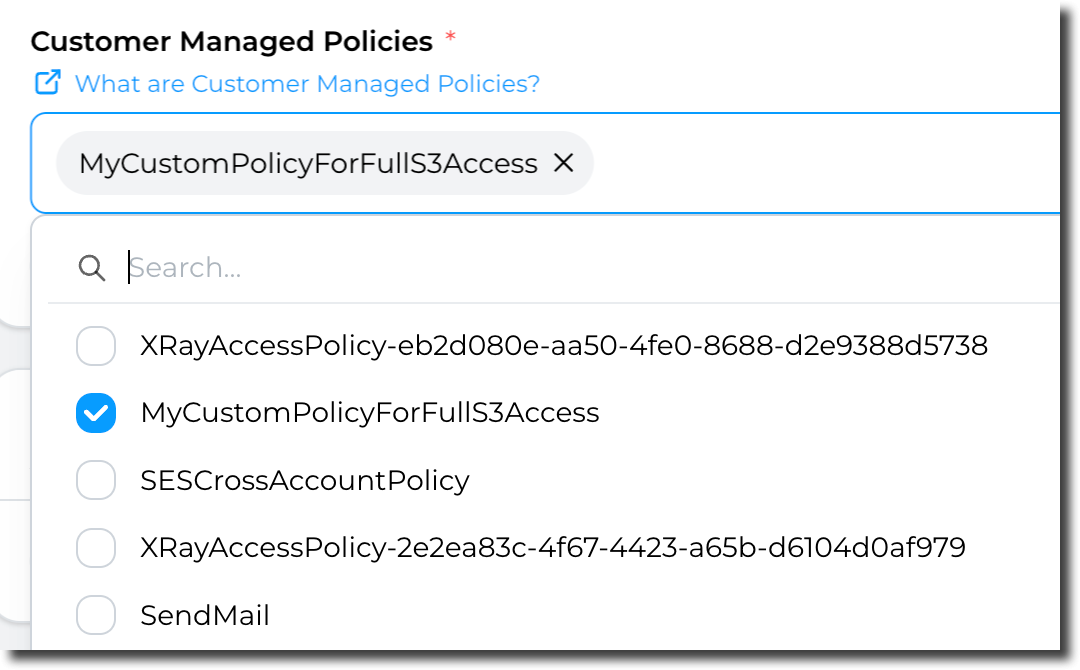](https://docs.sandboxstudiosoftware.com/uploads/images/gallery/2026-04/DYWimage.png) 3. **Inline policy** Finally, you can use inline policy (define the access directly in the section). [More details about inline policies.](https://docs.aws.amazon.com/IAM/latest/UserGuide/access_policies_managed-vs-inline.html#inline-policies) Example: [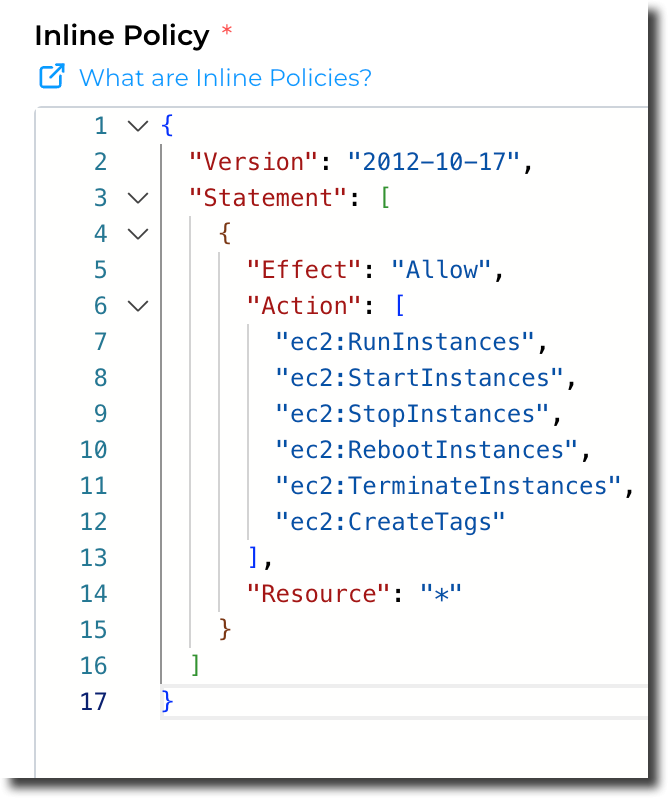](https://docs.sandboxstudiosoftware.com/uploads/images/gallery/2026-04/CS8image.png) ##### Permission Boundary: Finally, and following the same principles as previous options, you have the option to include **Permission boundaries.** [More details about Permission boundaries.](https://docs.aws.amazon.com/IAM/latest/UserGuide/access_policies_boundaries.html) [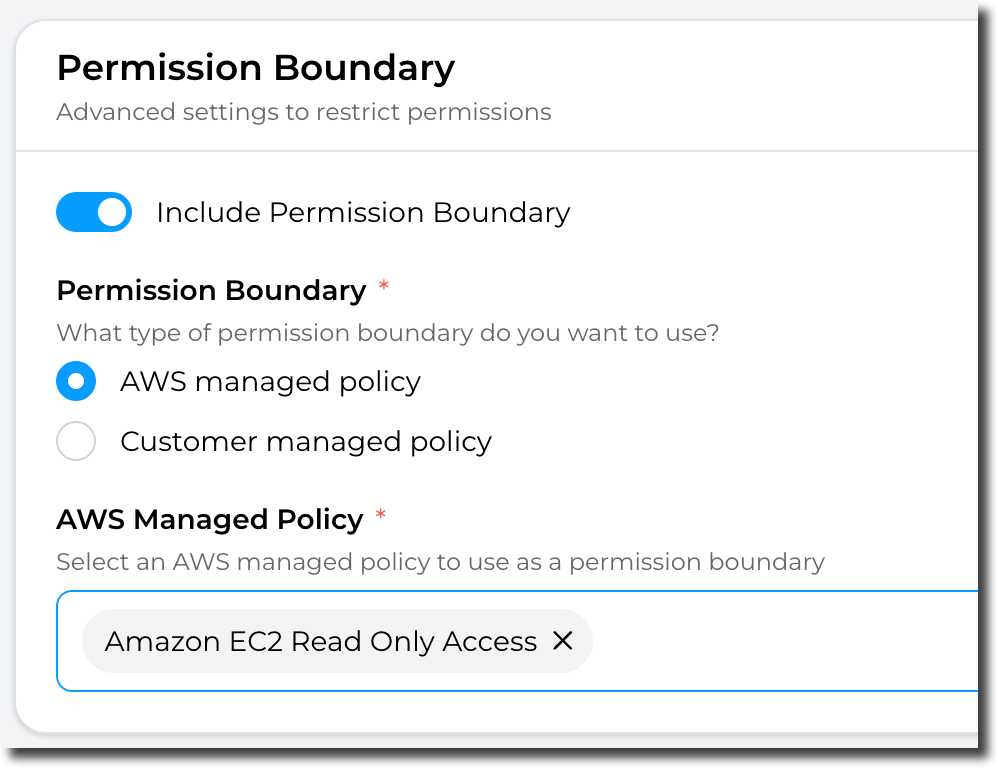](https://docs.sandboxstudiosoftware.com/uploads/images/gallery/2026-04/pkrimage.png)Note: Permission boundaries can only be "AWS managed policy" OR "Customer managed policy" (Not both). In addition, you can only select **ONE** policy to apply.
Having completed all the fields on the **Permissions** page as needed, click on **Next** to move to [Account template creation - Roles & Access](https://docs.sandboxstudiosoftware.com/books/manager-guide/page/account-template-creation-roles-access "Account template creation - Roles & Access") #### Example: This example restricts users to only basic EC2 actions: [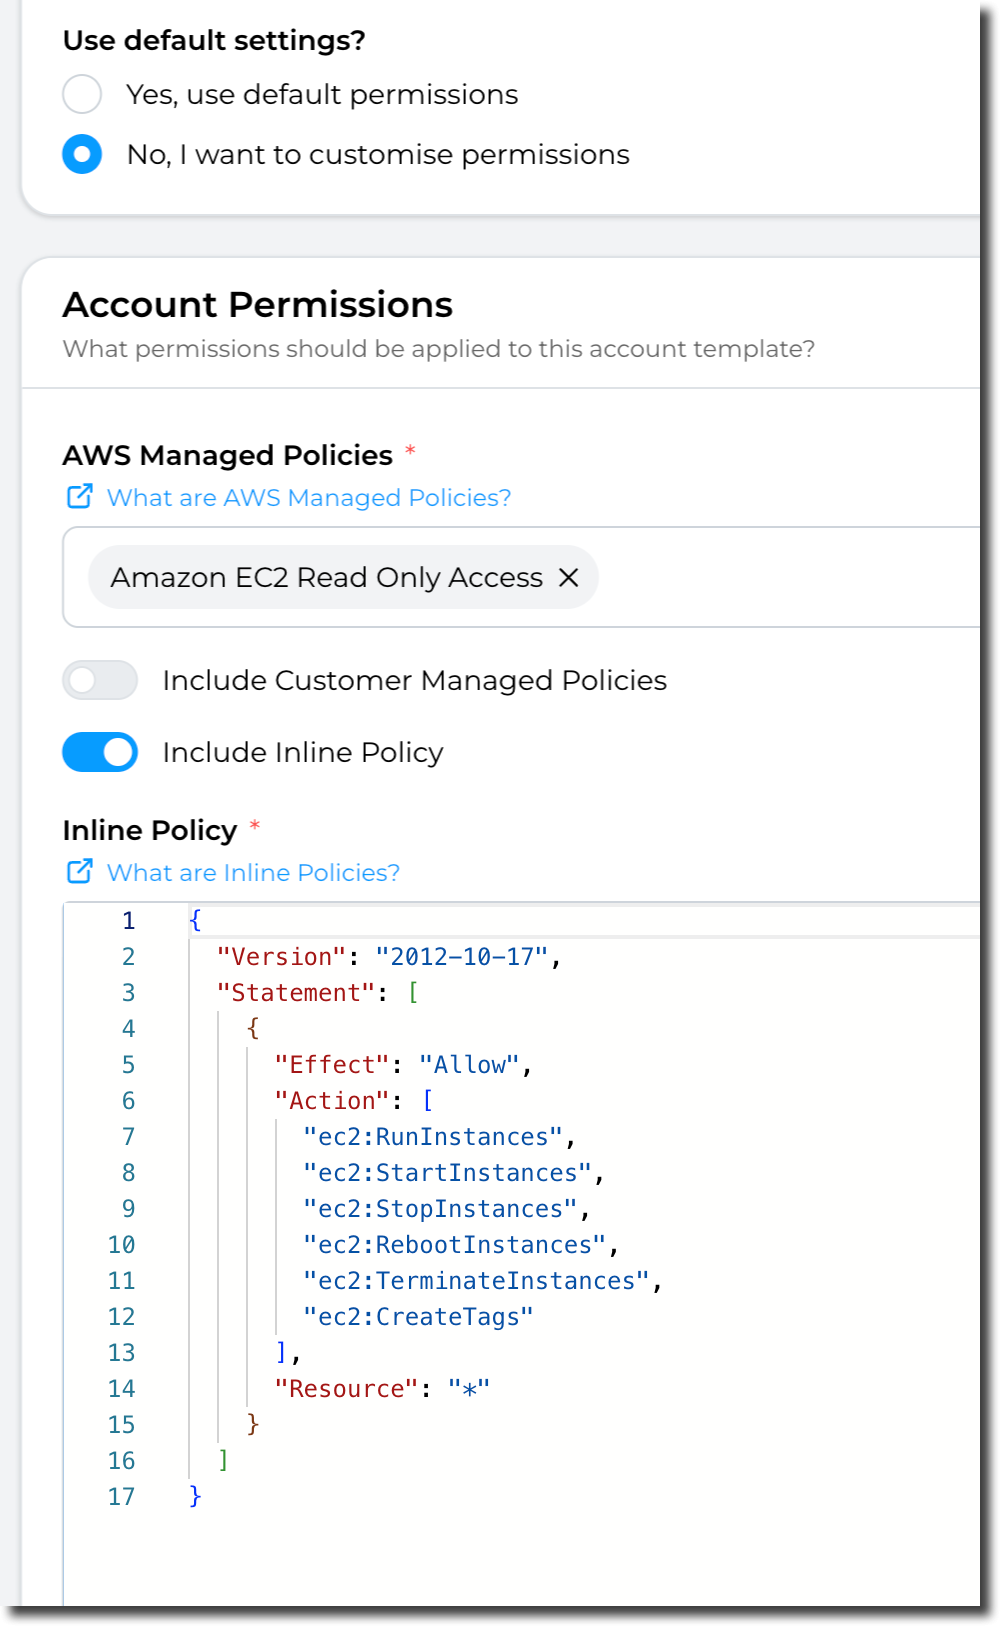](https://docs.sandboxstudiosoftware.com/uploads/images/gallery/2026-04/q2wimage.png) # Account template creation - Roles & Access In this section, you define if leases can be shared, if they require approval, and who can manage and approves them. [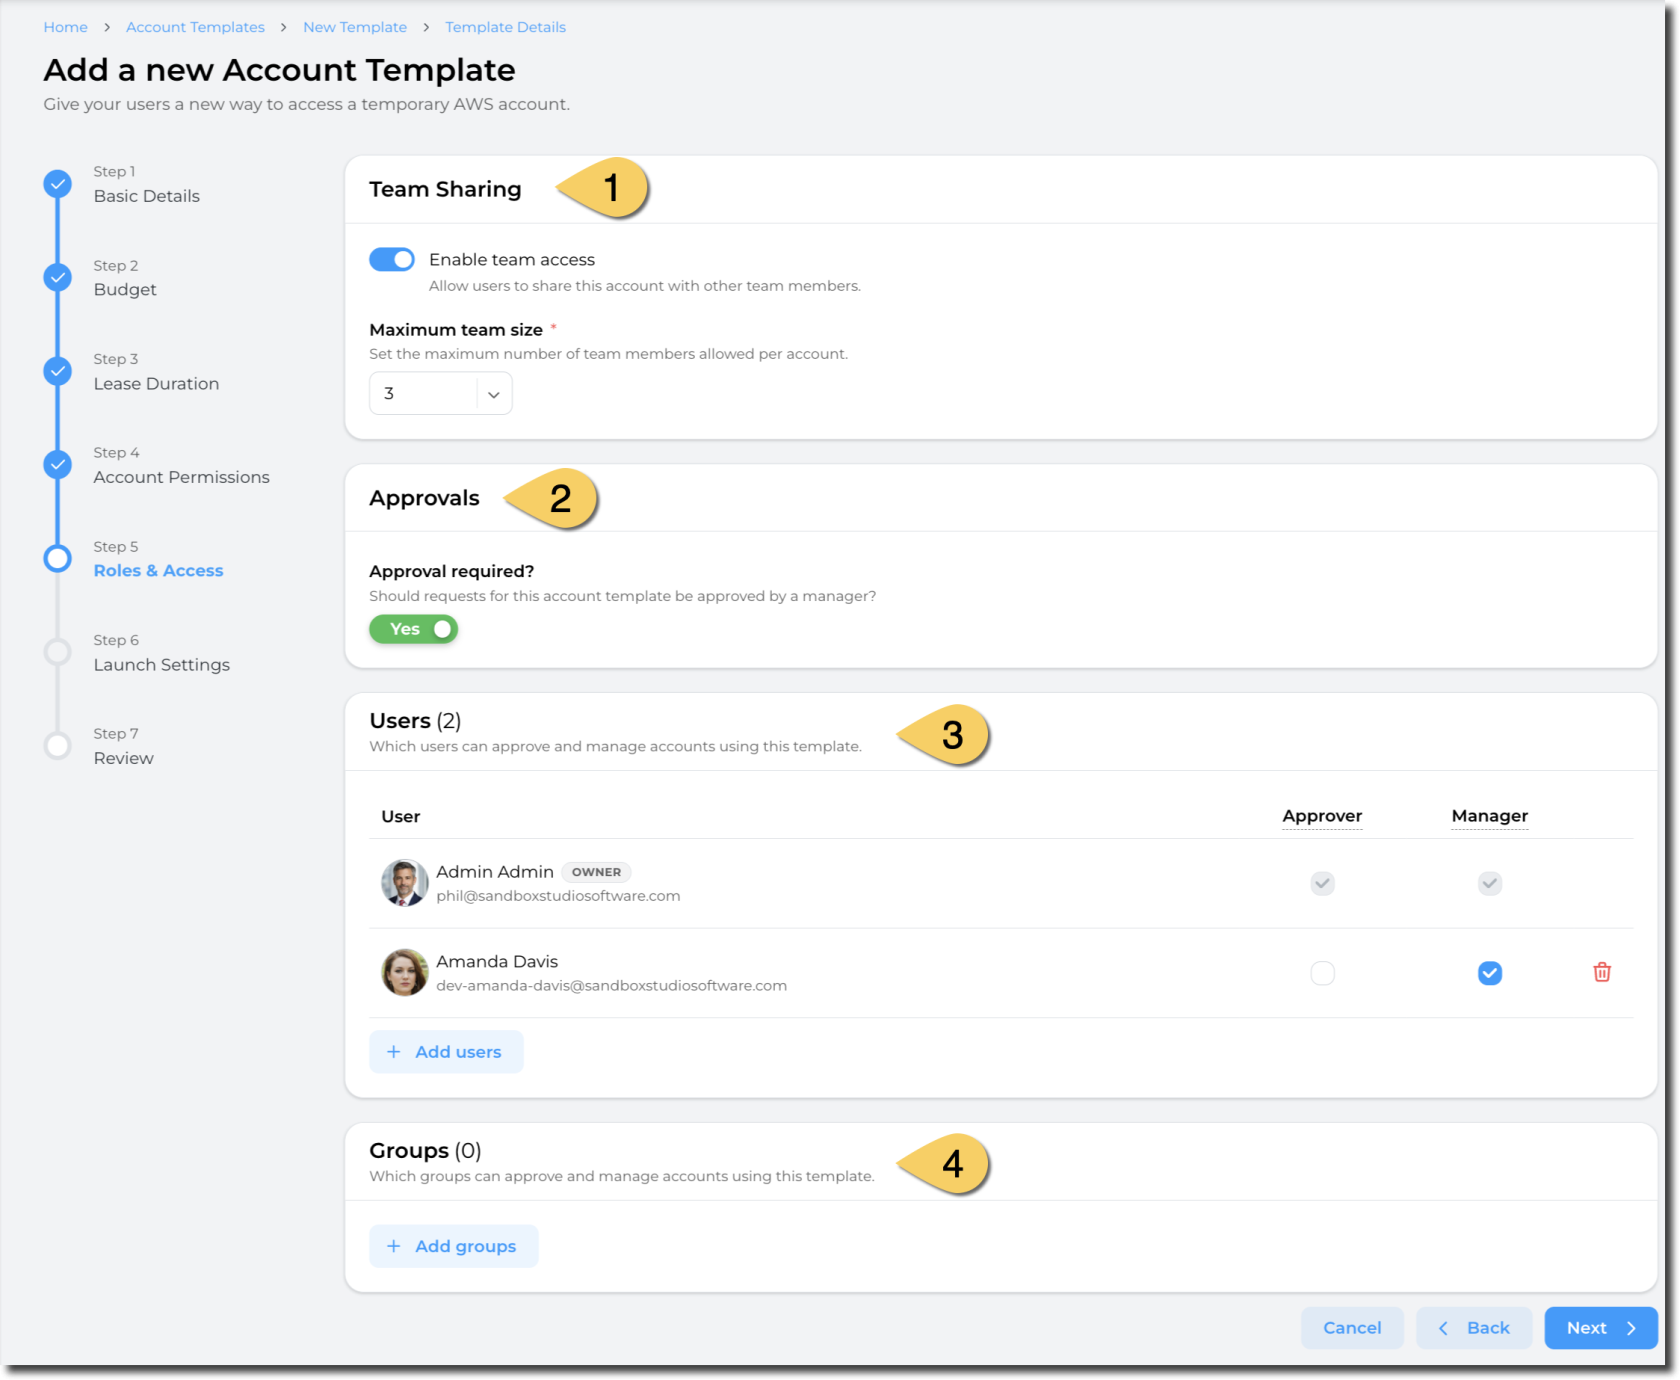](https://docs.sandboxstudiosoftware.com/uploads/images/gallery/2026-04/a4Pimage.png) ##### Team sharing (1) In the **Team Sharing** section of the page. A simple toggle that once enabled will require the Manager or Administrator to provide the number of Users it can be shared with. A User will provide the additional Users that a lease can be shared with a the request. - - Toggle the **Enable team access** to being configuring the number of Users that a lease can be shared with. - Set the **Maximum team size** to the number of Users to permit per lease.Team size is: Owner + Number of additional users
##### Approvals (2) This section lets you define whether an approval is required to create new leases using this template.We recommend requiring approval for leases with extended permissions or that will incur high costs.
- Set "**Approval required**" to **Yes** if you want new lease to be approved by managers before being created.If no approval is required, new leases are created immediately.
##### Users & Groups (3 & 4) These sections are set to define who can Approve or Managed leases created for this template: - **Approver**: Users or groups of users who receive approval requests on lease creation and who can approve leases created with this template - **Manager**: Users or groups of users who can manage leases created with this template, that is: - View the leases - Extend budget and duration - Terminate leases - Login to the AWS accountAdministrators can both approve and manage leases, even if not in this list of users/groups
Groups are defined in IAM Identity Center. [How to add groups to IAM Identity Center](https://docs.aws.amazon.com/singlesignon/latest/userguide/addgroups.html)
Having completed all the fields on the Managers page as needed, click on **Next** to [Account template creation - Launch Settings](https://docs.sandboxstudiosoftware.com/books/manager-guide/page/account-template-creation-launch-settings "Account template creation - Launch Settings") # Account template creation - Launch Settings Using launch templates, managers can define what resources need to be set up on new accounts creation. For instance, create S3 buckets, deploy Cloud Formation templates, etc.Sandbox Studio uses [AWS Codebuild](https://docs.aws.amazon.com/codebuild/latest/userguide/welcome.html) to set up resources.
[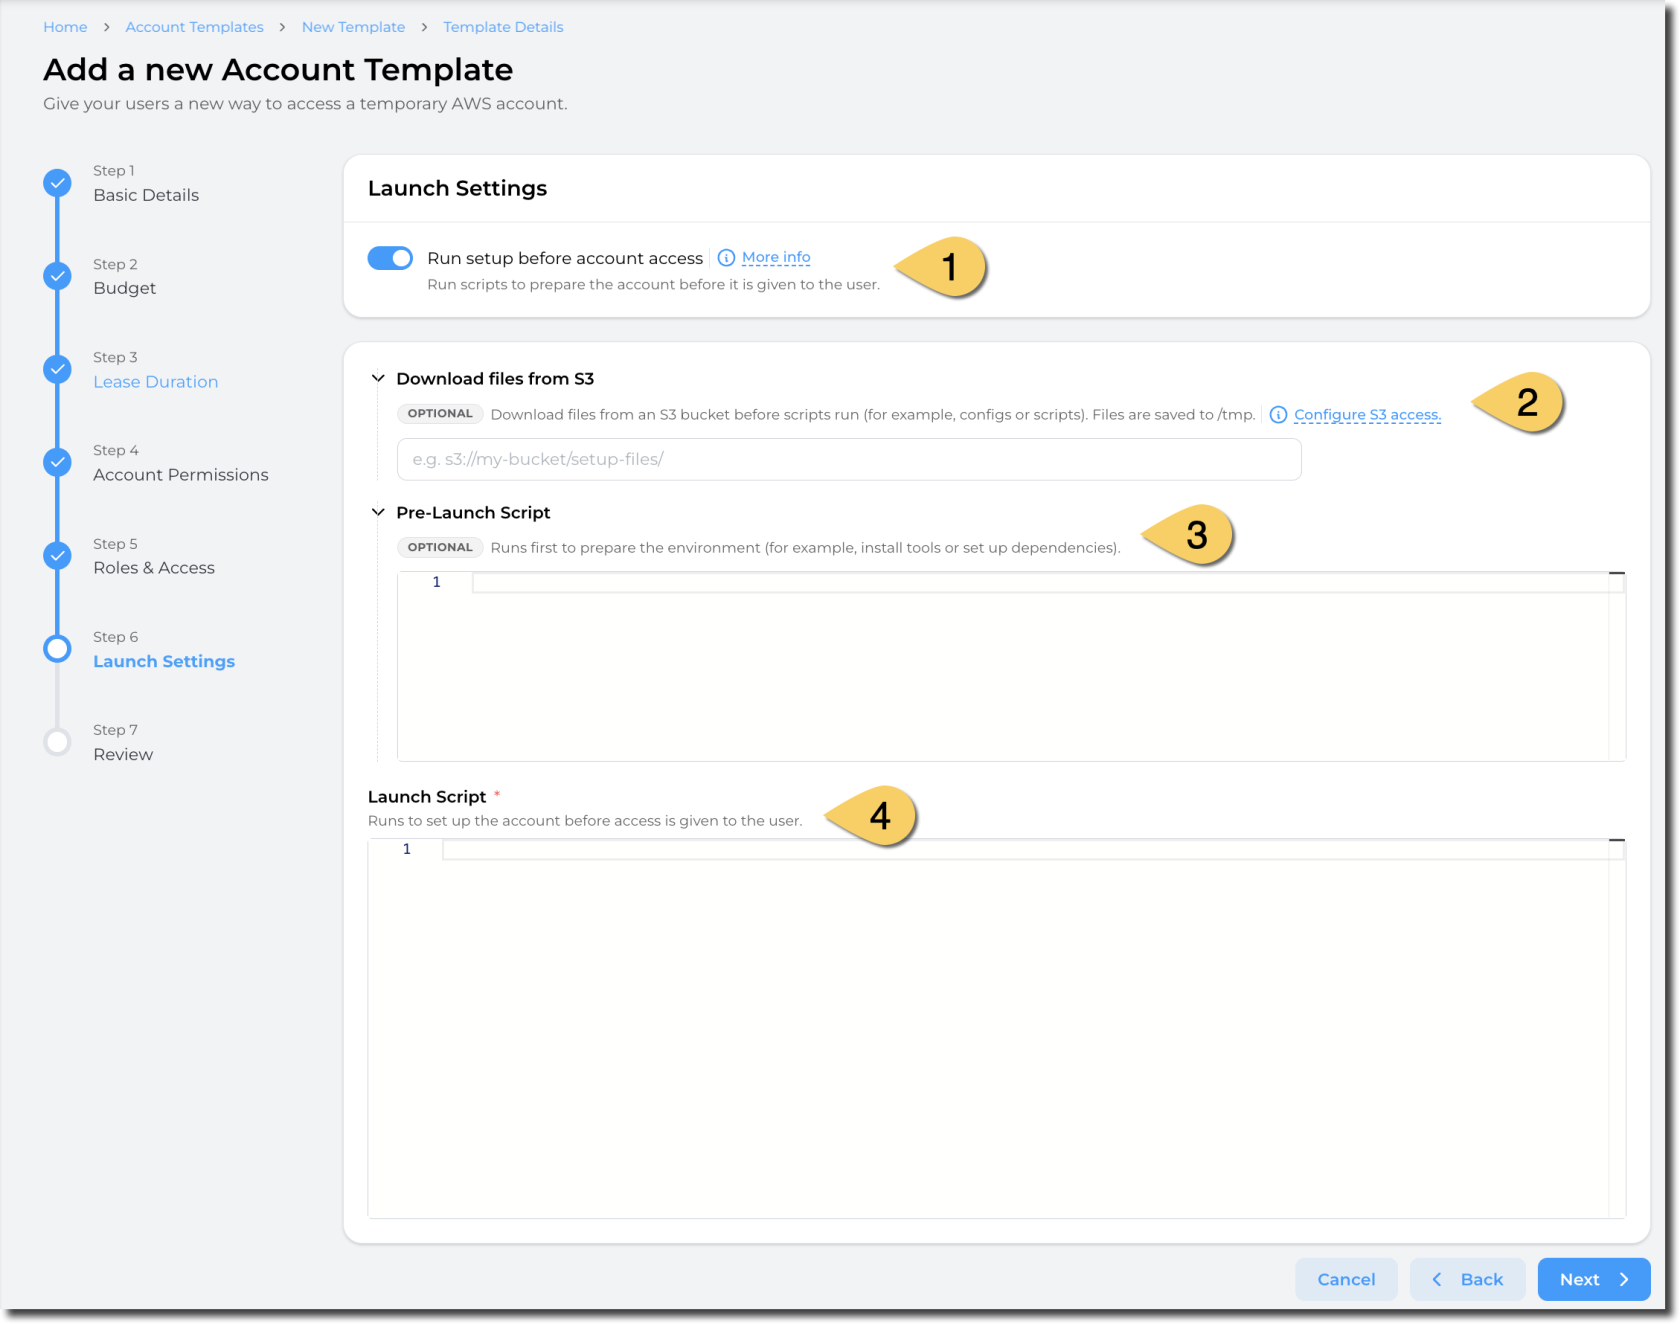](https://docs.sandboxstudiosoftware.com/uploads/images/gallery/2026-04/JiJimage.png) ##### Launch Settings (1) Select "**Run setup before account access**" to enable launch templates. By ticking this item, you need to provide the script to create resources on account creation.If no resource needs to be created on account creation, untick this box to provide an "empty" account to users.
##### Download files from S3 (2) In some scenario, you may need to download files from S3 to create your resources. For example, download a Cloudformation template, download softwares, etc.You need to provide an S3 path to a folder or a bucket (not to the object directly).
[](https://docs.sandboxstudiosoftware.com/uploads/images/gallery/2026-04/Z7nimage.png) Sandbox Studio will run a `sync` command to fetch the folders and objects from S3 into the `/tmp` folder of the Codebuild instance.Sandbox Studio does not require your bucket to be public! Follow the next steps to learn how to configure S3 access
Sandbox Studio requires your bucket to be accessible to the `LaunchTemplateExternalAccessRole` created in your environment. You can click on "Configure S3 access" to display the S3 bucket policy to apply on your S3 bucket: [](https://docs.sandboxstudiosoftware.com/uploads/images/gallery/2026-04/vm6image.png)| [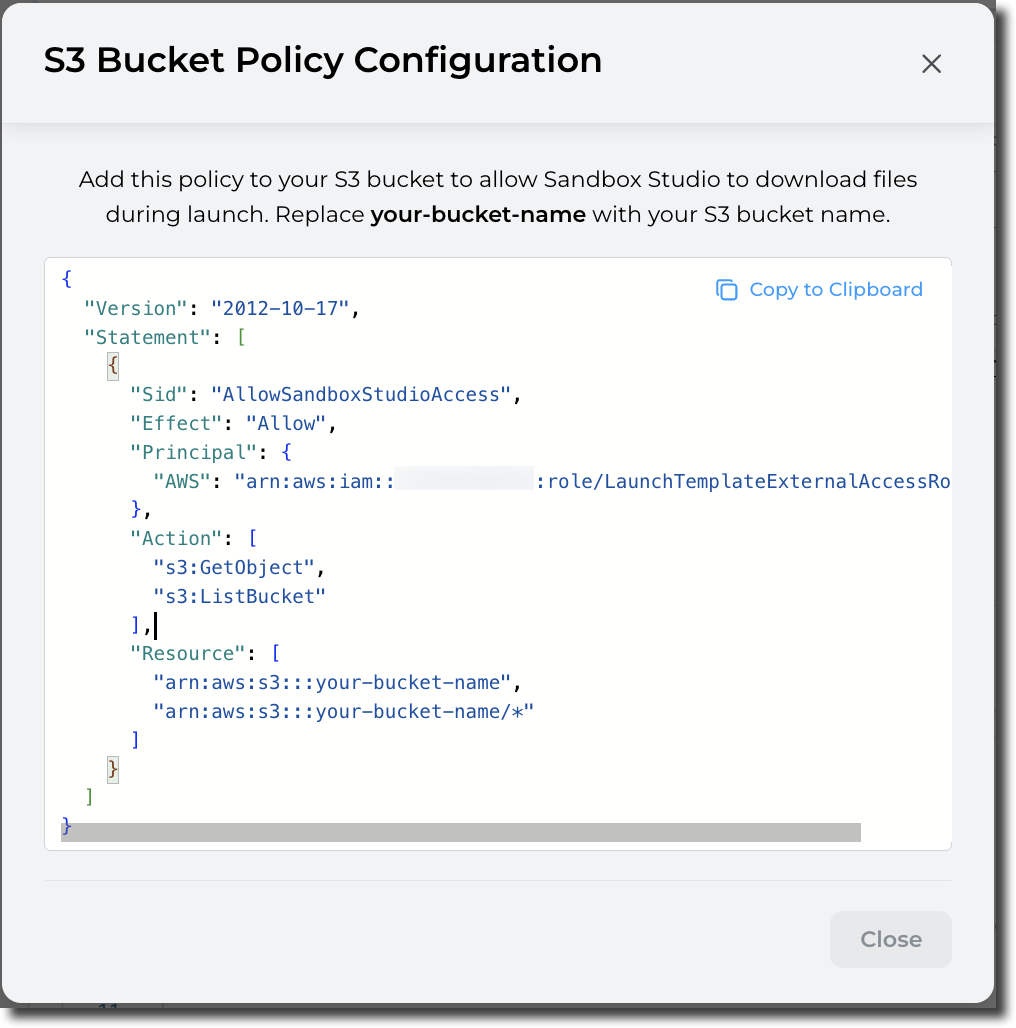](https://docs.sandboxstudiosoftware.com/uploads/images/gallery/2026-04/x4himage.png) | ```json
{
"Version": "2012-10-17",
"Statement": [
{
"Sid": "AllowSandboxStudioAccess",
"Effect": "Allow",
"Principal": {
"AWS": "arn:aws:iam:: |
The environment used to create the resources is based on **Amazon Linux 2023 (x86\_64)**. ([aws/codebuild/amazonlinux-x86\_64-standard:5.0)](https://docs.sandboxstudiosoftware.com/uploads/images/gallery/2025-07/Xwjimage.png)
##### Launch script (4) Launch script is your actual script to create resources in your account.The environment used to create the resources is based on **Amazon Linux 2023 (x86\_64)**. ([aws/codebuild/amazonlinux-x86\_64-standard:5.0)](https://docs.sandboxstudiosoftware.com/uploads/images/gallery/2025-07/Xwjimage.png)
Please refer to following section to return environment details to the Sandbox Studio interface.
Example of script to create a S3 bucket: ```bash #!/bin/bash BUCKET_NAME="sample-bucket-$(date +%s)" # Unique bucket name from current timestamp REGION="us-east-1" aws s3 mb --region $REGION s3://$BUCKET_NAME ``` #### How to set "Environment details" in Sandbox Studio? Sandbox Studio allows you to display environment details from the launch template script. You can, for example, return URLs, passwords, environment variables, etc.One interesting use case is to provide access to a VSCode environment: You can create a VSCode environment to your users and return the URL to the user. They don't need to login to the account and can directly access their VSCode with the information provided by the install script.
To set the environment details, you can use the pre-defined `set-sandbox-output` command: ```bash VSCODE_URL="https://example.com" PASSWORD="SuperStrongPassword" set-sandbox-output --name "VSCodeServerUrl" --value "$VSCODE_URL" set-sandbox-output --name "Password" --value "$PASSWORD" --is-secret ``` The tool takes 2 parameters (name and value). For secret strings (i.e.: Password, API keys, etc.), add the parameter `is-secret` [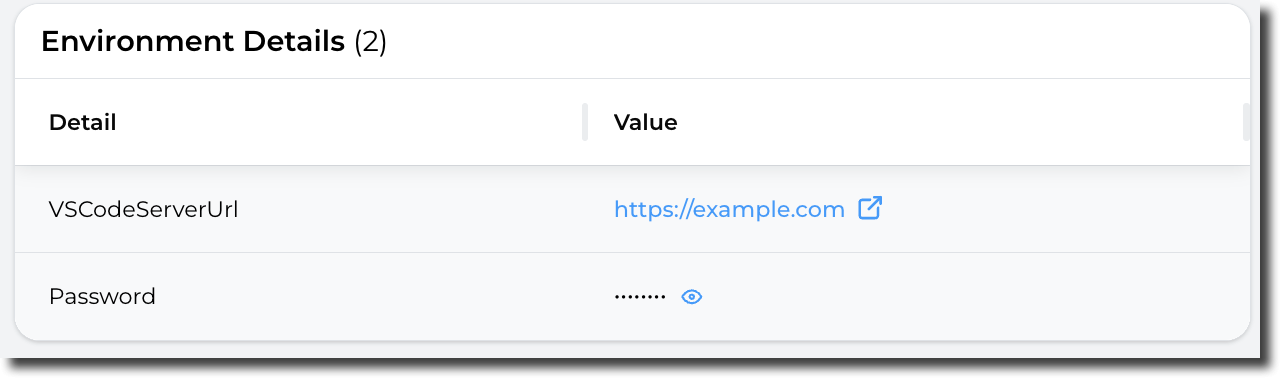](https://docs.sandboxstudiosoftware.com/uploads/images/gallery/2026-04/wDVimage.png)Secrets variables are saved in AWS Secrets Manager and only displayed when the user clicks on the Display icon.
Having completed all the fields on the Launch Settings page as needed, click on **Next** to [Account template creation - Review](https://docs.sandboxstudiosoftware.com/books/manager-guide/page/account-template-creation-review "Account template creation - Review") # Account template creation - Review Having completed all the steps, the final step is to **Review** the selected settings and one satisfied that everything is correct, click **Submit** to create a new lease template. Users can then request a lease with this new lease template. [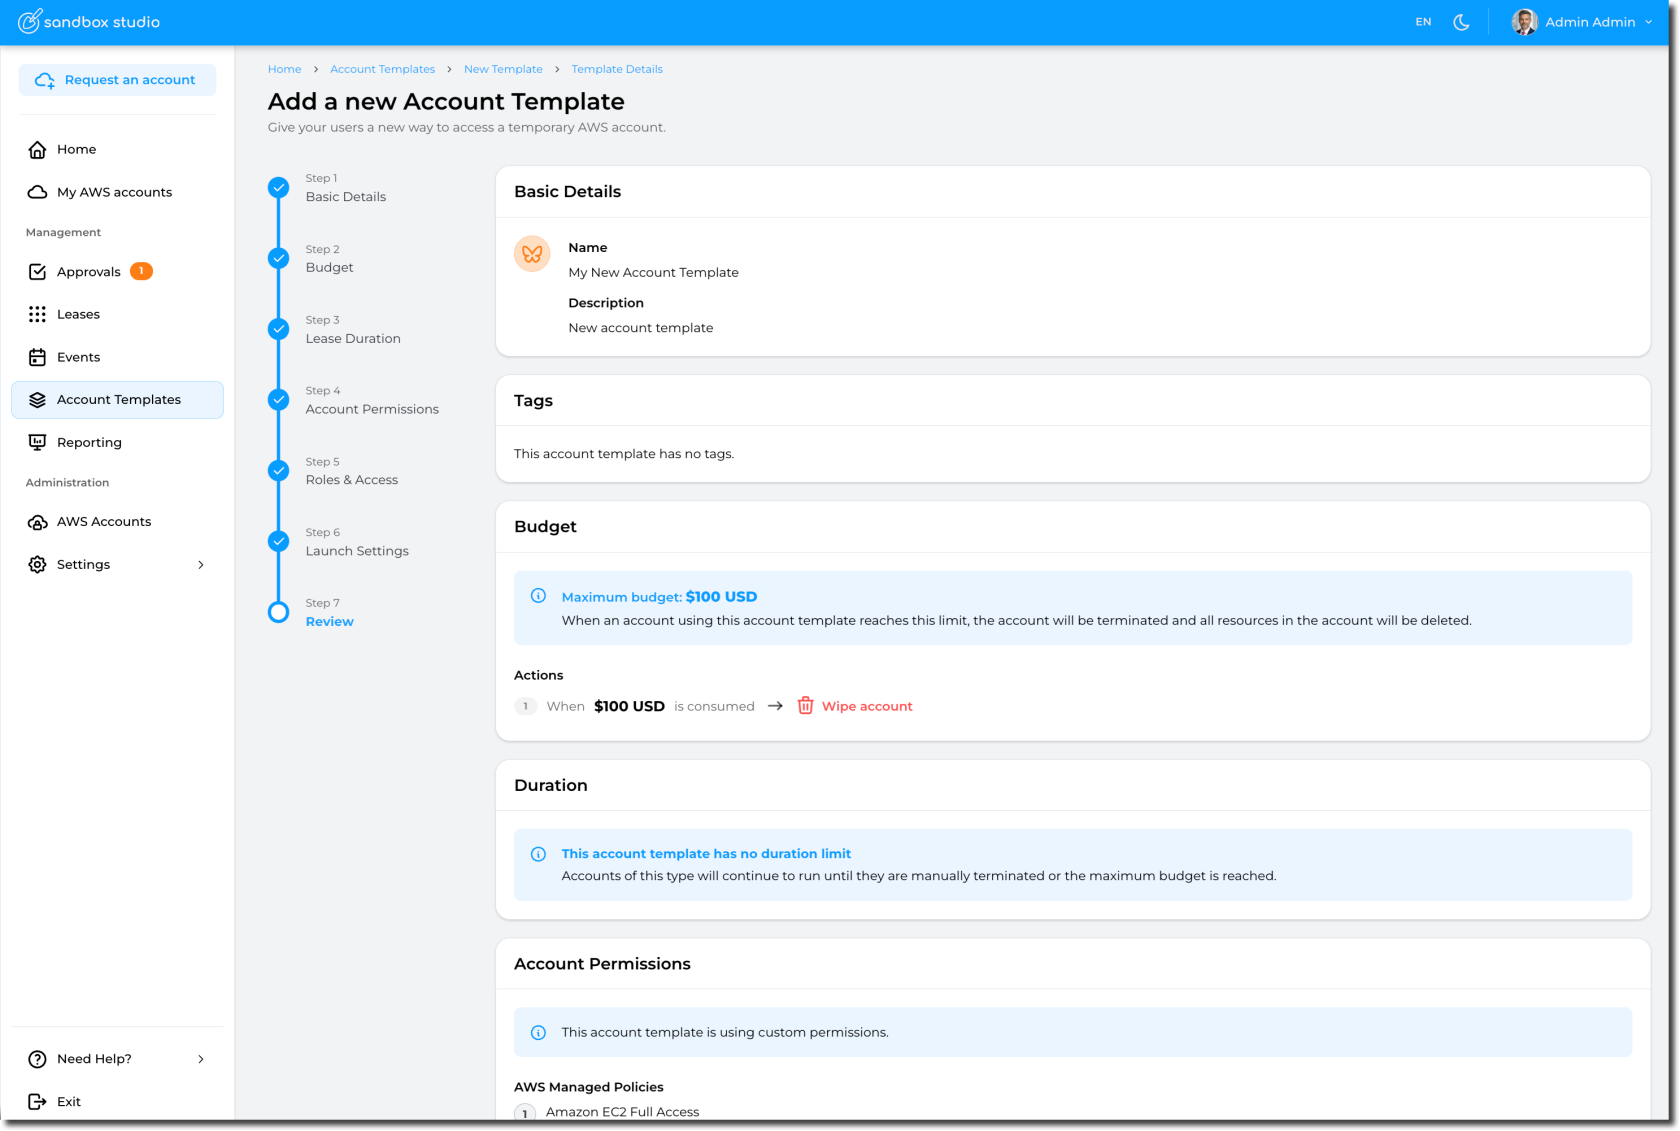](https://docs.sandboxstudiosoftware.com/uploads/images/gallery/2026-04/OWQimage.png) The new lease template becomes available immediately: [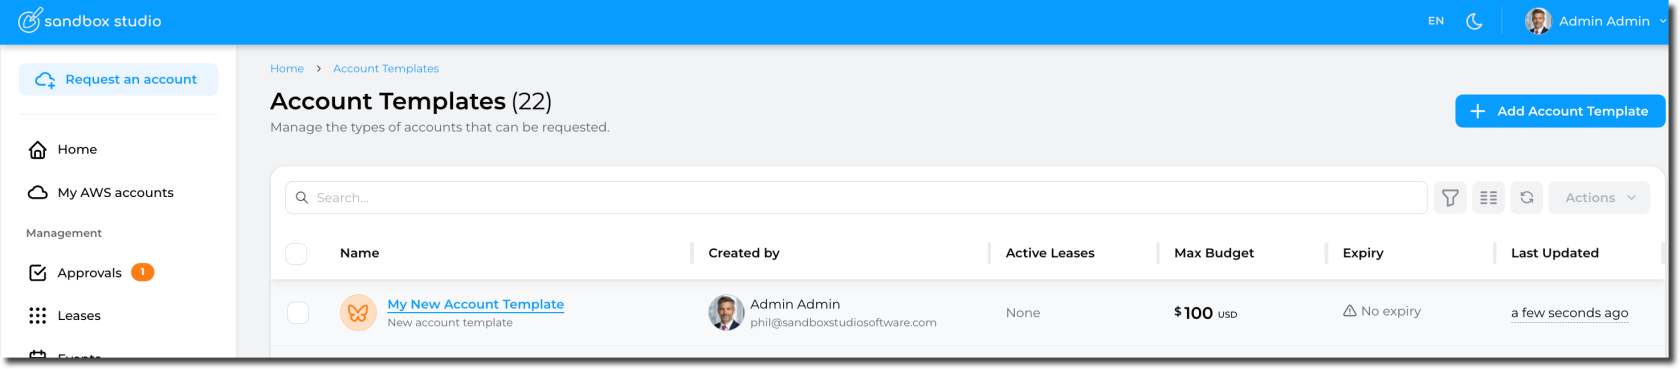](https://docs.sandboxstudiosoftware.com/uploads/images/gallery/2026-04/6Ofimage.png) And end users can start using it: [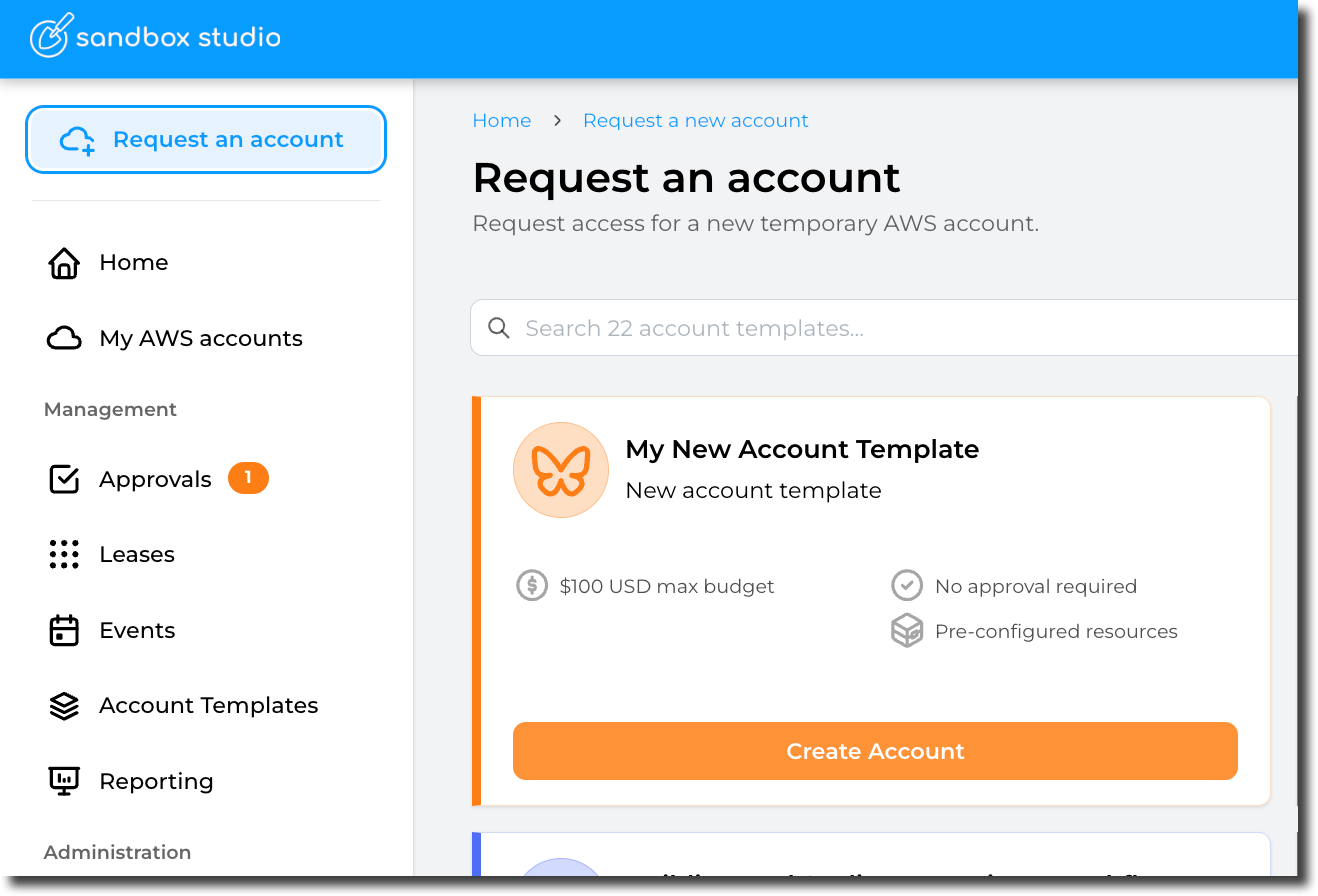](https://docs.sandboxstudiosoftware.com/uploads/images/gallery/2026-04/J9aimage.png) # Update Account templates To update an account template, go to "Account Templates" and open the template you want to modify: [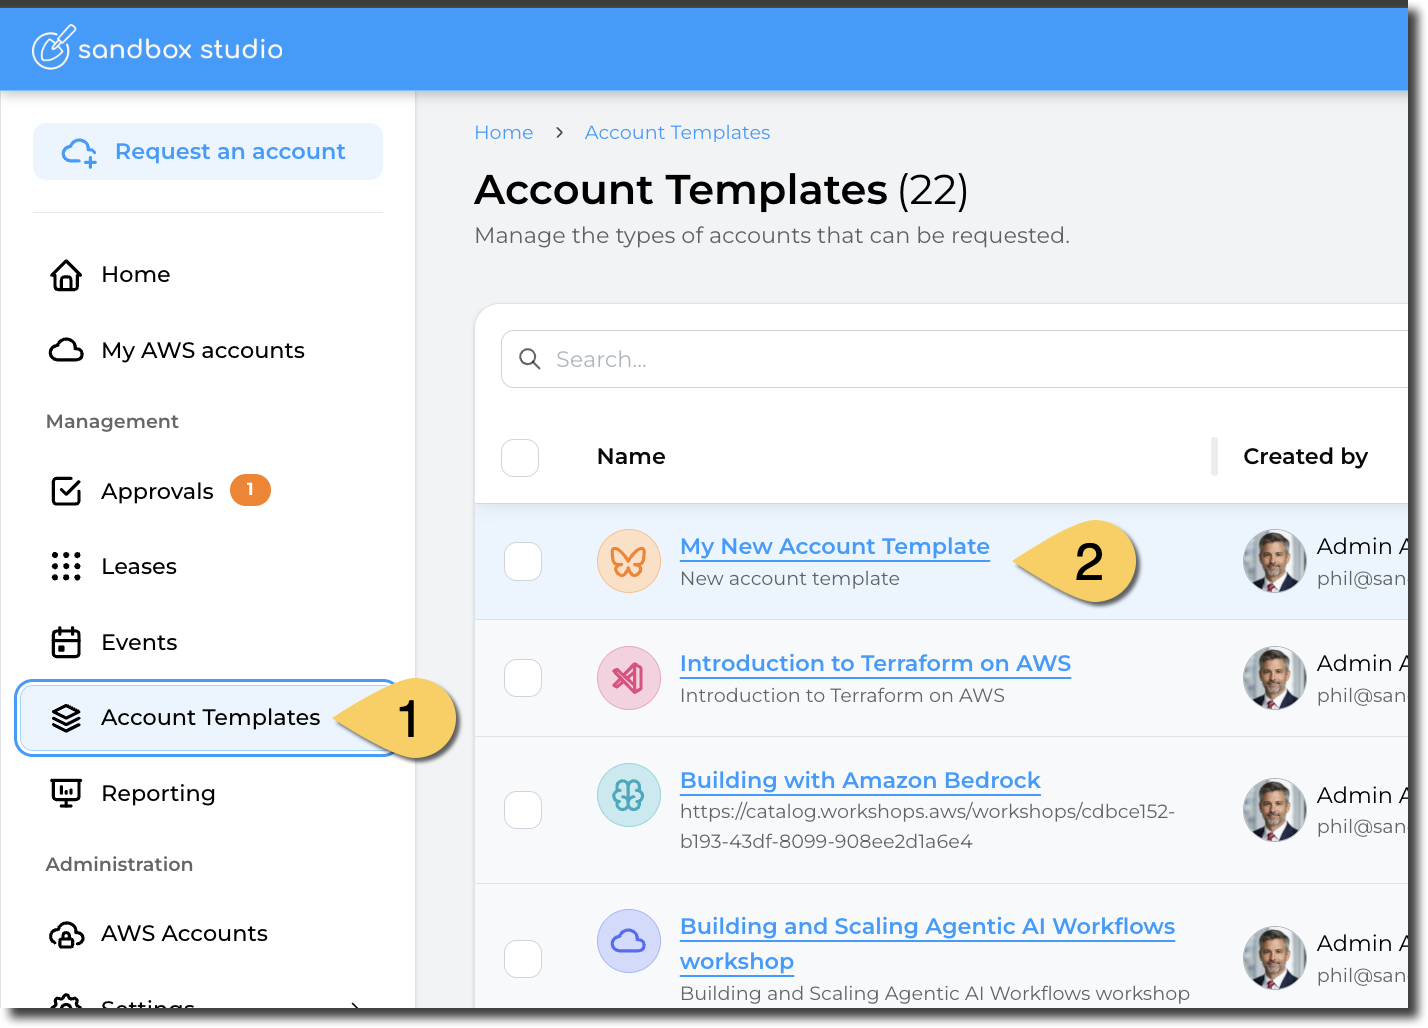](https://docs.sandboxstudiosoftware.com/uploads/images/gallery/2026-04/s15image.png) Then edit any of the fields you want to update: [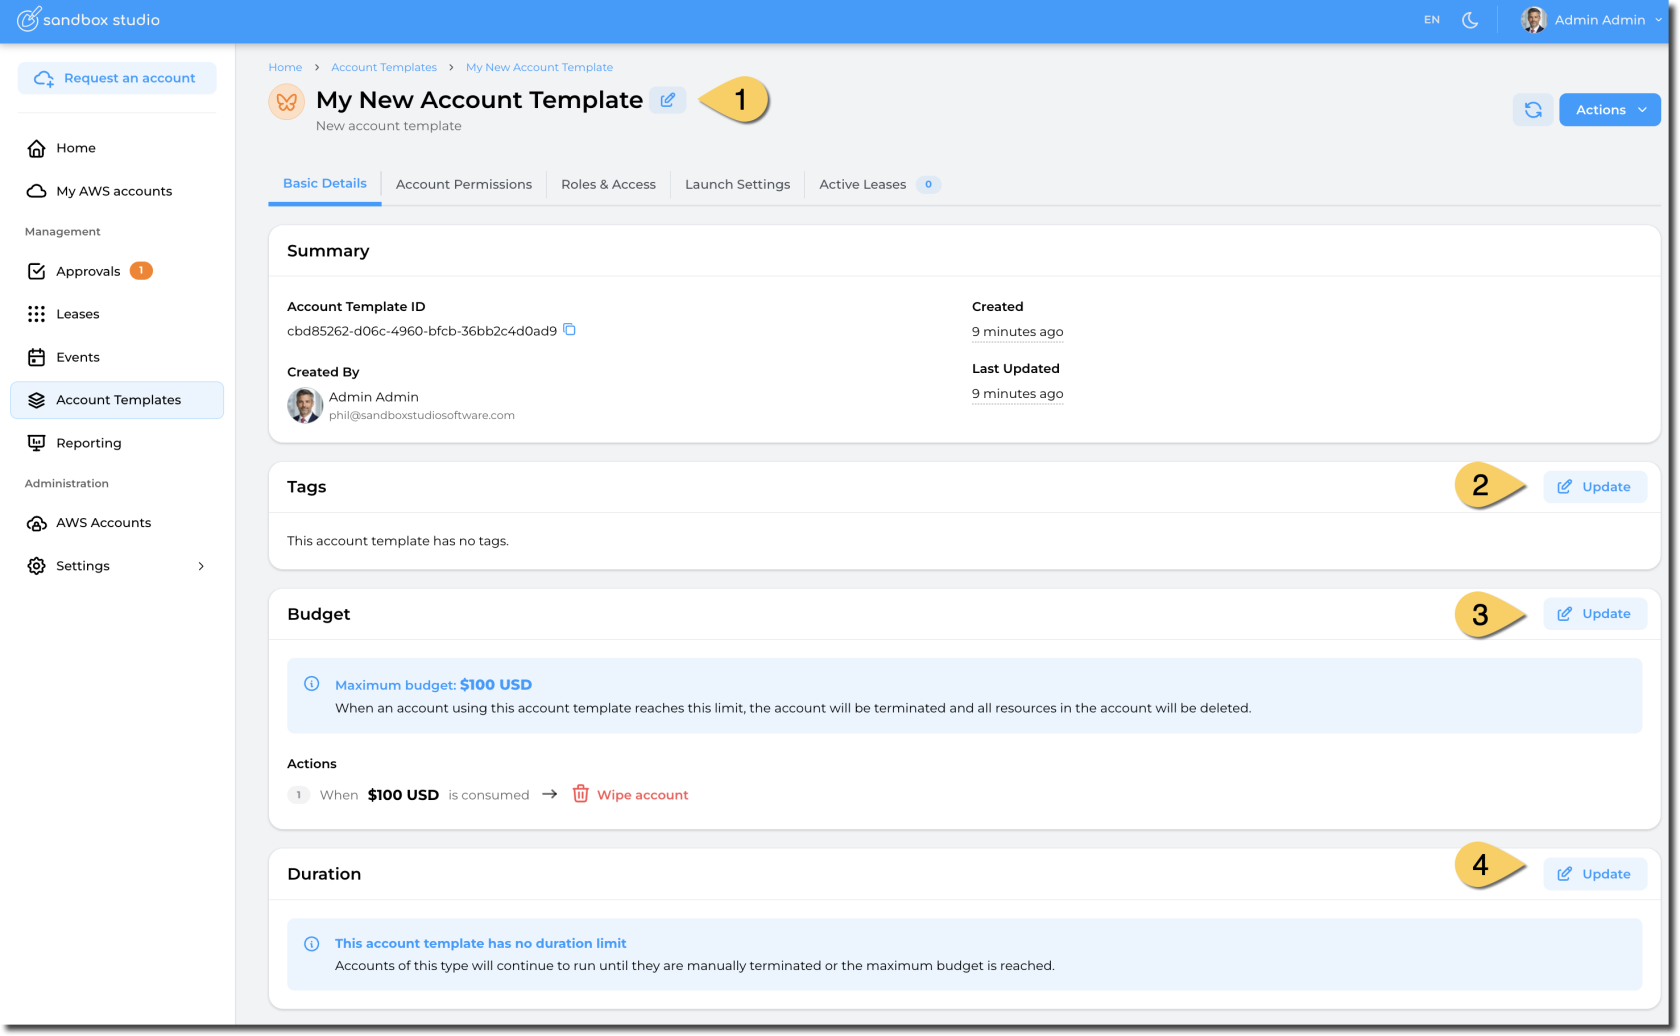](https://docs.sandboxstudiosoftware.com/uploads/images/gallery/2026-04/B4bimage.png) # Duplicate Account Templates To duplicate an account template, go to "Account Templates" and open the template you want to duplicate: [](https://docs.sandboxstudiosoftware.com/uploads/images/gallery/2026-04/s15image.png) Click on the "Actions" button and choose "Duplicate account template": [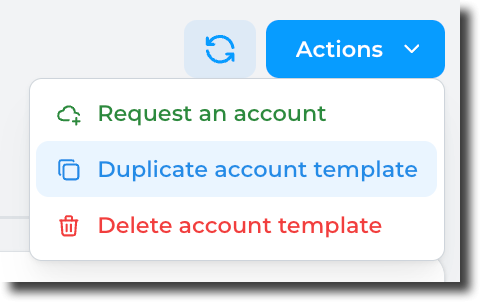](https://docs.sandboxstudiosoftware.com/uploads/images/gallery/2026-04/0jcimage.png) This will redirect you to the Account template creation page with information pre-filled: [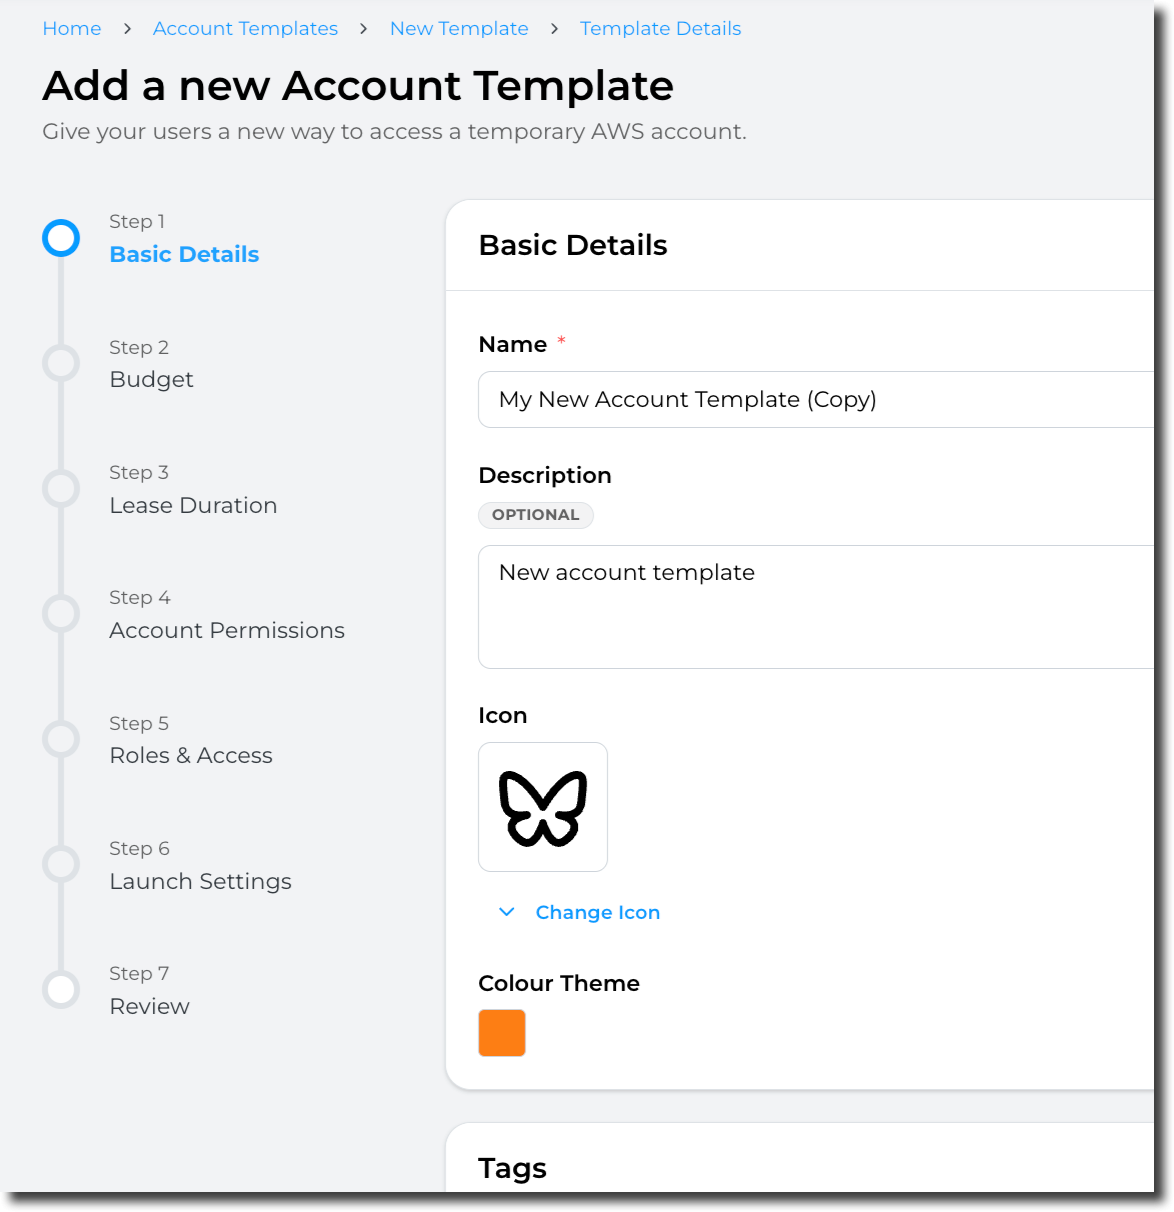](https://docs.sandboxstudiosoftware.com/uploads/images/gallery/2026-04/g7simage.png)