Do not use your root account to run this script as it will fail and does not follow AWS best practices!
#### Prerequisites The wizard will automatically check for [prerequisites](https://docs.sandboxstudiosoftware.com/books/installation-guide/page/installation-prerequisites "Installation Prerequisites"). If any of the prerequisites are not met, the wizard will display the URL to the right documentation to help you configure your environment. See [Installation Prerequisites](https://docs.sandboxstudiosoftware.com/books/installation-guide/page/installation-prerequisites "Installation Prerequisites") page for more details. #### Inputs The installation wizard will ask you to set/confirm a set of input parameters during the installation process:| **Input Variable** | **Description** | **Input or Confirm** | **Comments** |
|---|---|---|---|
| Management Account ID | The AWS account ID of the management account (auto-detected by the script). | Confirm | During setup, you will be asked to confirm that you are indeed using the correct **organisation management account**. This ensures Sandbox Studio can set up organisation units and Service Control Policies. |
| Region | AWS region where Sandbox Studio will be deployed. | Confirm / Input | The script attempts to detect the region from AWS CLI config. If not found, you will be prompted to input one (default `us-east-1`). |
| Hub Account ID | The account ID that will host Sandbox Studio infrastructure (may be same as management account). | Input | Must be a 12-digit AWS account ID. If left empty, the management account ID will be used. See [Choosing the hub account](https://docs.sandboxstudiosoftware.com/books/installation-guide/page/choosing-the-hub-account "Choosing the hub account"). |
| Parent OU ID | AWS Organisation Unit ID where Sandbox Studio OUs will be created. | Input | Defaults to the **Root OU ID**, but can be set to any valid parent OU so that Sandbox Studio's OU are created under that OU and inherit existing SCP's if required. |
| Namespace | Short prefix (3–8 alphanumeric characters) used to name Sandbox Studio resources. | Input | Example: `MySs`. Used as a unique identifier in stack names and IAM groups. |
| Managed Regions | List of AWS regions where Sandbox Studio should manage accounts/resources. | Input | Comma-separated values (e.g., `us-east-1,eu-west-1`). Defaults to the chosen region. See [Choosing your region(s)](https://docs.sandboxstudiosoftware.com/books/installation-guide/page/choosing-your-regions "Choosing your region(s)"). |
| Admin Group Name | IAM Identity Center group name for Sandbox Studio administrators. | Input | Defaults to ` |
| Manager Group Name | IAM Identity Center group name for Sandbox Studio managers. | Input | Defaults to ` |
| User Group Name | IAM Identity Center group name for Sandbox Studio end users. | Input | Defaults to ` |
| Identity Center Instance | The IAM Identity Center instance ARN and Identity Store ID used for Sandbox Studio integration. | Confirm | The wizard will list the detected Identity Center instance and ask you to confirm it is the correct one. |
| Custom Application in Identity Center | The SAML 2.0 application used by Sandbox Studio for authentication. | Confirm / Input | You can either select an existing Identity Center application or the wizard will help you create a new one. |
| Allowed IP Ranges | CIDR ranges of IP addresses allowed to access the Sandbox Studio API. | Input | Defaults to all IPs (`0.0.0.0/1,128.0.0.0/1`). Restrict to corporate ranges if needed. |
| Custom Domain | (Optional) A DNS domain for Sandbox Studio instead of the CloudFront URL. | Input | If used, must configure CloudFront and ACM with this domain, and update Identity Center ACS URL accordingly. |
| Email From Address | Email address Sandbox Studio will use to send system notifications. | Input | Must be a verified identity in SES. Example: `sandboxstudio@example.com`. |
| Admin Users | Initial set of users (by username) to be added to the Admin group in Identity Center. | Input | You will be prompted to enter usernames to grant them full Sandbox Studio admin rights. |
Make sure your session timeout is at least 2 hours for during the installation of Sandbox Studio.
# Update Sandbox Studio ##### Updating Made Simple Updating Sandbox Studio is easier than ever. The update process uses the same [installation script ](https://docs.sandboxstudiosoftware.com/link/89#bkmrk-page-title)you used for the initial setup, making it straightforward and familiar. ##### How It Works When you run the installation script on a environment with an existing Sandbox Studio installation, the script automatically: 1. **Detects** the previous installation 2. **Gathers** all required configuration information from your current setup 3. **Presents** a summary of what will be updated 4. **Asks for confirmation** before proceeding ##### ##### Running the wizard 1. Login to your AWS **Organisation Management account**. 2. Open a new [CloudShell](https://aws.amazon.com/cloudshell/) console (a link to open CloudShell can be found in the bottom left corner of the AWS console). 3. Ensure you are in the region where you want to install Sandbox Studio. 4. Run the following command: ```bash bash <(curl -s https://dist.sandboxstudiosoftware.com/install.sh) ``` 1. The following should display: [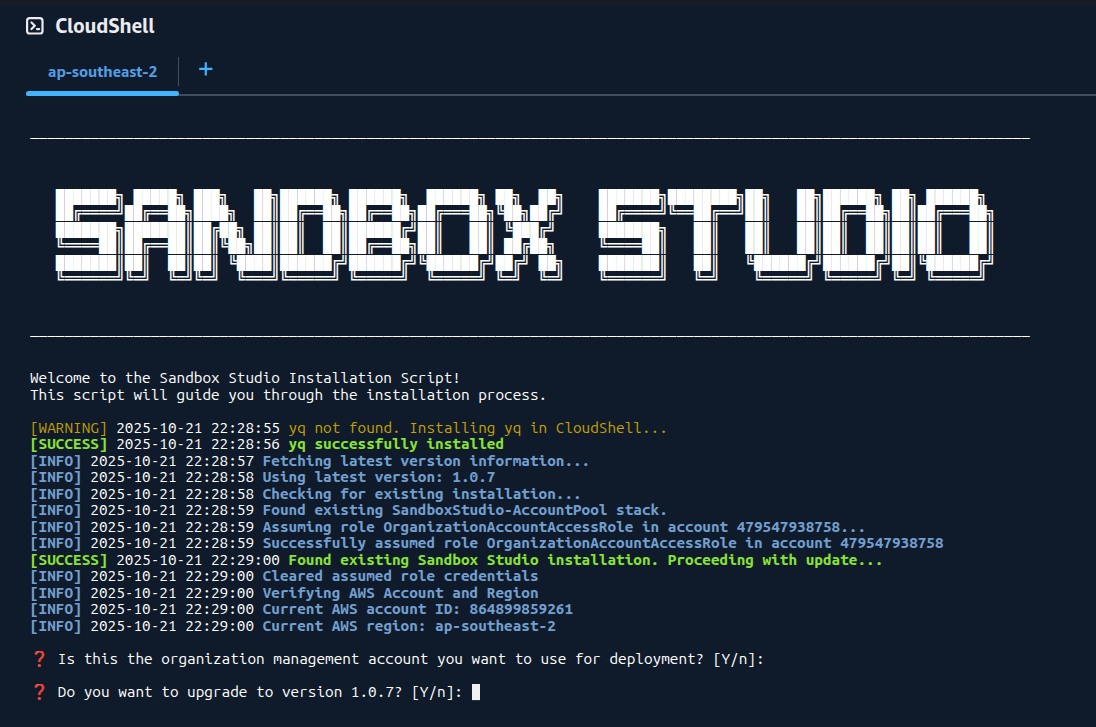](https://docs.sandboxstudiosoftware.com/uploads/images/gallery/2025-10/3CHimage.png) ##### Confirm existing values The script will display your current installation details and the updates available. Review this information carefully to ensure everything is correct. [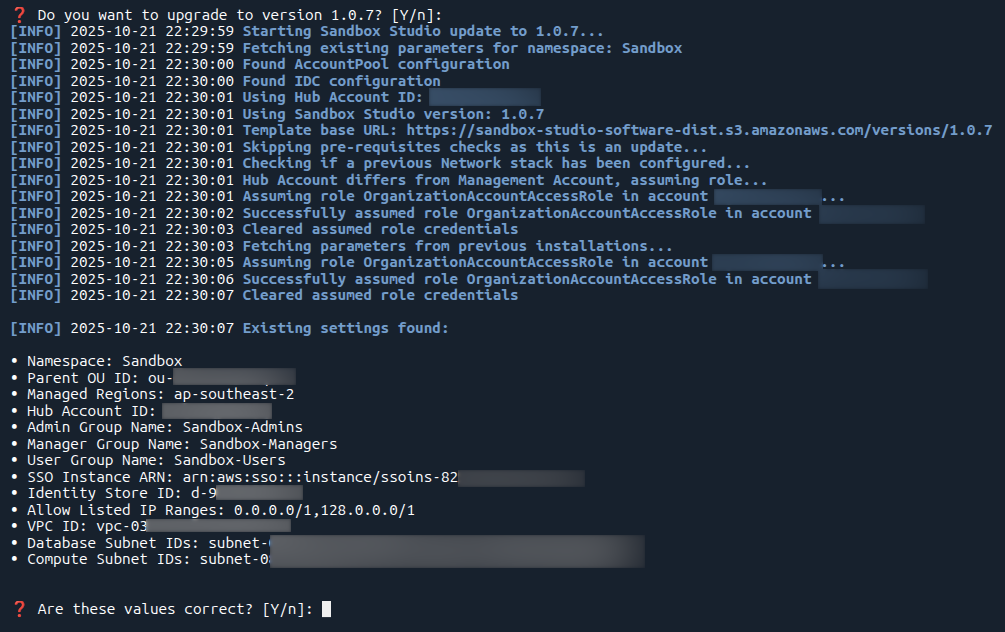](https://docs.sandboxstudiosoftware.com/uploads/images/gallery/2025-10/57Oimage.png) ##### Select Stacks to Update You'll be presented with a stack-by-stack selection interface. For each stack, you can choose whether to update it or skip it.**Best Practice:** It is highly recommended to update all stacks to ensure compatibility and access to the latest features and security patches.
[](https://docs.sandboxstudiosoftware.com/uploads/images/gallery/2025-10/h3timage.png) #####Note: During update process, the script does not modify your existing configuration (AppConfig), your Identity Center applications, or anything else than the CloudFormation stacks for Sandbox Studio. You can force a reinstall of the solution by adding the flag **--reinstall true** to the installation script
##### ##### Support If you encounter any issues during the update process, please contact your Sandbox Studio support team at