Administrator Guide
As an Administrator, you are responsible for configuring and maintaining Sandbox Studio for your organisation. This includes setting global policies such as global maximum budget thresholds and cleanup policies. You will also manage integration with AWS, set up permissions and guardrails, and provision new sandbox accounts when required.
Beyond initial setup, you’ll regularly monitor account activity, review system alerts, and ensure the platform remains secure, compliant, and cost-effective. This guide will walk you through the key administrative tasks, from first-time configuration to ongoing monitoring and troubleshooting.
- Home Page
- AWS Accounts
- Settings
- Monitoring the solution
- Troubleshooting & Support
- Maintenance
- Updating the solution
- UI Customisation
Home Page
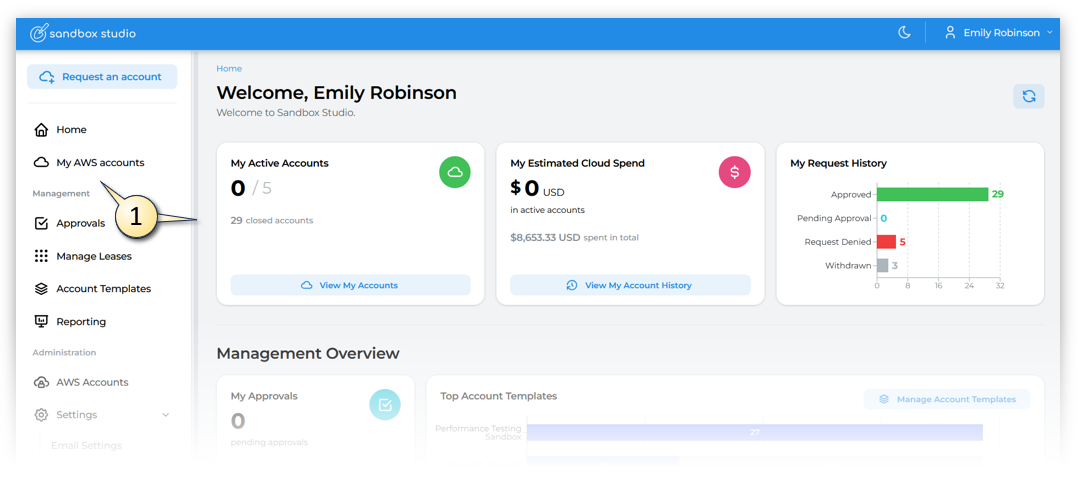
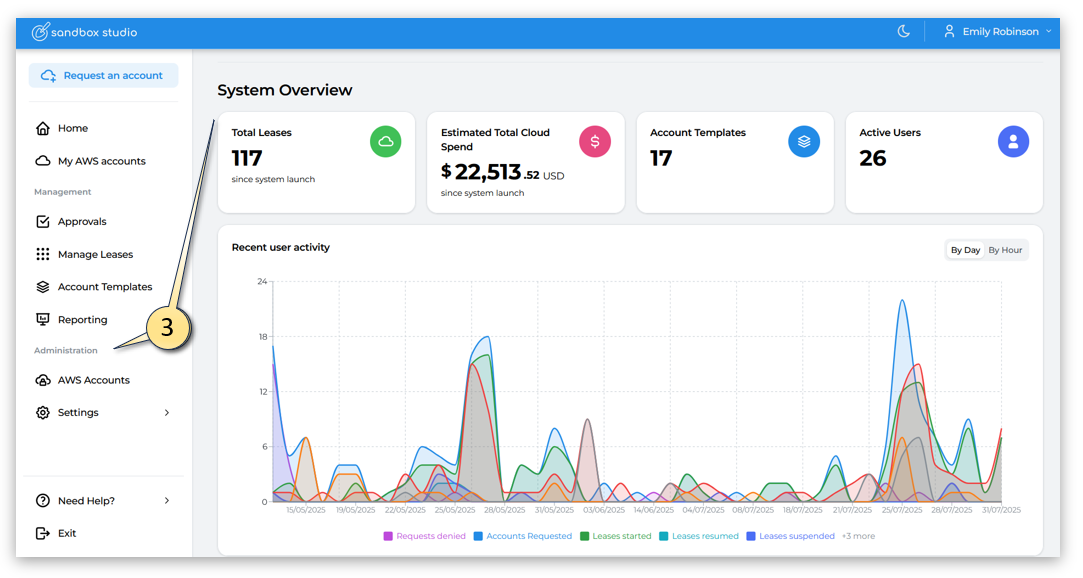
After logging into the Sandbox Studio UI, as an Administrator, you will land on your Administrator's Home page.
As a Sandbox Studio Administrator, you have the capability of requesting and accessing AWS Accounts yourself, overseeing the end user accounts as a manager would, as well as the global overview of your entire AWS Sandbox environment.
Therefore the Administrator's homepage is divided into three sections, both on the main page and the left menu:
- one providing insights of your personal My AWS accounts (1). As the functionality of accessing your own accounts is identical to how End Users would experience it, if you want to know more about how to access and manage your own AWS Accounts, see the User Guide.
- and the second offering a Management Overview summarizing the usage status of all your end users & Management functions from the left menu (2). As the functionality of managing users is identical to how Managers would experience it, if you want to know more about how to manage users, see the Managers Guide.
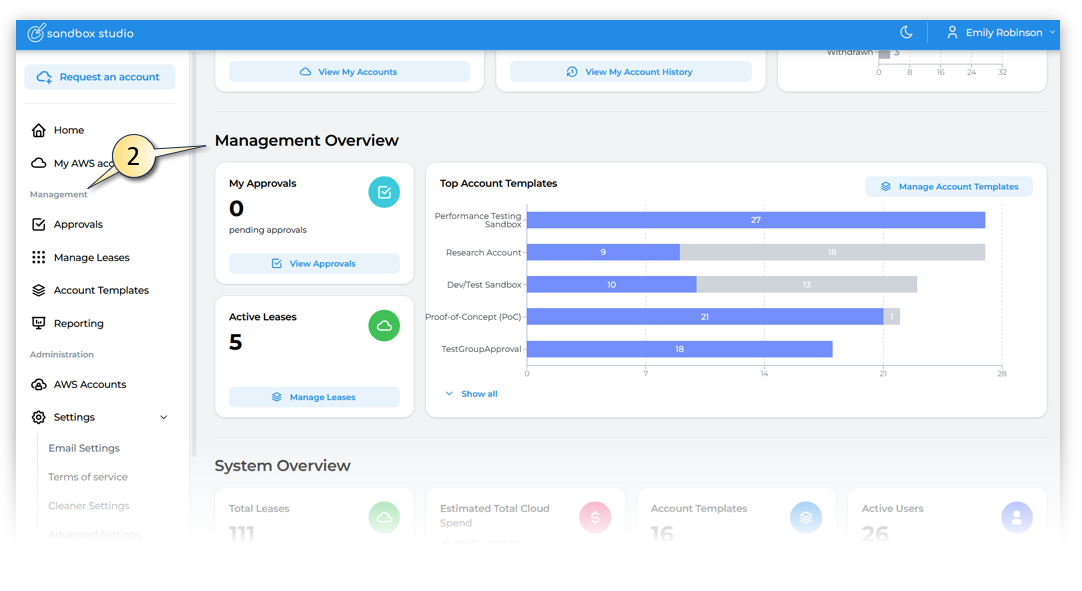
- and the last section providing insights on your entire Sandbox environment and Administration functions from the left menu. (3)
The rest of this Administrators Guide, will focus on features specific to Administrators.
It is really important to monitor the duration and budget on all of your own and your users accounts. If they reach their thresholds , the accounts will (depending how your Sandbox Studio environment is setup) terminate and delete everything in that account. So if what you or your users are working on is important, closely monitor the thresholds and/or move the account out of the sandbox environment into a production environment. Users can request an account extension from their manager or administrator.
AWS Accounts
AWS Accounts
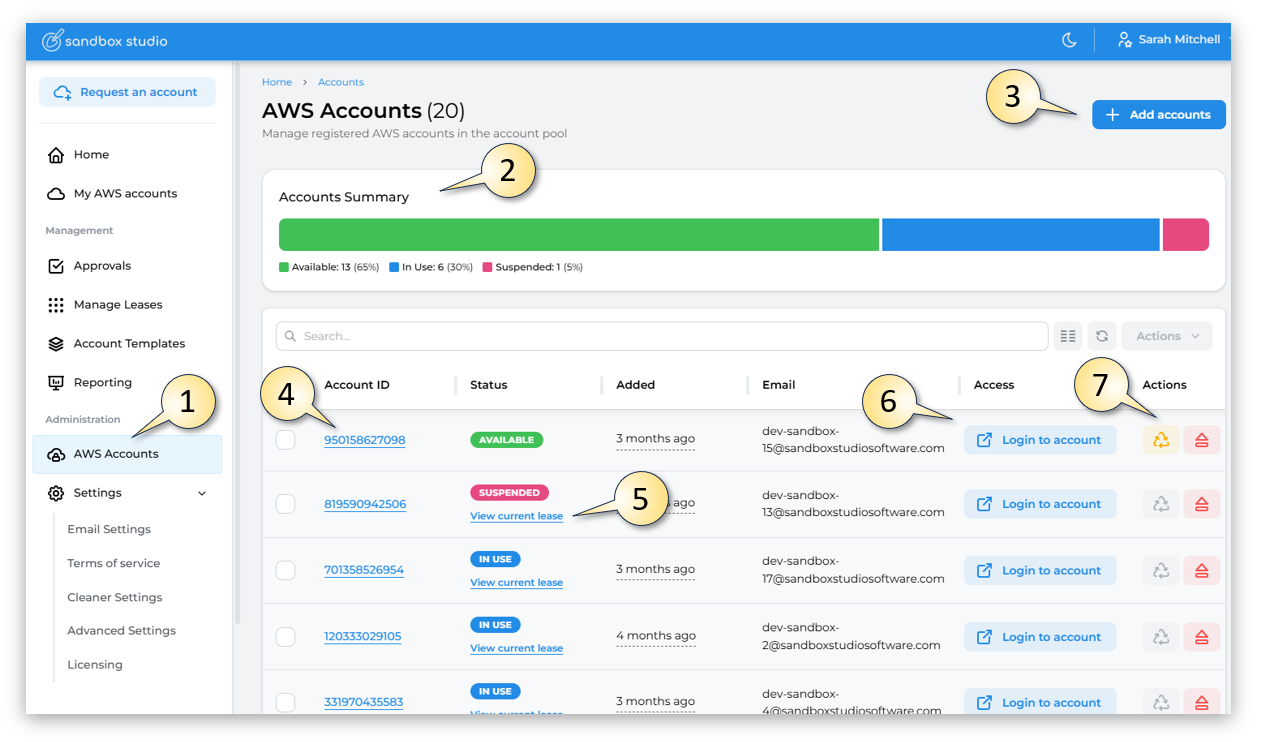
As an Administrator, by clicking on the AWS Accounts (1) link in the Administrator section of the left menu, the Administrator can access the Accounts Summary page.
- On this page the Administrator can see an Accounts Summary (2) of how many accounts are in the accounts pool and how many of those accounts are in use.
- The Administrator can add accounts to the Account pool (3)
- Can drill into the account details, by clicking on the Account ID (4)
- Can view the leased currently associated with the Account - by clicking on the View current lease (5) link
- Can log into the AWS account, by clicking on the Login to account (6) button
- Can change the status of the account by forcing it into Clean up or Eject the account (7)
 Account Sumary
Let's look at some of these in more detail.
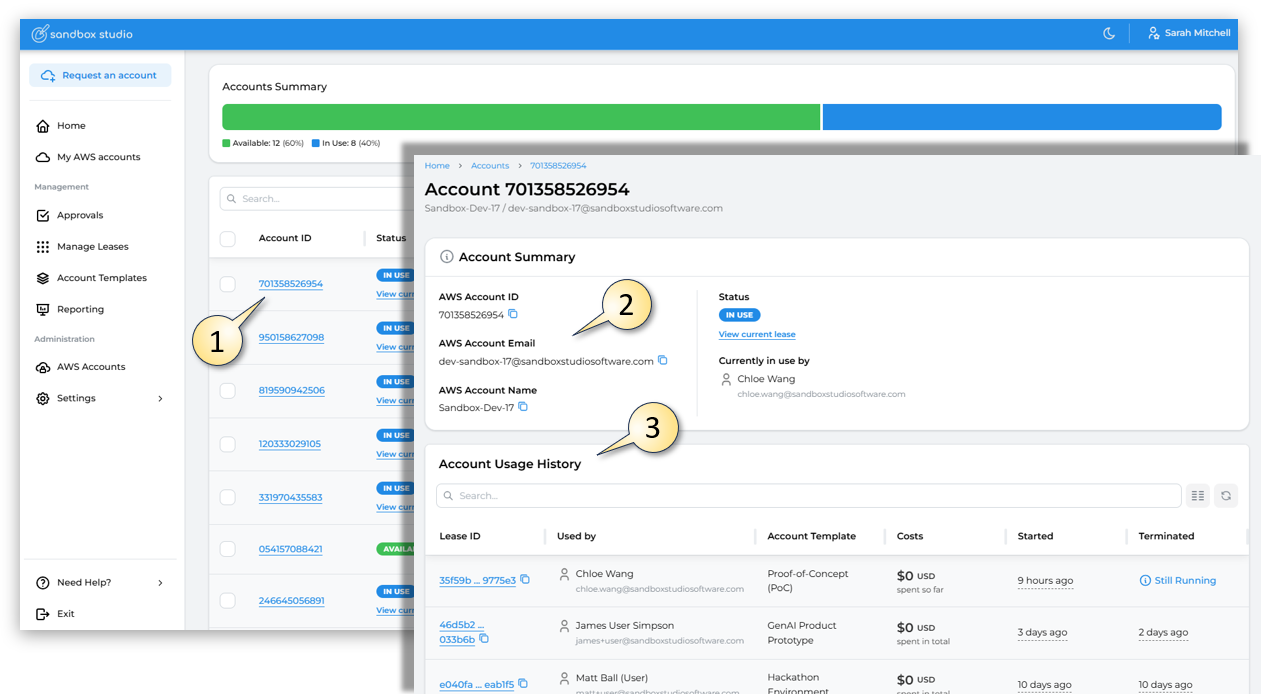
By clicking on the Account ID (1), this provides more details on the AWS Account itself, including the account email and account name (2) as well as the Account Usage History (3) of which user / account template was associated with this AWS Account in the past.
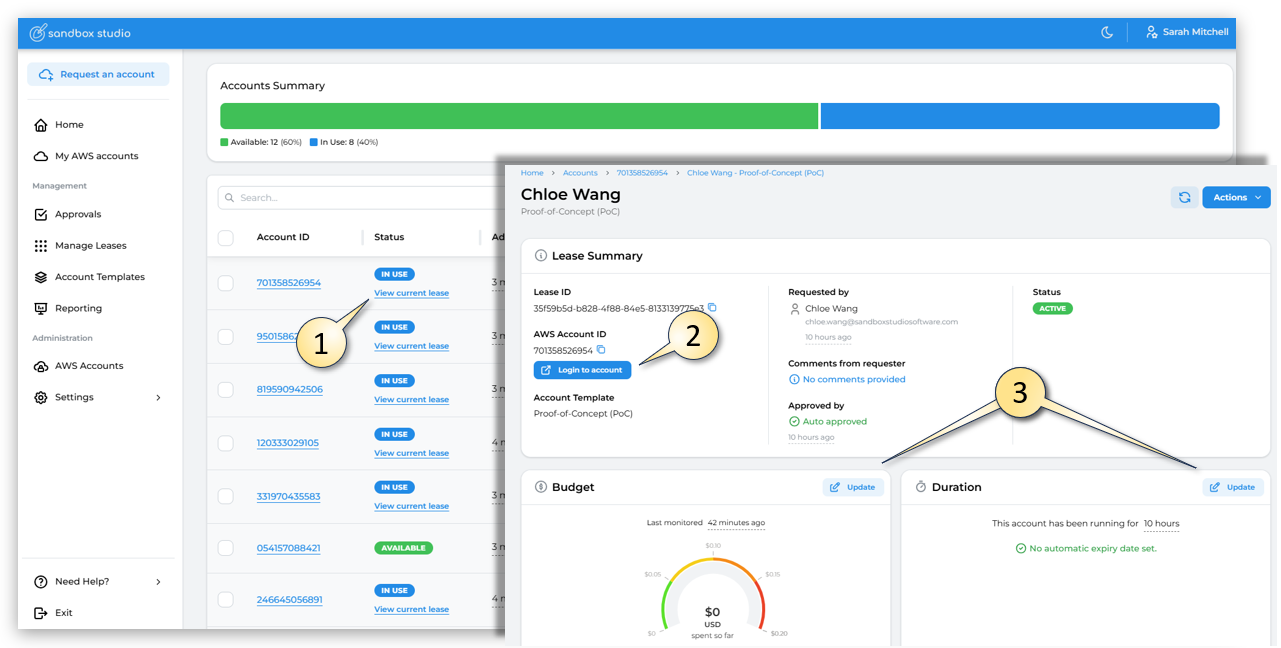
By clicking on the View current lease (1), link, this provides more details on the Lease associated with the AWS Account. From this page, the Administrator can do various things including Login to the account (2) and Update (3) (change) the Budget or Duration of the lease.
Settings
This section will cover details of the settings and configuration capabilities for Administrators
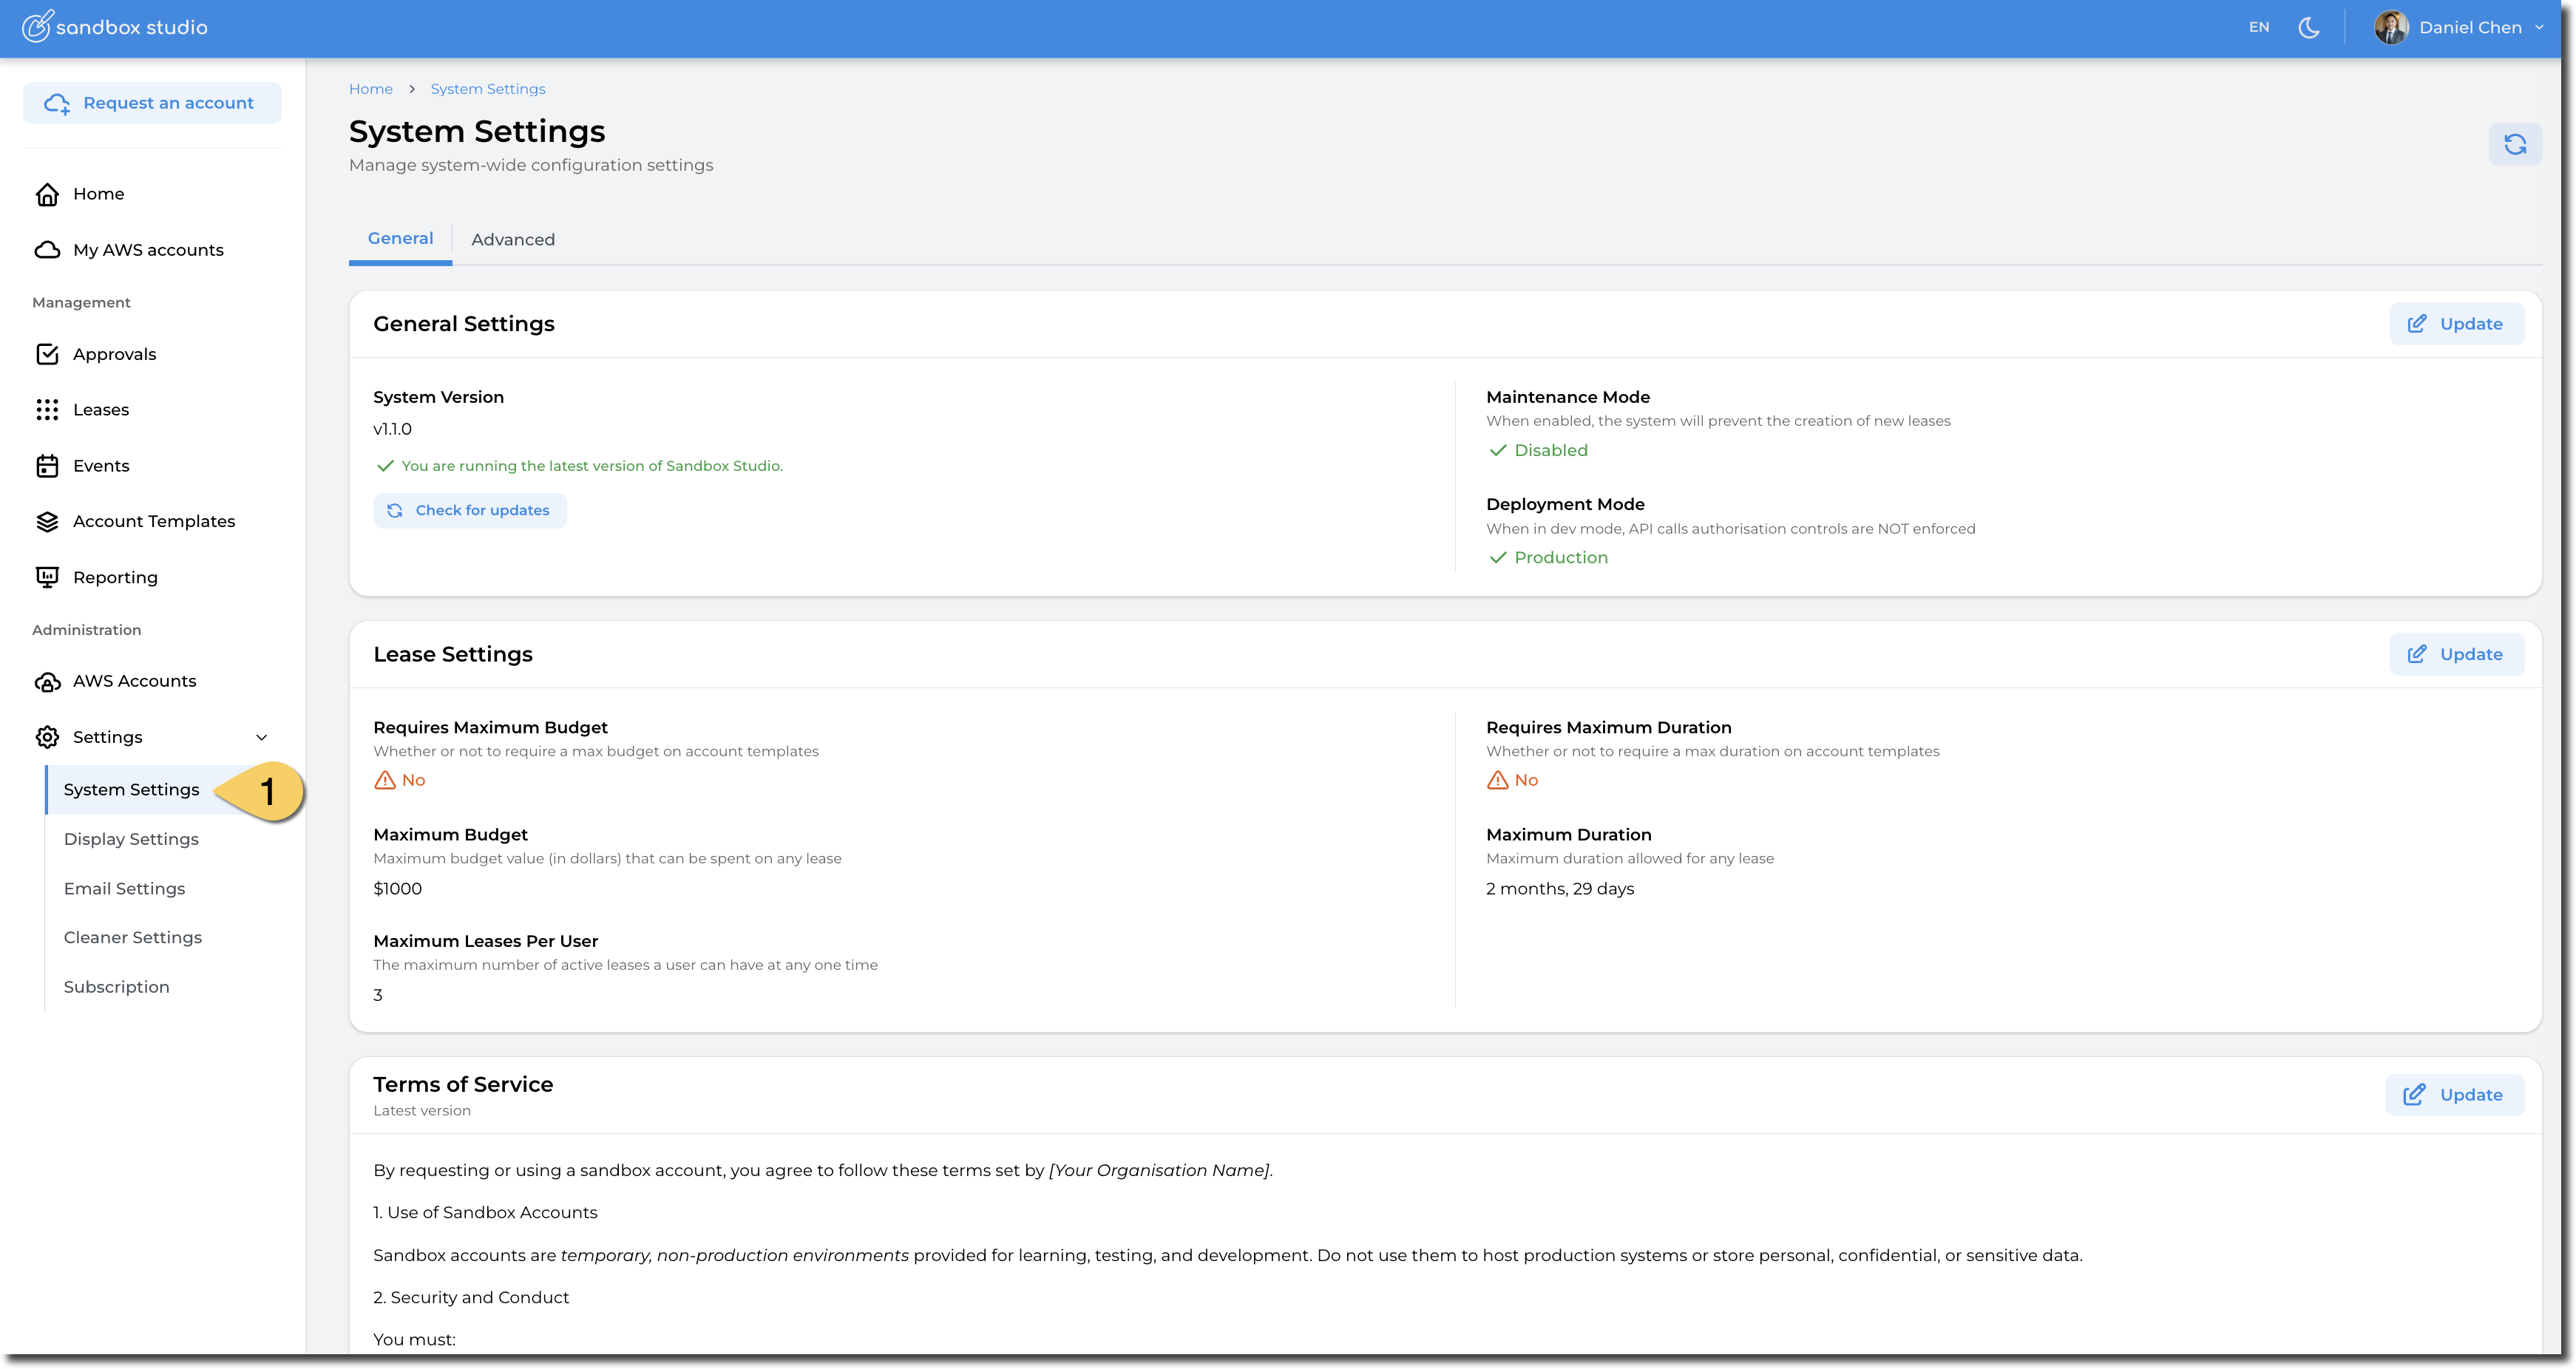
System Settings
The Administrator has access to a wide range of advanced settings from the System Settings (1) menu on the left hand menu. This page will detail each of the following sections:
- General Settings
- Lease Settings
- Terms of Service
- Advanced > Authentication Settings
- Advanced > Account Monitoring
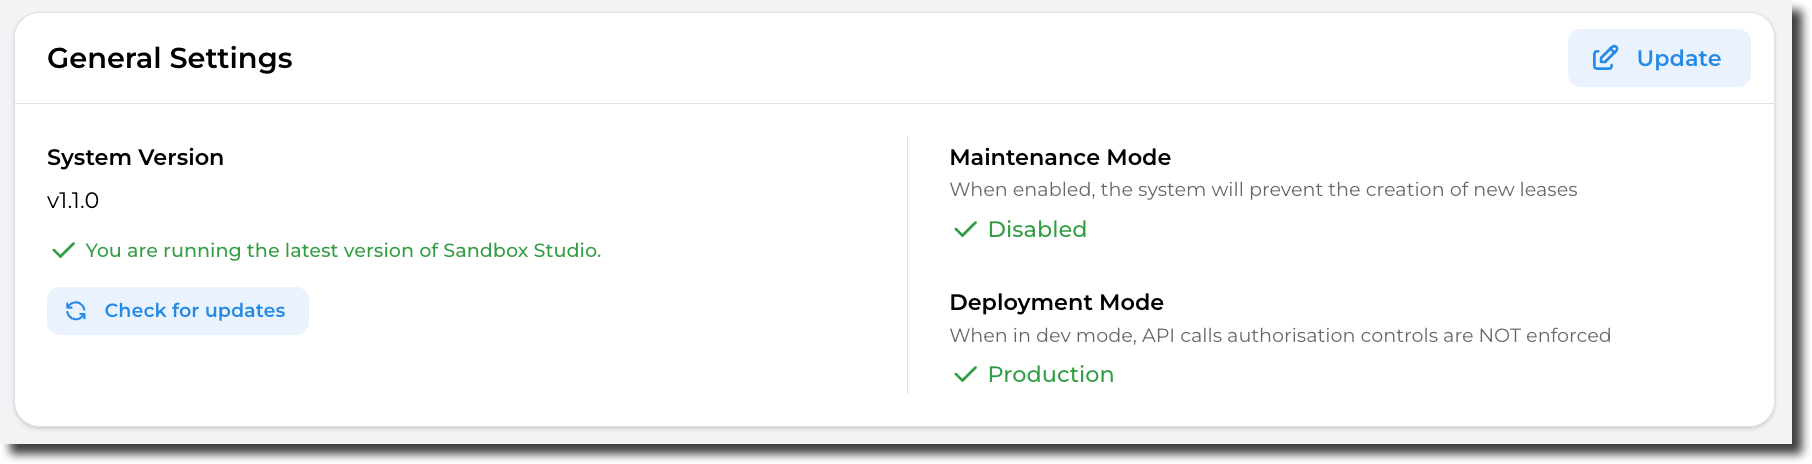
General Settings
In the General Settings section, the Administrator can make the following configuration changes by clicking on the Update (1) button :
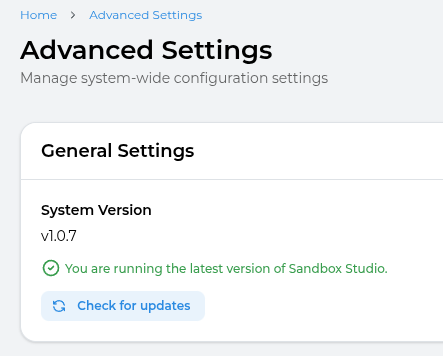
- System Version: Check if the Version of Sandbox Studio they are running is the latest by clicking on the Check for Updates. More details here: Monitor for updates
- Maintenance Mode: Set the application into Maintenance Mode. In maintenance mode, users cannot create leases. This is particularly interesting when you need to update Sandbox Studio for example.
- Deployment Mode: Development or Production. When in development, authorisation on API calls is not enforced.
Unless requested by the Sandox Studio team for support purpose, please avoid changing this value.
Lease Settings
In the Lease Settings section, the Administrator can make the following configuration changes by clicking on the Update (1) button:
- Requires Maximum Budget: If set to Yes, managers or administrators creating an account templates will have to set a maximum budget. In other words, this makes sure manager set a maximum budget when creating an account template.
- Maximum Budget: The maximum budget that an account template can have. Account templates won't be able to have budget higher than this value.
- Maximum Leases Per User: This setting limits the number of active leases a user can have at any point in time.
- Requires Maximum Duration: If set to Yes, managers or administrators creating an account templates will have to set a maximum duration. In other words, this makes sure manager set a maximum duration when creating an account template.
- Maximum Duration: The maximum duration that an account template can have. Account templates won't be able to have duration longer than this value.

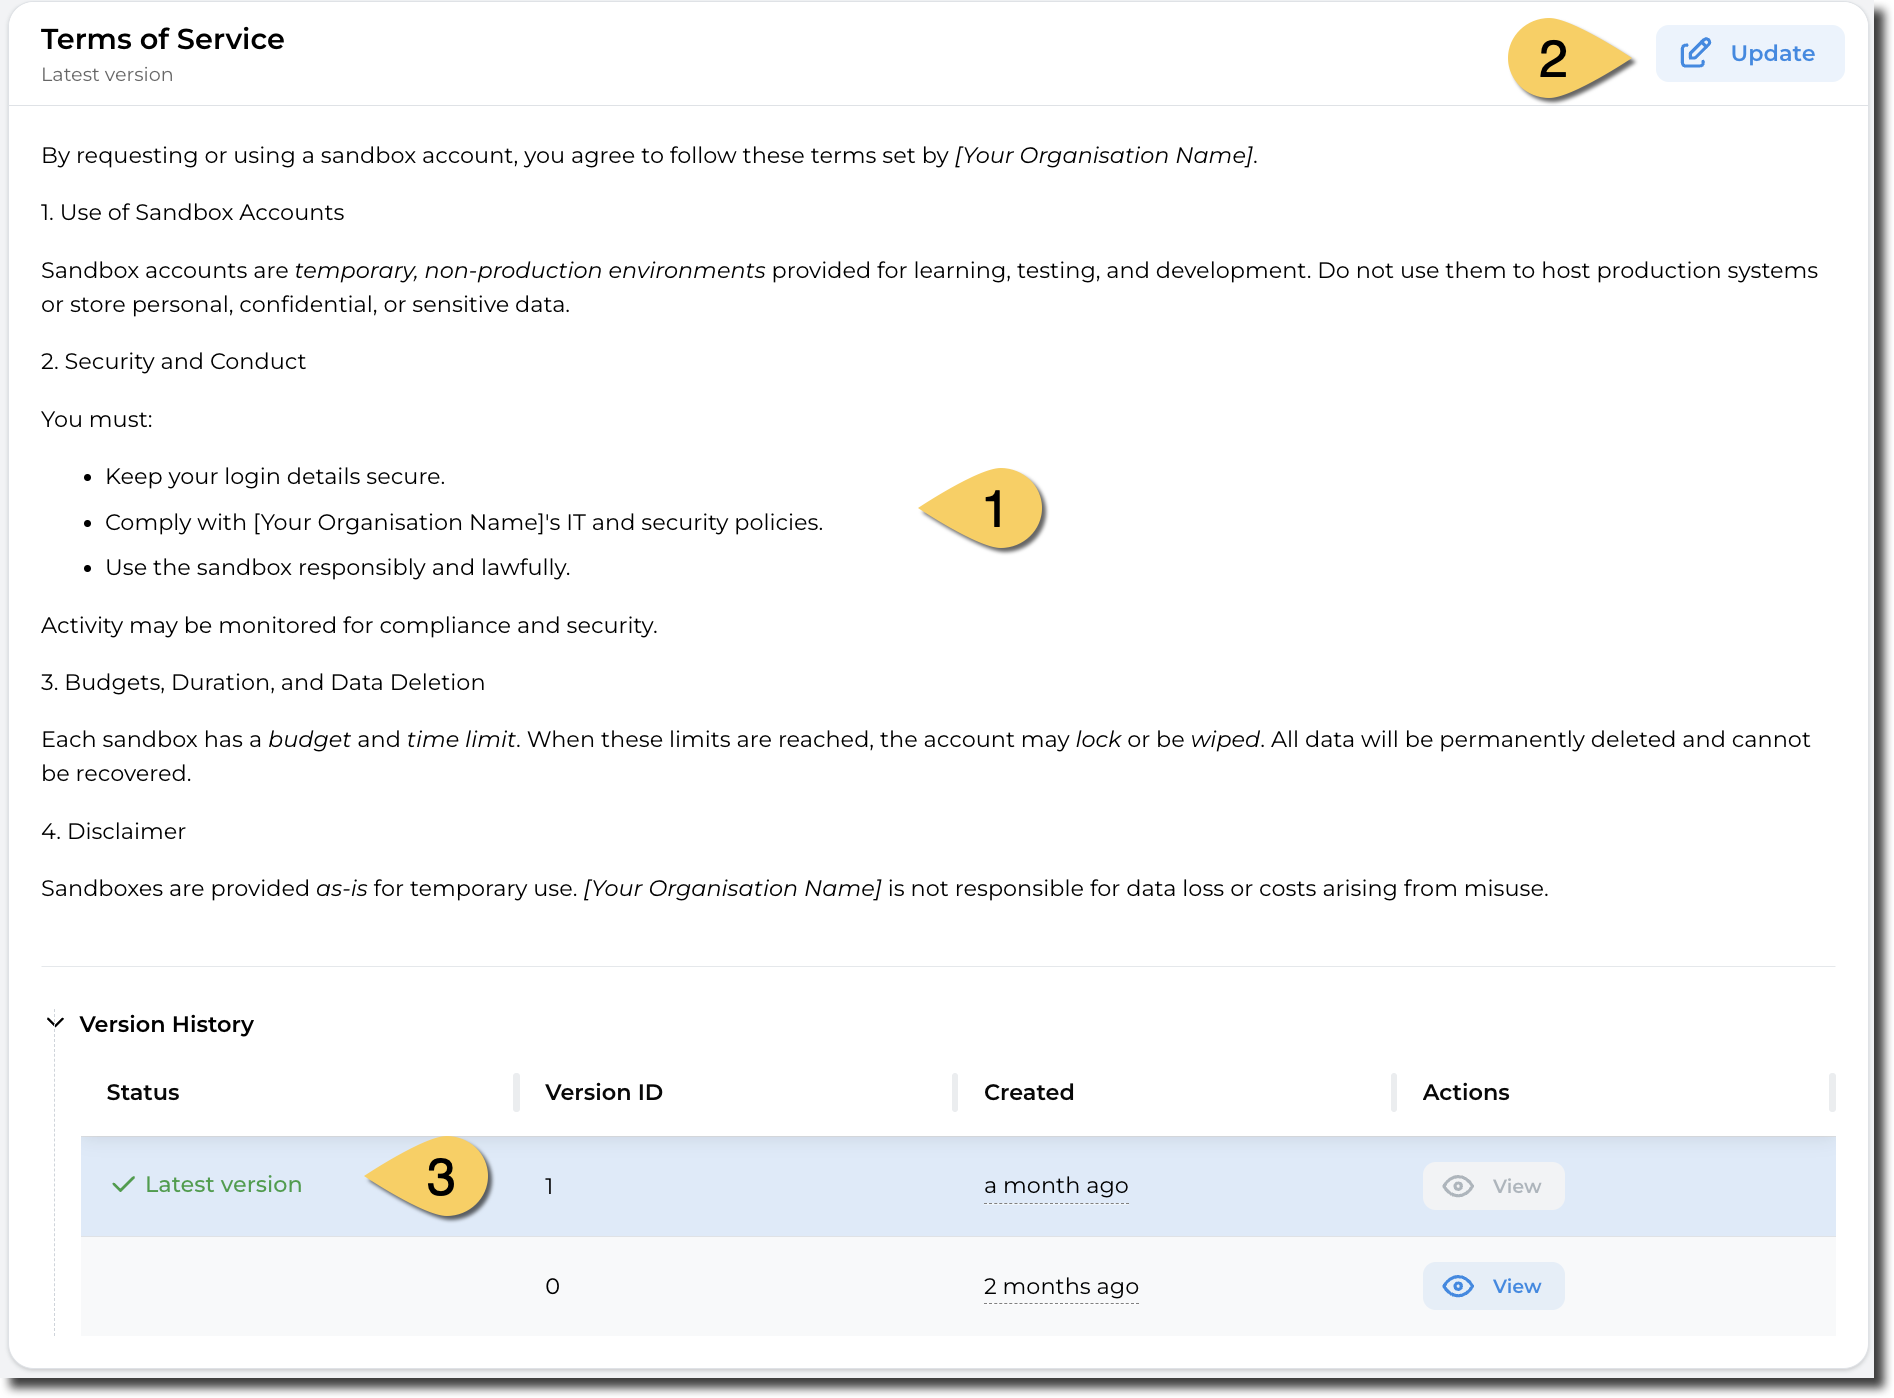
Terms of Service
An Administrator may wish to get the users of their sandbox accounts to agree to certain Terms of Service before they access their sandbox environments. An Administrator is able to edit these Terms of Service and also keep a record of previous versions that users agreed too.
Within the Terms of Service page, the Administrator is able to view (1) the existing terms of service, Edit (2) the terms of service and view the version history (3) of previous versions of Terms of Service.
Authentication Settings
In the Authentication Settings section, the Administrator can make the following configuration changes by clicking on the Update button :
- Web App URL: The URL of the application (defaults to Cloud Front Distribution URL or custom domain)
- AWS Access Portal URL: The AWS Access Portal URL for IAM Identity Center SSO
- Session Duration: The duration of the session in minutes
- IDP Sign In URL: The IDP Sign In URL for IAM Identity Center SSO
- IDP Sign Out URL: The IDP Sign Out URL for IAM Identity Center SSO
- IDP Audience: The IDP Audience Identifier for IAM Identity Center SSO
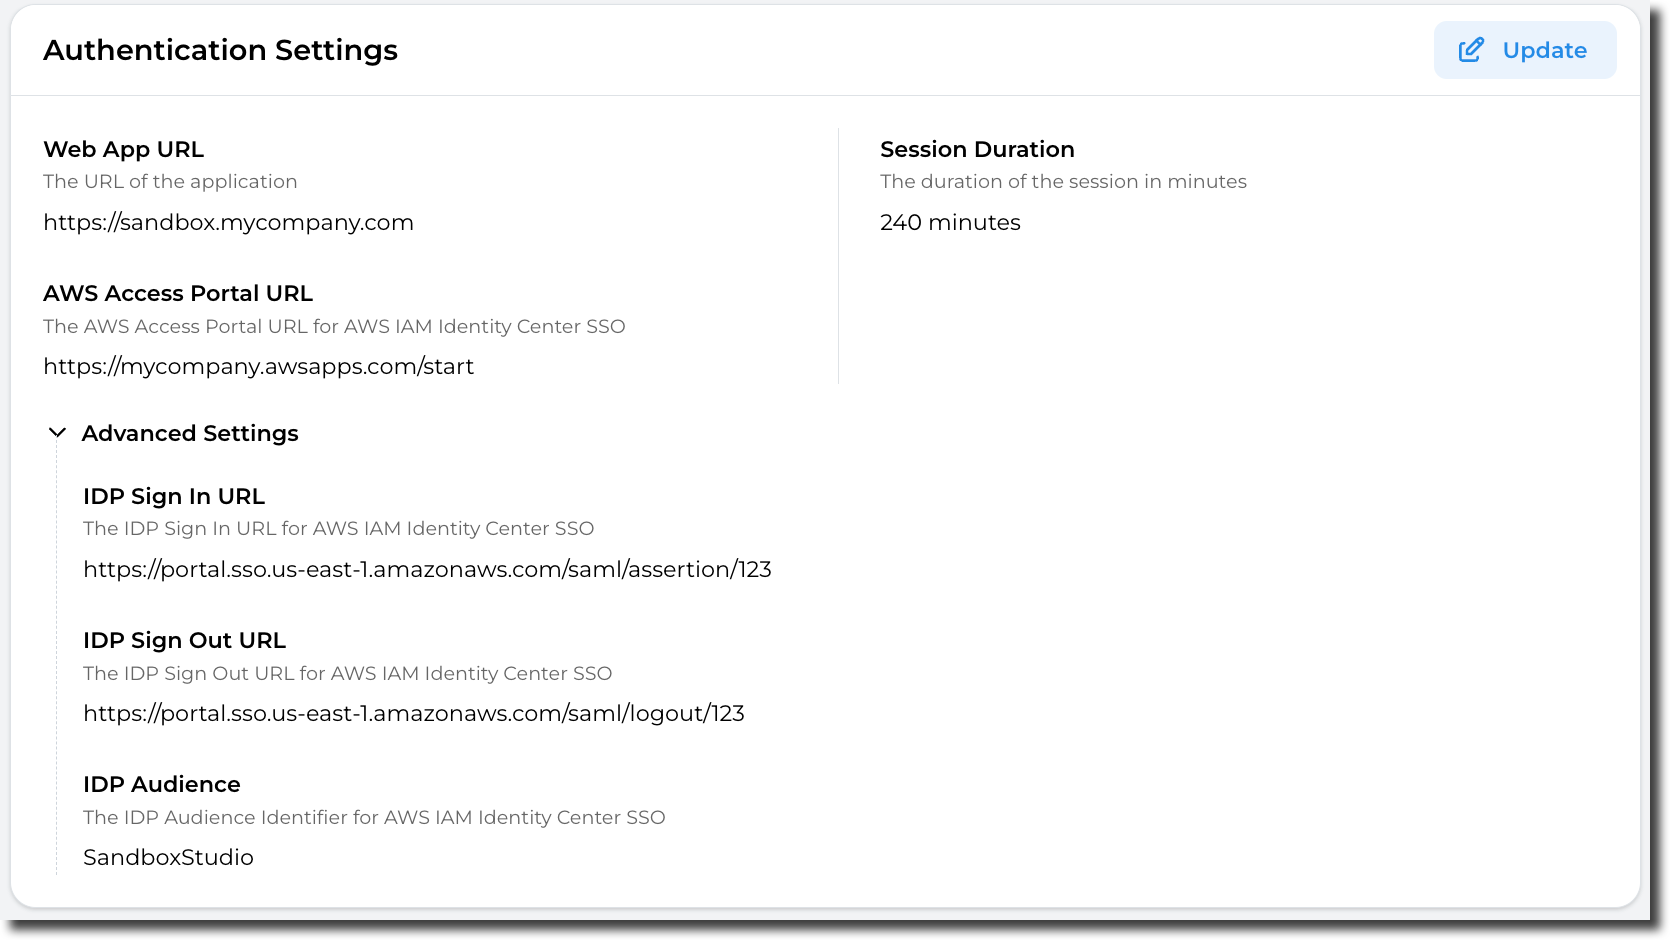
Changing those settings may break your Sandbox Studio installation, please update carefully!
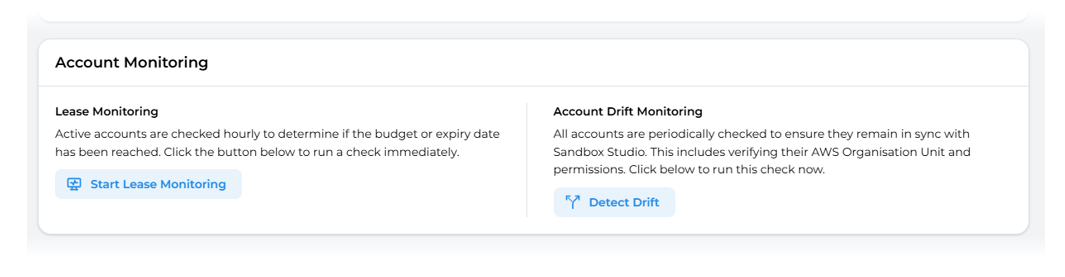
Account Monitoring
In the Account Monitoring section, the Administrator can trigger the following checks manually:
- Lease Monitoring: Active accounts i.e. accounts associated with a lease are checked hourly to determine if the budget or expiry date has been reached. However if you wish to check the current status - you can press the Start Lease Monitoring buttons to run a check immediately.
- Account Drift Monitoring: All AWS accounts are periodically checked to ensure they remain in sync with Sandbox Studio. This includes verifying their AWS Organisation Unit and permissions. Click on the Detect Drift to run this check immediately.
Display Settings
Please refer to UI Customisation for more details about Display Settings.
Email Settings
As an Administrator you have control over what and how notifications are sent. From the left hand menu, select Settings > Email Settings (1):
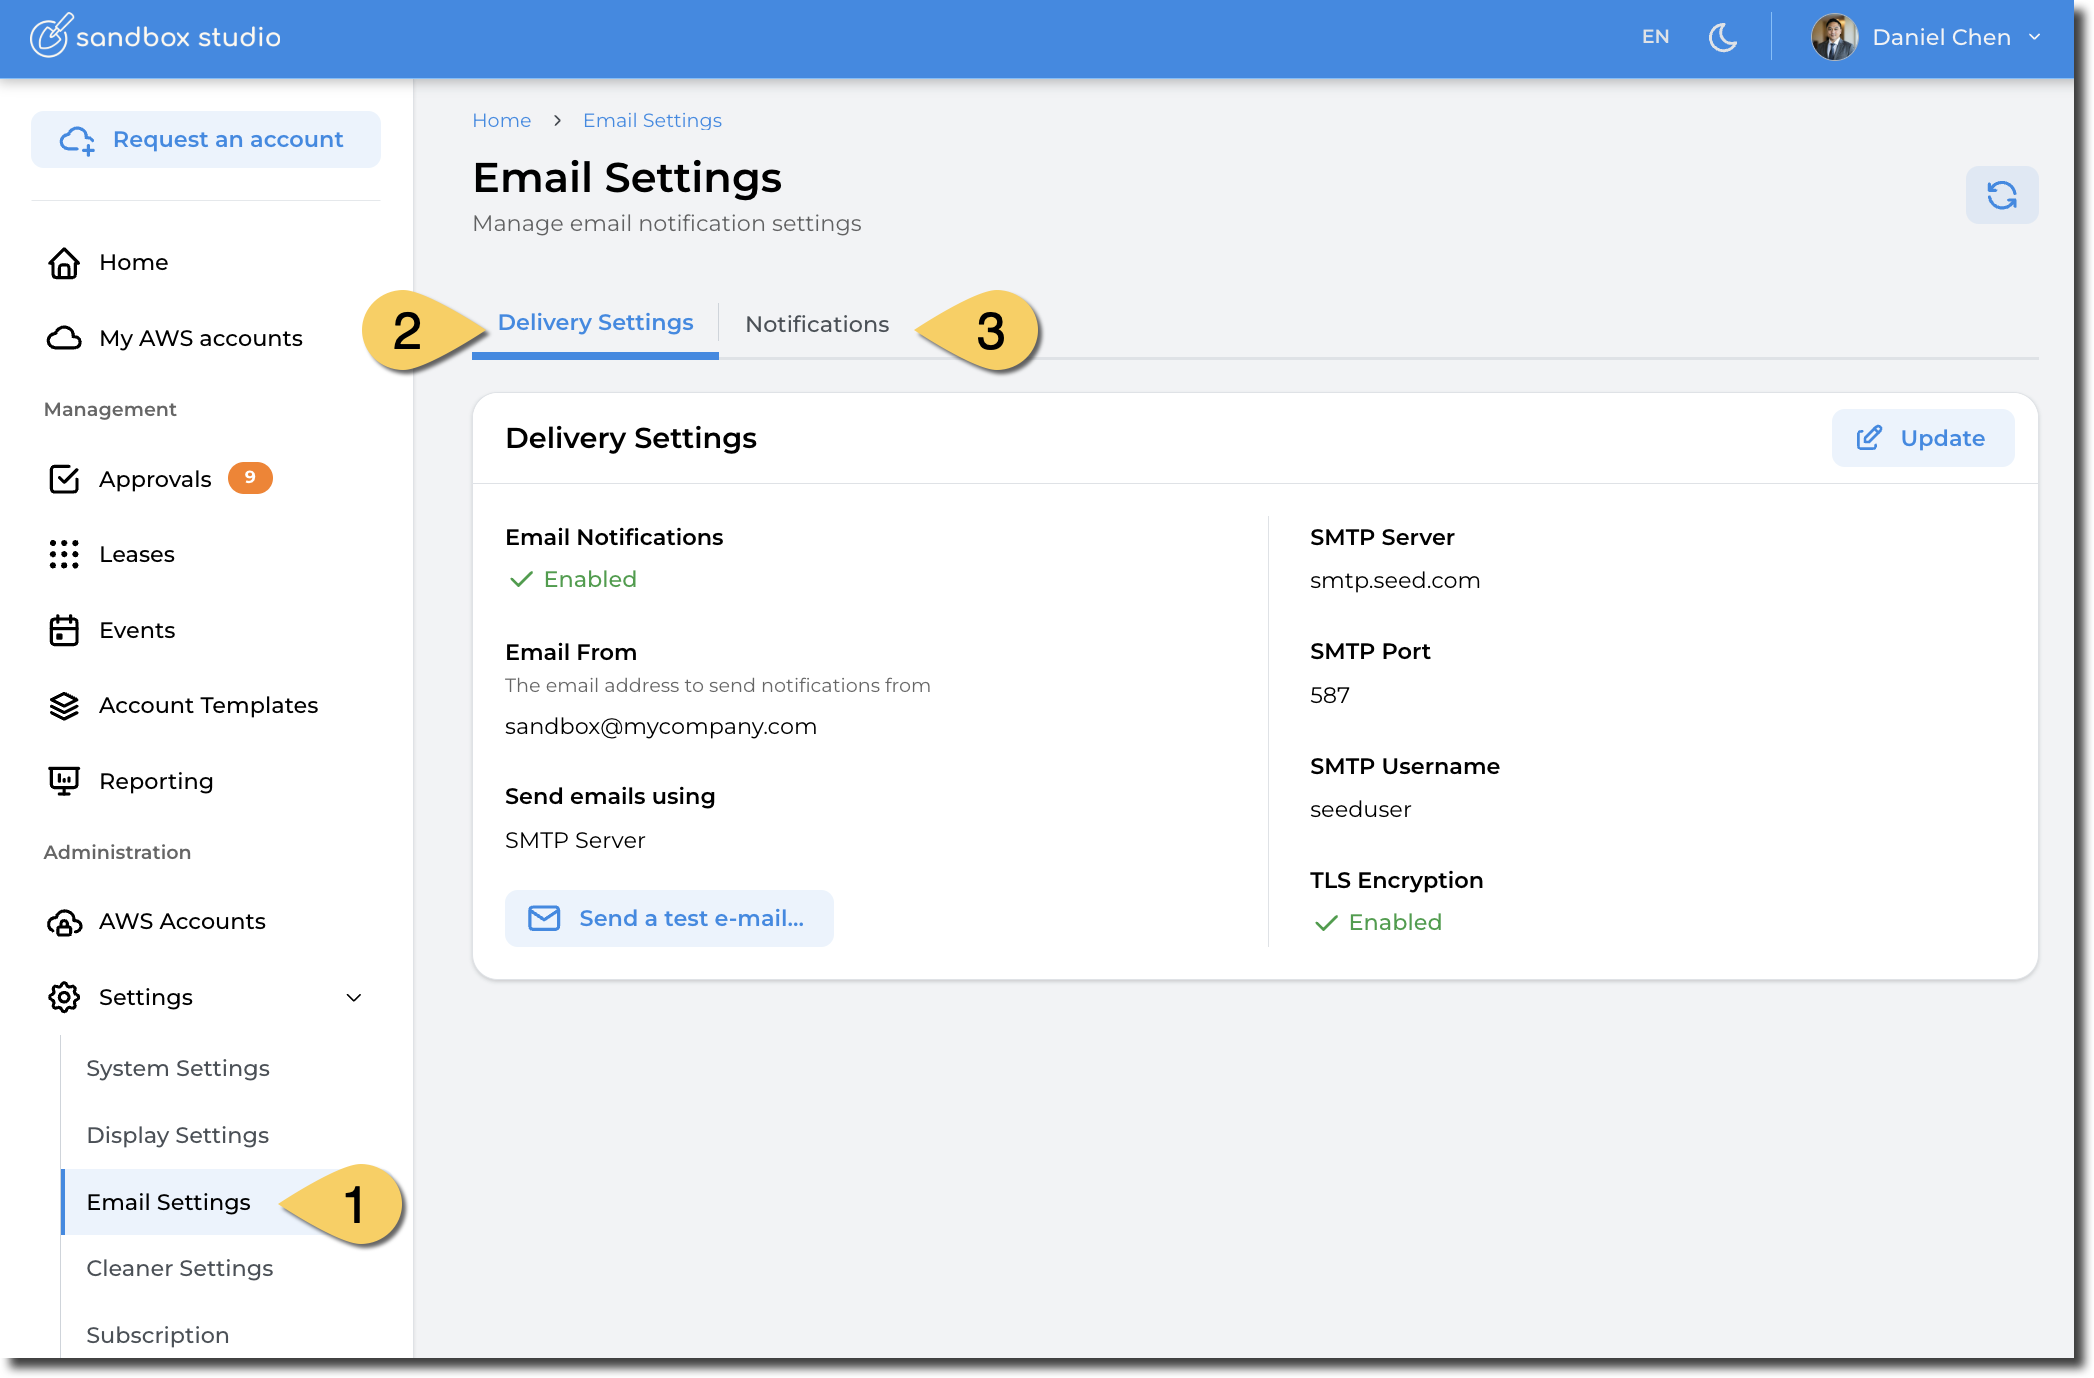
Two tabs are available:
- Delivery Settings: Allows to configure how emails are sent, either through Amazon Simple Email Service (SES) or through a standard SMTP server.
- Notifications: Allows to select what notifications are sent to users, managers or approvers. In the current version of Sandbox Studio, this settings applies for all users.
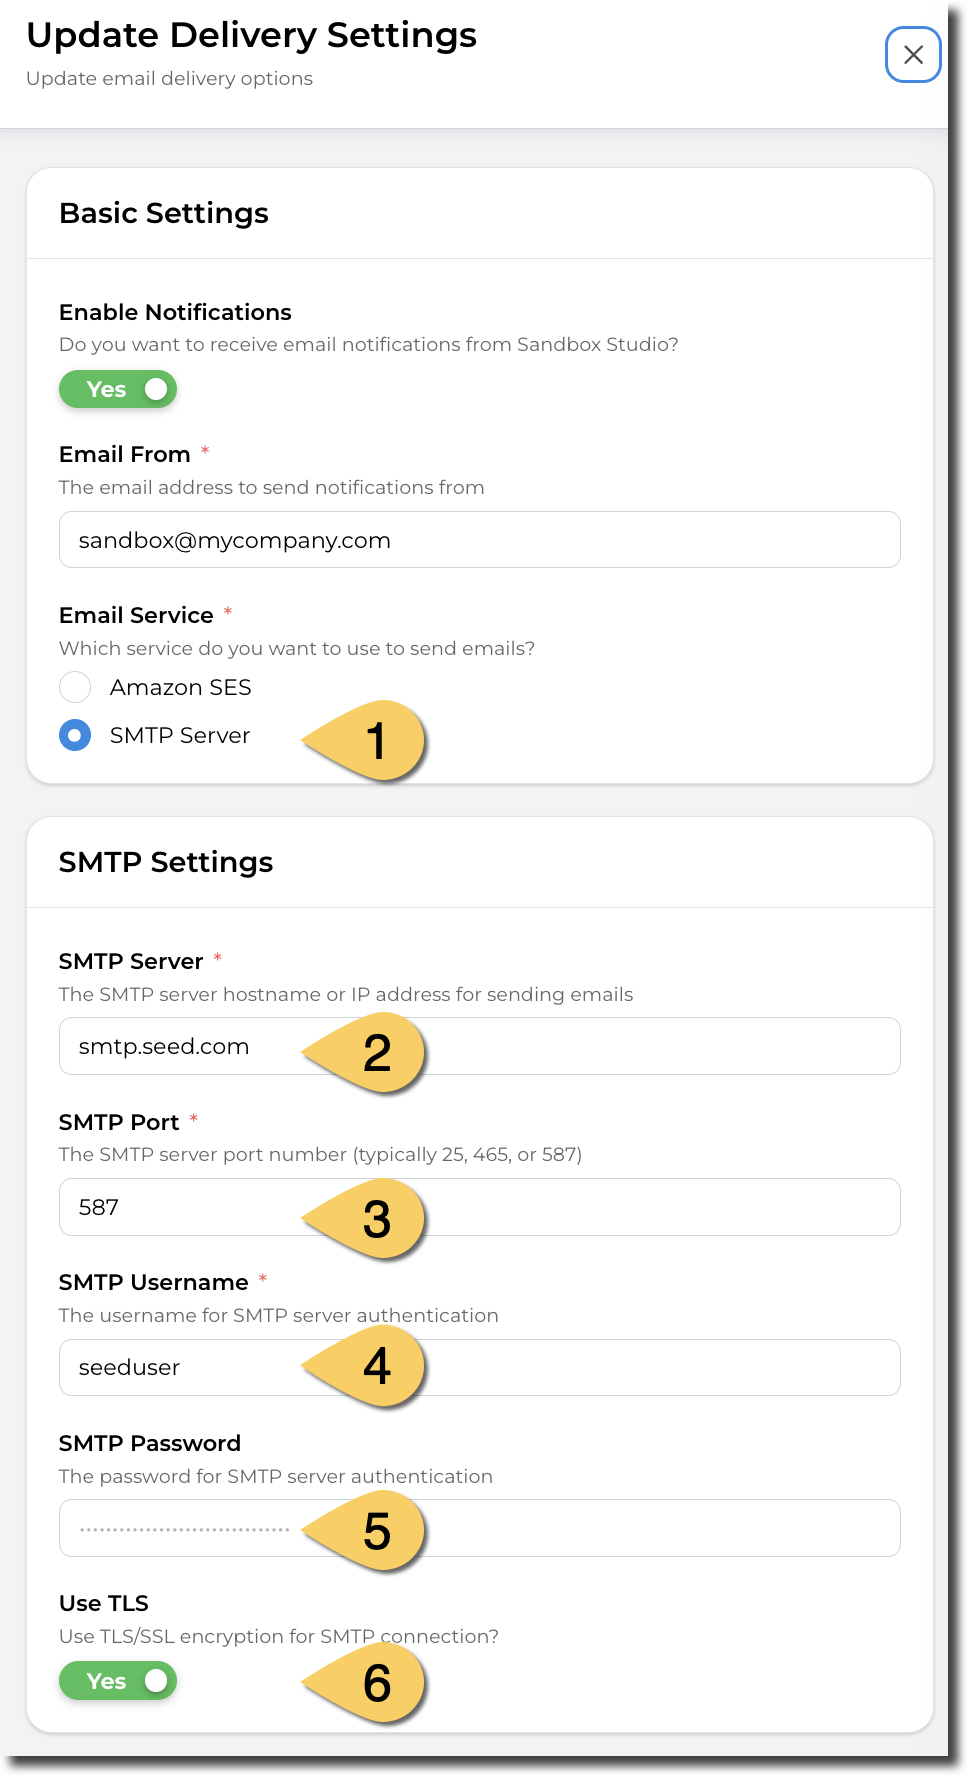
Delivery Settings
Configure SMTP server
 |
|
Configure Simple Email Service (SES)
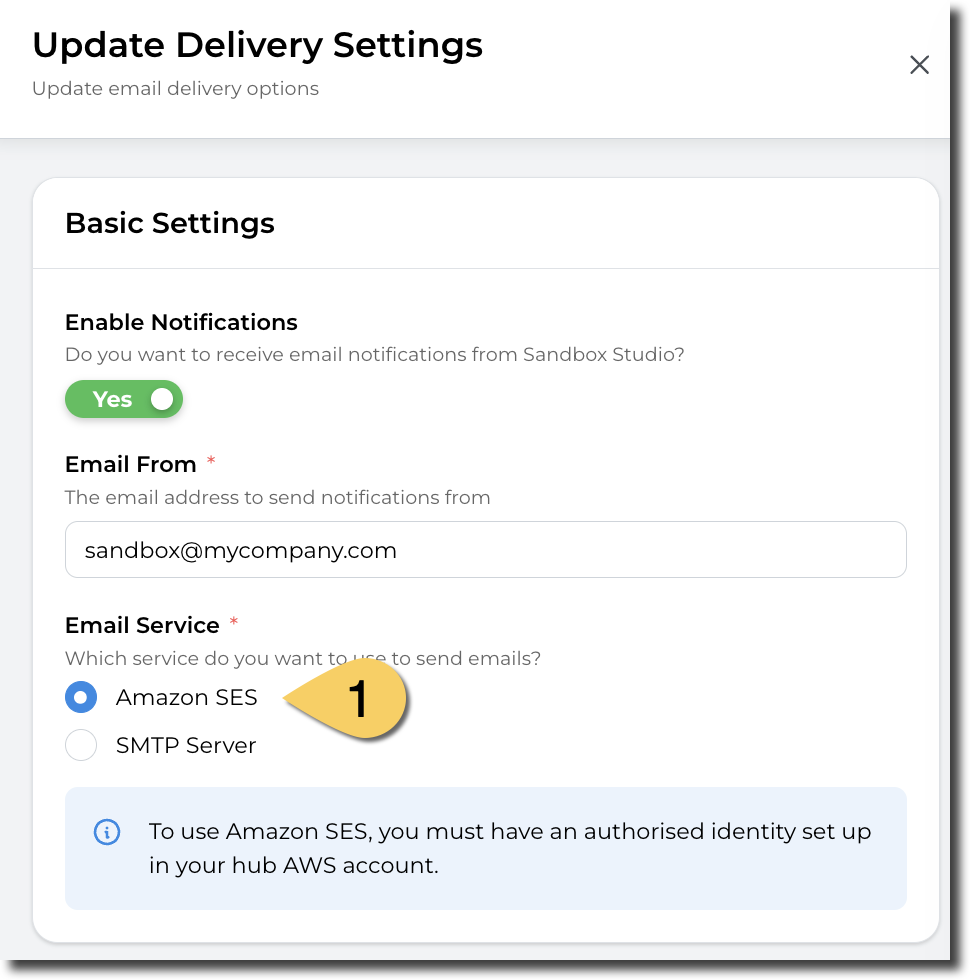
For SES to work, you need to have a verified identity in your SES environment in the Hub account. More details here: https://docs.aws.amazon.com/ses/latest/dg/verify-addresses-and-domains.html
This verified identity needs to:
- Be able to send e-mails from the "Email From" e-mail address
- Be able to send e-mails to the Sandbox Studio users
We recommend having a domain verified identity and have your environment out of the SES Sandbox. https://docs.aws.amazon.com/ses/latest/dg/request-production-access.html
Notifications
In the notification tab, you can select the notifications you want Sandbox Studio to send. Those notifications can be for leases lifecycle (Lease created, lease shared, ...), for events (Event created, event started, etc.) but also for administrative tasks (ie: account failed setup, or account failed cleanup)
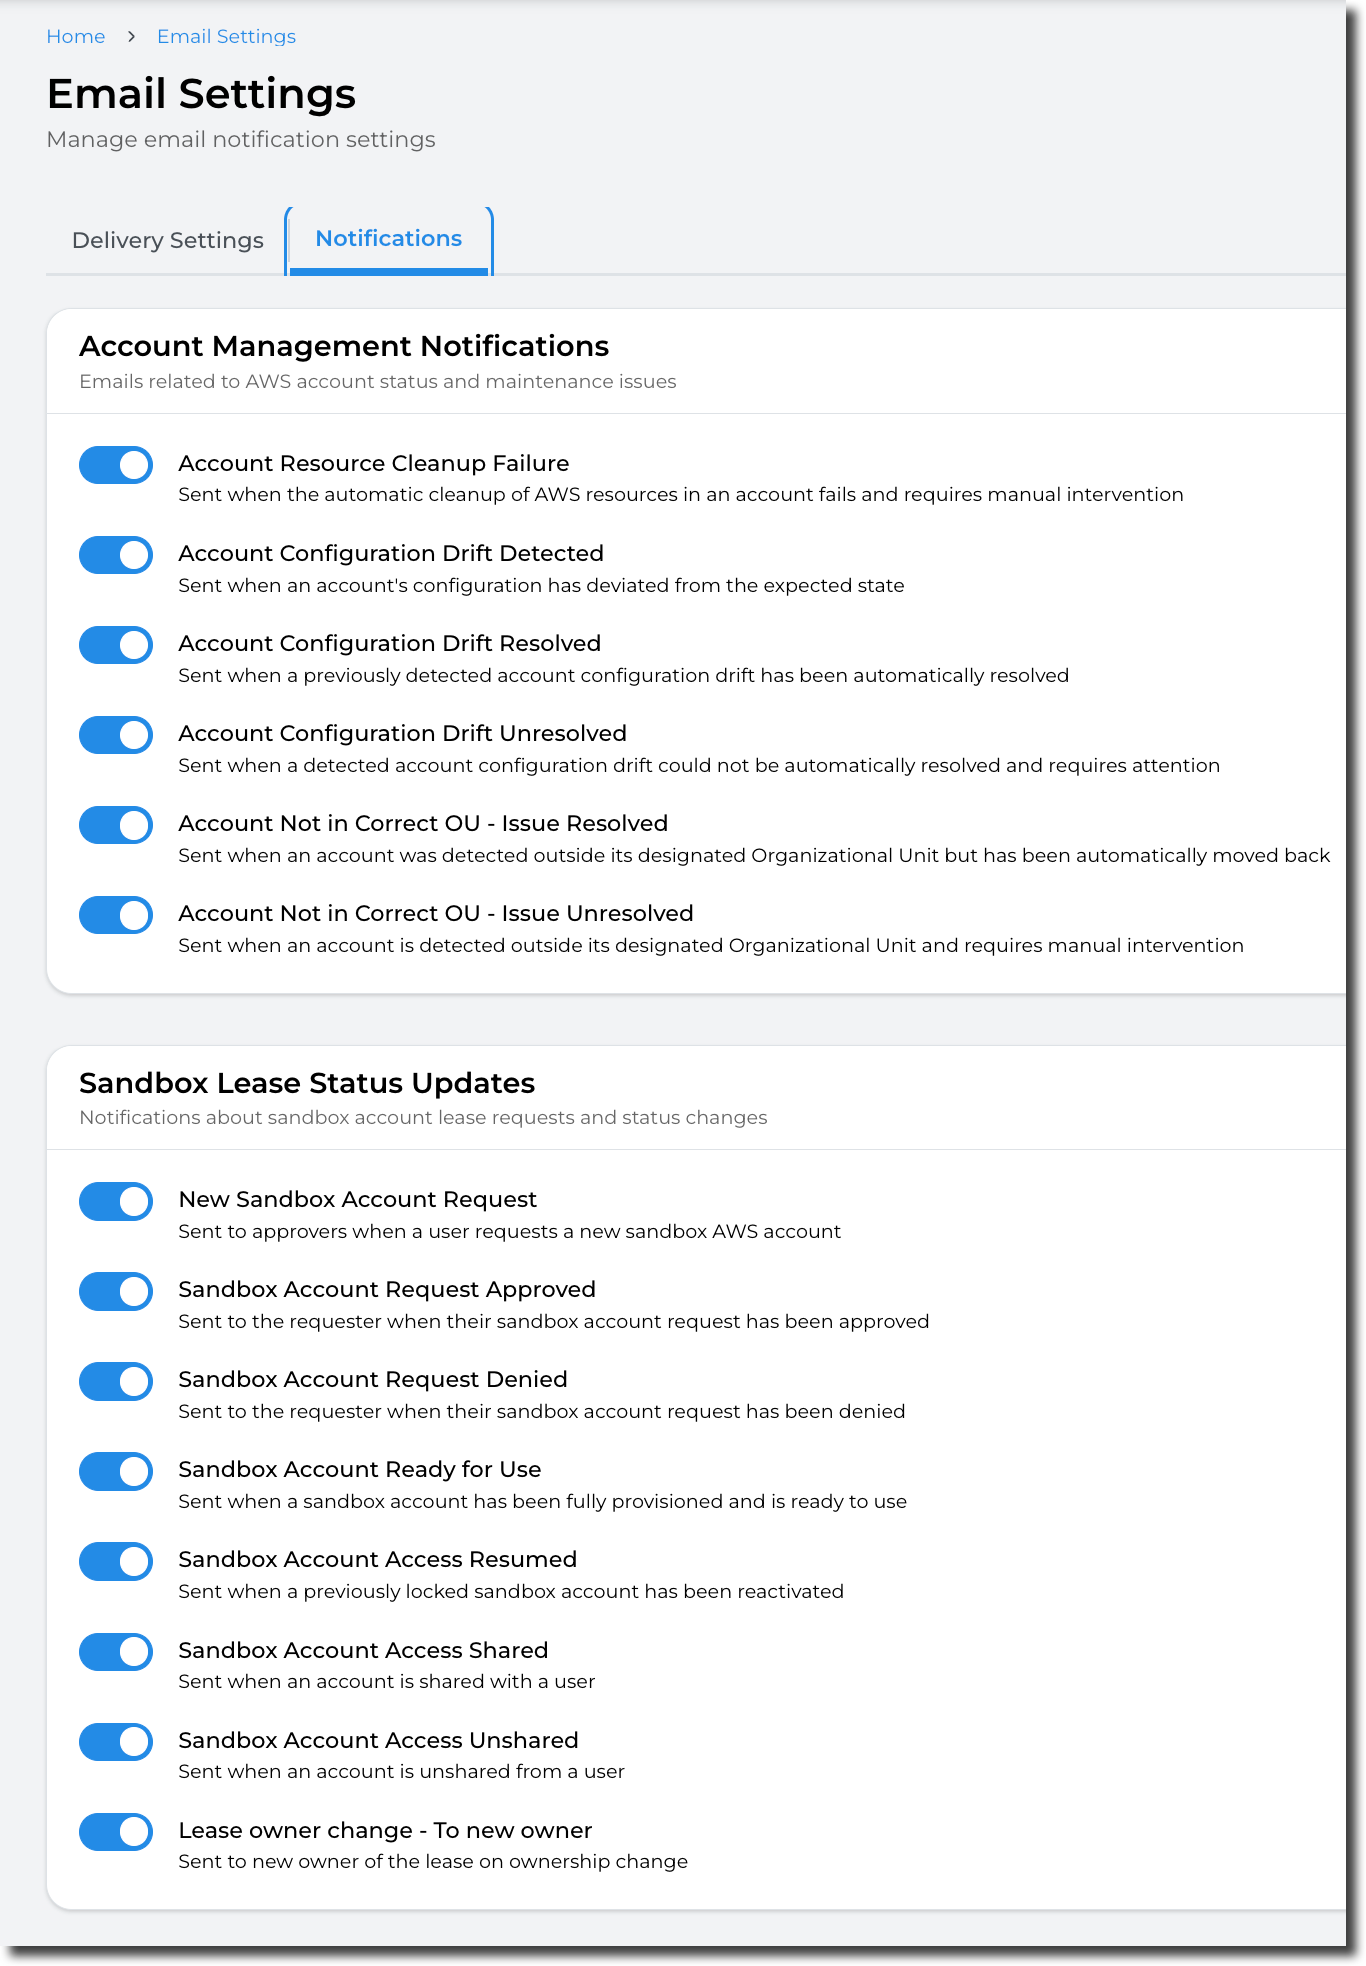
In this version of Sandbox Studio, the modifications on the notifications will apply for ALL users. eg: if you disable the notifications for leases, no user will receive notification for when leases are created.
Cleaner Settings
An Administrator is able to control and change the way that the AWS Accounts are cleaned/recycled at the end of a lease. This is task is completed by an open-source tool called AWS Nuke. However, in some instances an Administrator may wish to modify the way that the accounts are cleaned to preserve or delete certain resources. This can be done through the Cleaner Settings (1) menu on the left hand menu.
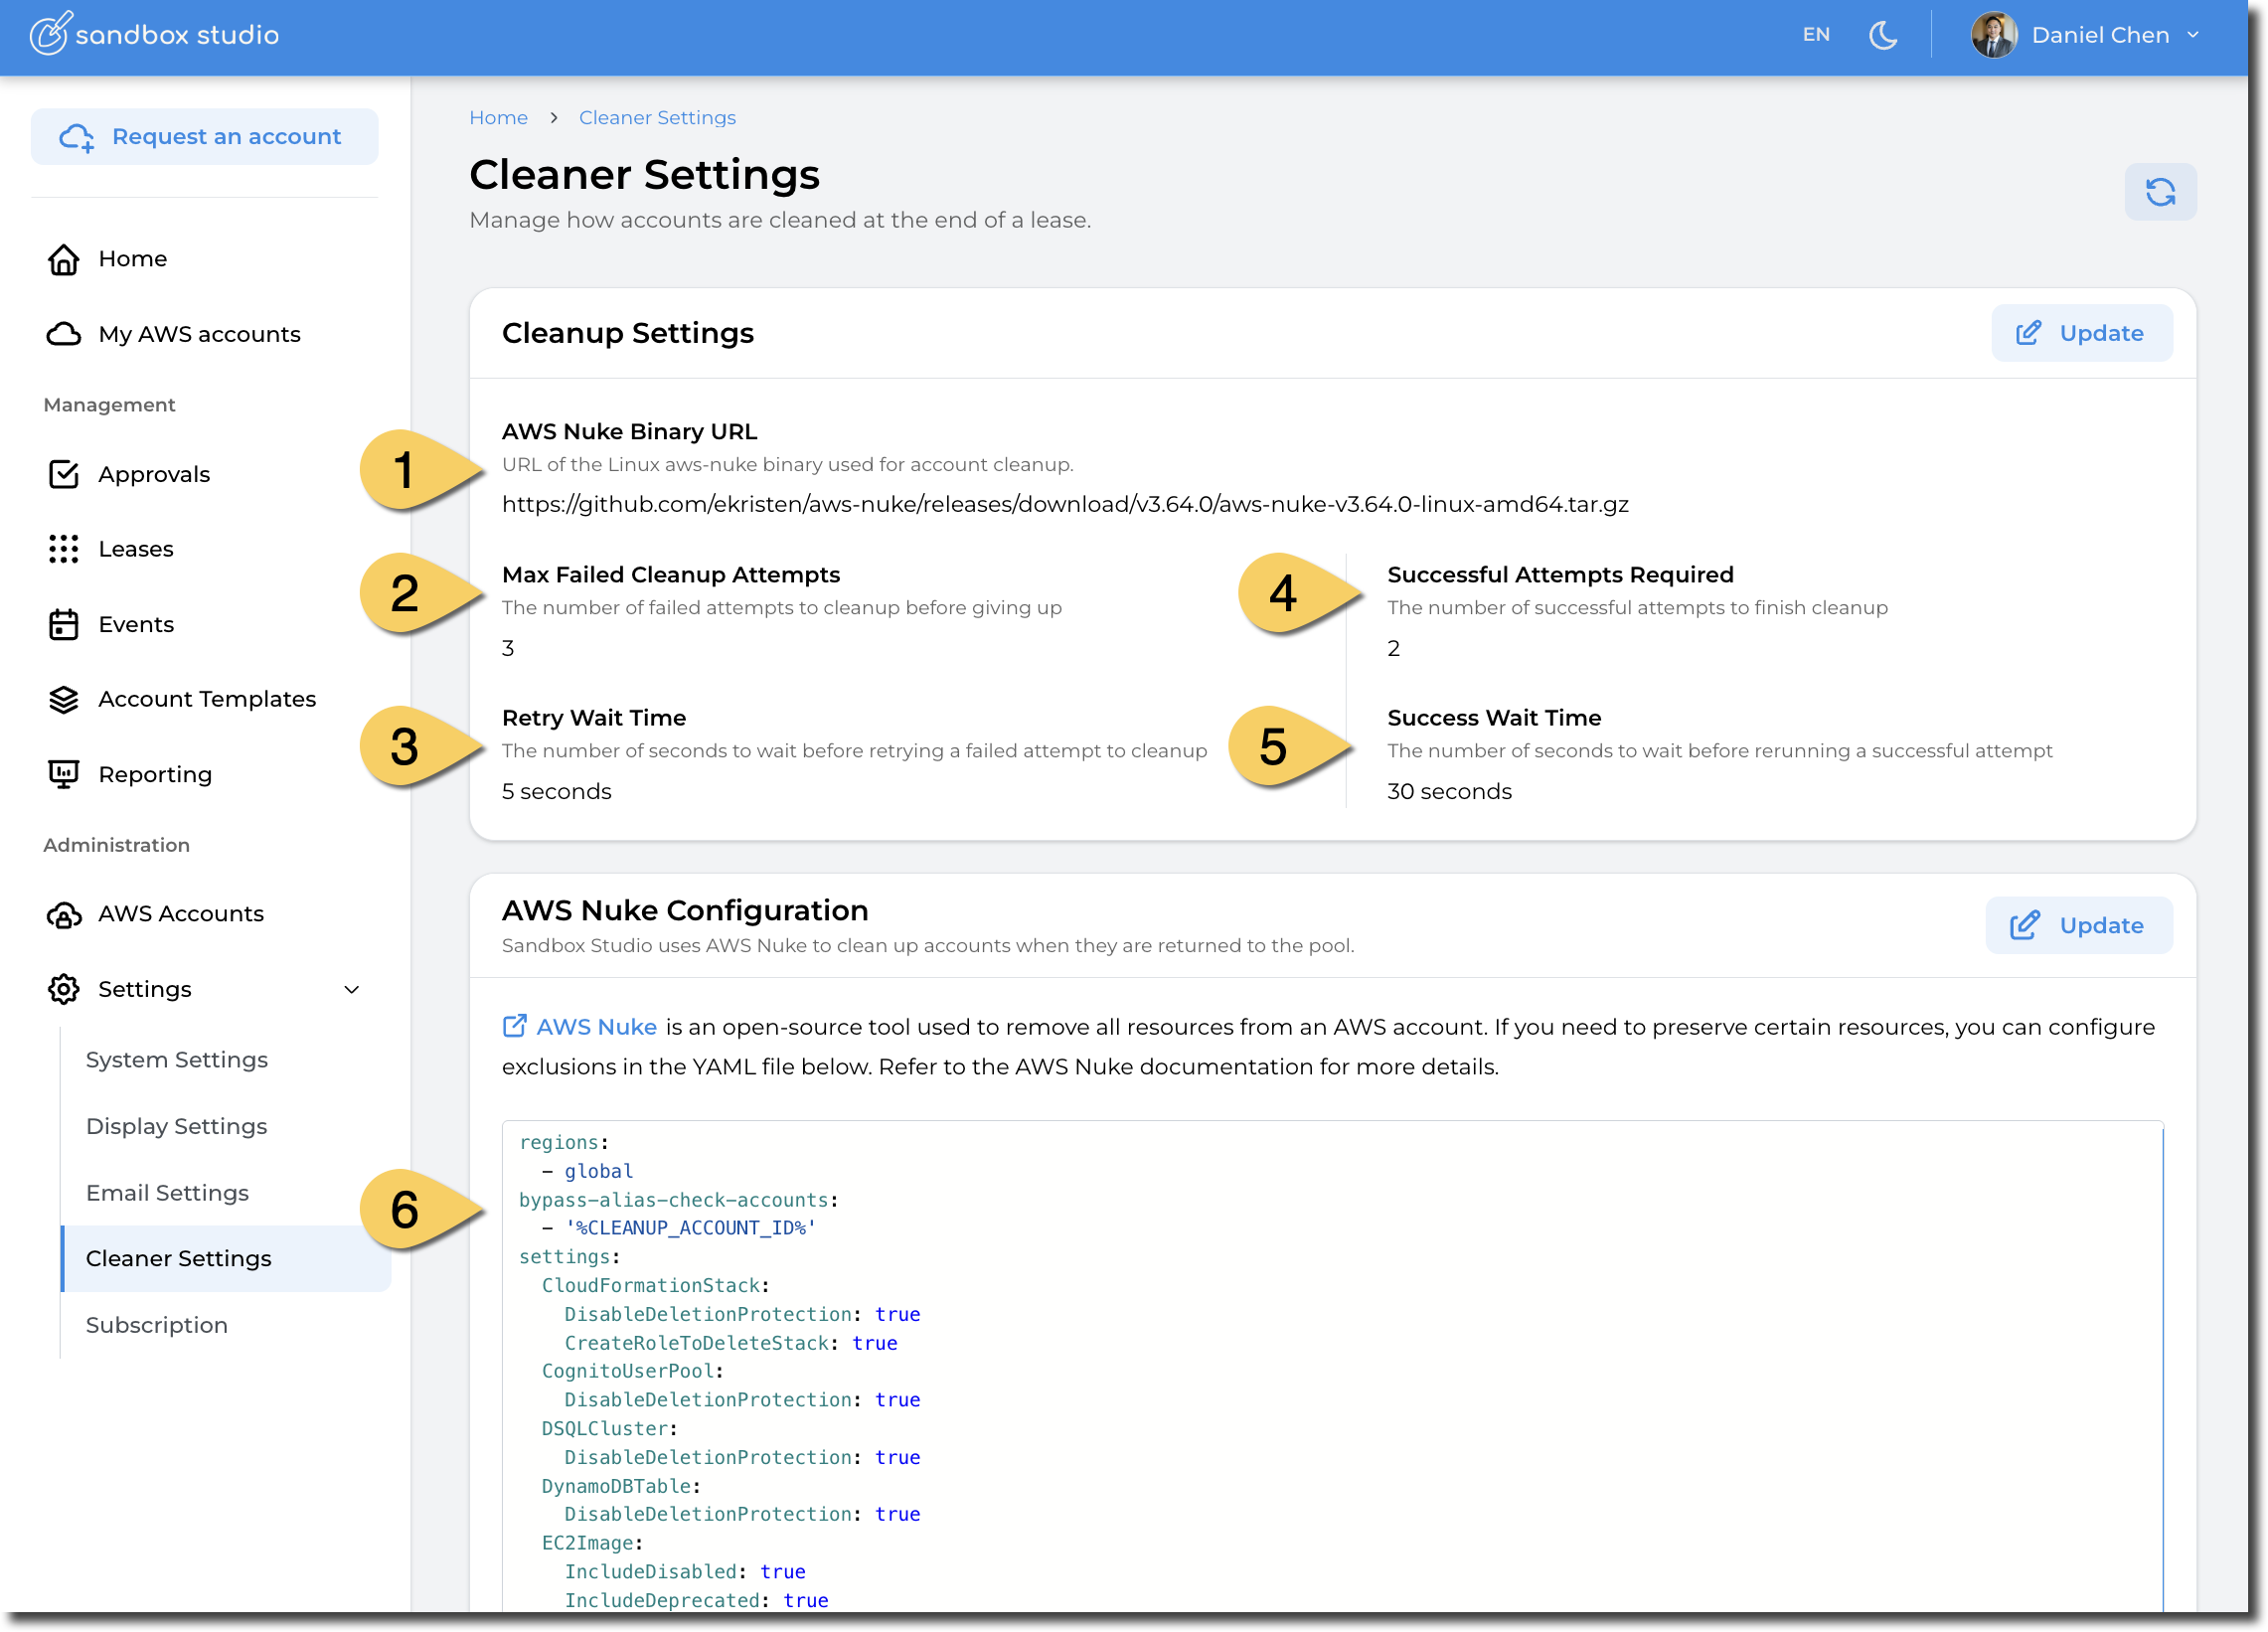
- AWS Nuke Binary URL: URL of the Linux aws-nuke binary used for account cleanup. This allows you to use the latest available AWS Nuke version as soon as it's released.
You can find the latest releases links here: https://github.com/ekristen/aws-nuke/releases
Distribution: Linux, AMD64
- Max Failed Cleanup Attempts: In certain circumstances, AWS Nuke fails to cleanup resources from the first try. Sandbox Studio to retry on error. This setting help defines how many times it needs to retry.
- Retry Wait Time: Time to wait between retries when cleanup fails.
- Successful Attempts Required: Number of successful cleanup to execute before Sandbox Studio marks the cleanup as successful. In this example, Nuke will run 2 times and if both execution succeed, the account will be marked as successfully cleaned up.
-
Success Wait Time: The number of seconds to wait before rerunning a successful attempt
- AWS Nuke Configuration
Refer to AWS Nuke documentation for more details.
Subscription
On the Subscription page, an Administrator can view their Sandbox Studio current licensing entitlements and usage.
Subscription page
The Subscription page shows the current status of the licence, how many AWS accounts are allowed, the API key used to connect to Sandbox Studio for updates and the duration of the licence.
- It is possible to add or edit the API Key - by clicking on the Update button.
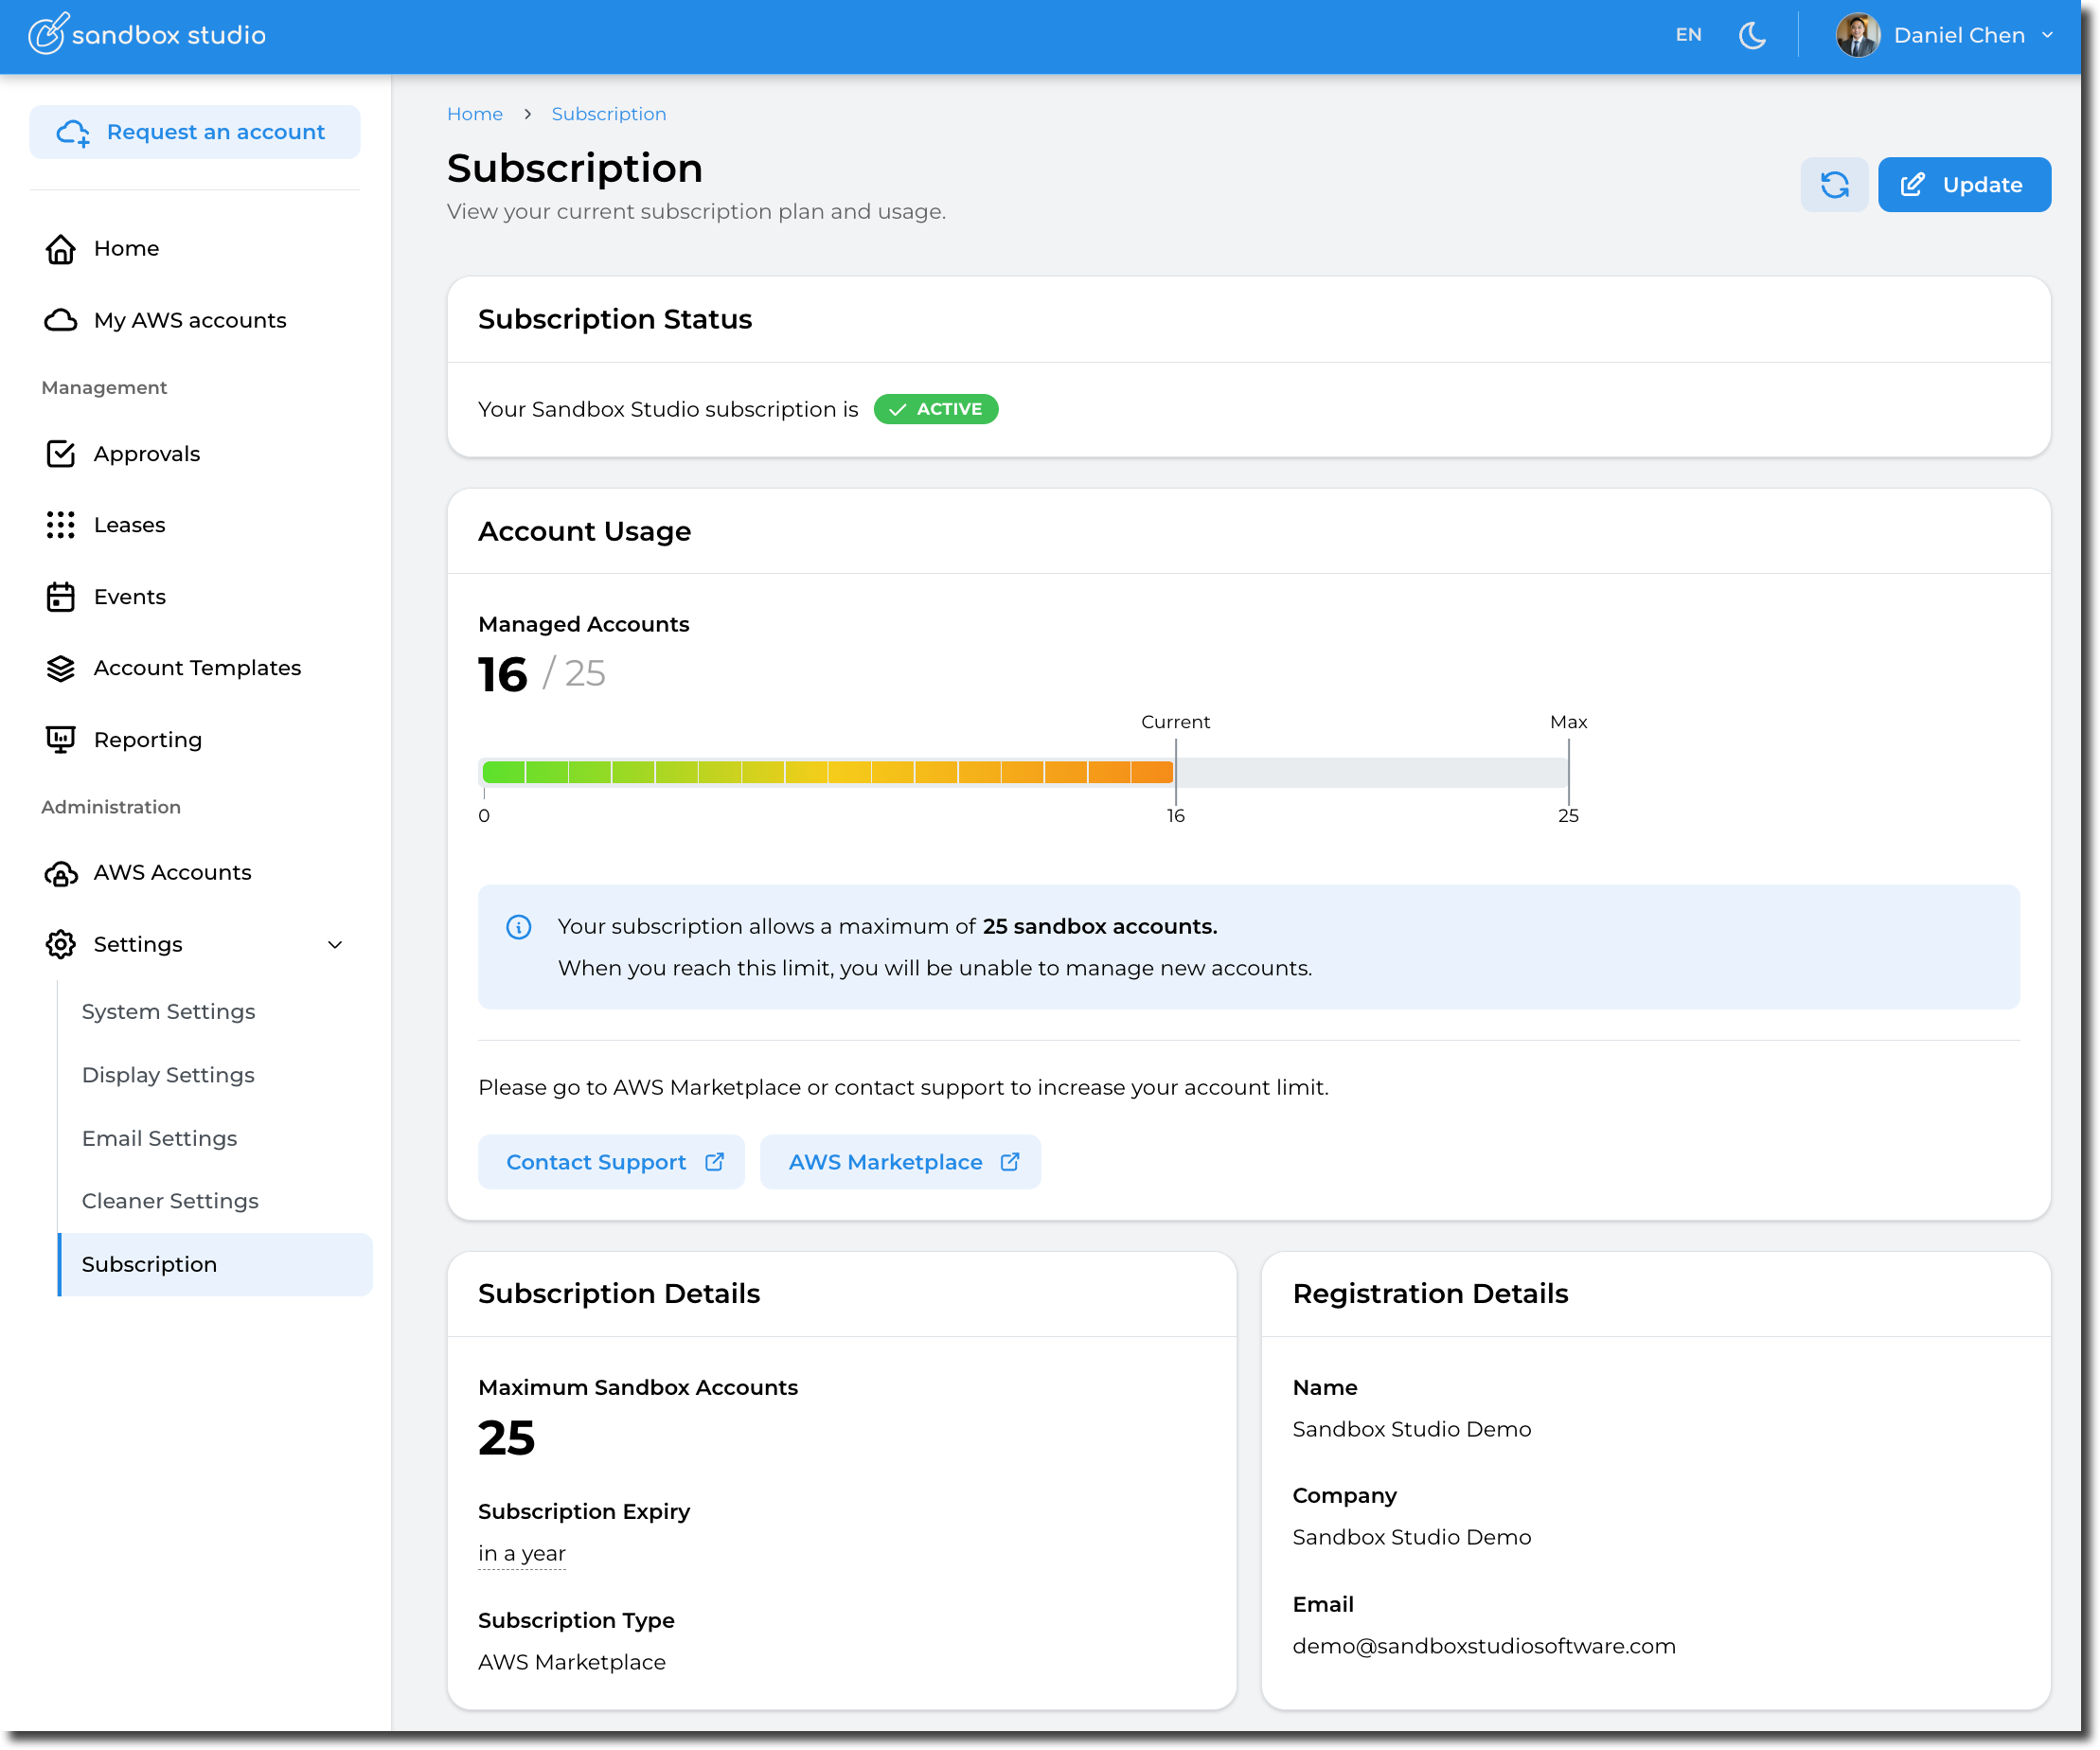
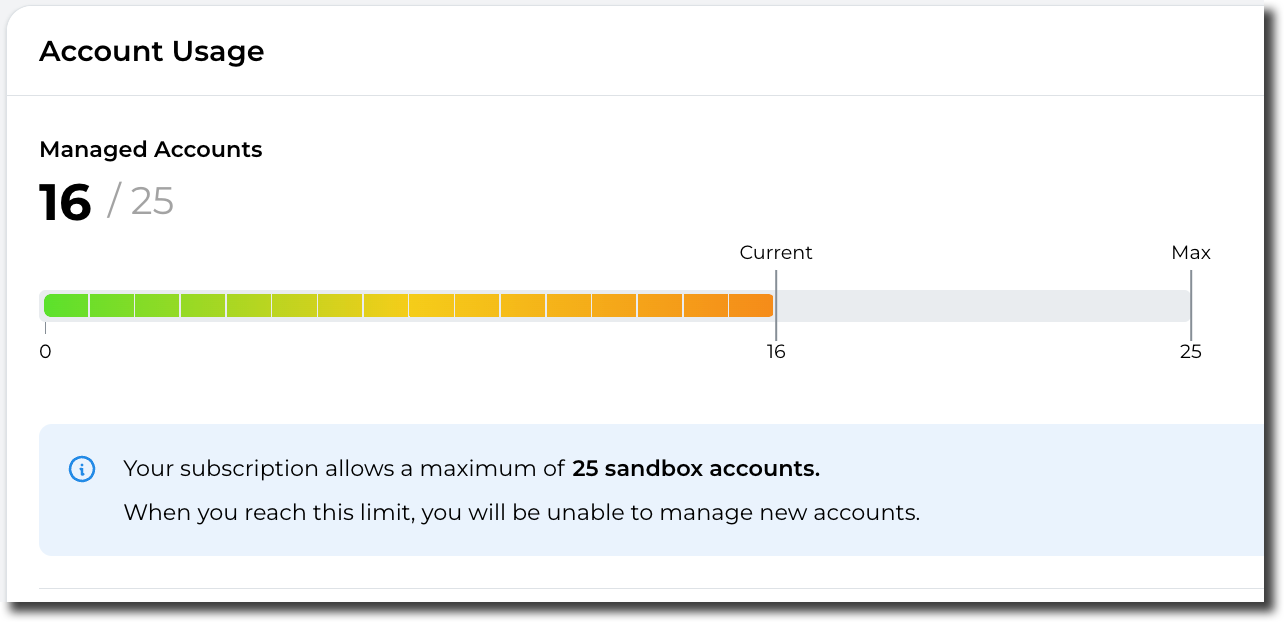
Account Usage
On the account usage page, the Administrator can view how many accounts are in use and what the maximum number of AWS accounts are allowed.
Monitoring the solution
Monitoring the solution
Overview
The Sandbox Studio solution includes observability tools for monitoring the solution resources.
Amazon CloudWatch Application Insights
Sandbox Studio on AWS includes access to Amazon CloudWatch Application Insights to provide automatic detection and alerting for any errors raised by the solution. When a recurring error is detected within the solution, Application Insights will raise an alarm indicating the potential problem.
Currently, active alarms are displayed in the AWS Cloudwatch Console Dashboard. You can also view an overview of all current and previously detected issues for the solution using the CloudFormation Application Insights console.
CloudWatch Application Insights helps you monitor your applications by identifying and setting up key metrics, logs, and alarms across your application resources and your technology stack. It continuously monitors metrics and logs to detect and correlate anomalies and errors. To assist with troubleshooting, it creates automated dashboards for detected problems, which include correlated metric anomalies and log errors, along with additional insights to identify a potential root cause.
To view the CloudWatch AppInsights dashboard for Sandbox Studio:
- Sign in to the CloudWatch console.
- From the left sidebar, under Insights, choose Application Insights.
- Select the Applications tab.
- In the Find applications search box, type the solution name to find the dashboard.
- Select the dashboard, and the application.
The dashboard displays various metrics and logs for your solution.
Cloudwatch log queries
Note: By default, Sandbox Studio will retain all compute logs for one year. You can change this retention period as part of the solution’s Compute stack CloudFormation parameters.
Sandbox Studio provides several pre-populated AWS CloudWatch log insights queries that allow you to troubleshoot issues.
To access log insights queries:
- Sign in to the CloudWatch console.
- From the left sidebar, under Logs, choose Logs Insights.
- On the Logs Insights tab, select Saved and sample queries.
- From the Sample queries, run one of these queries:
- LogQuery — search for all logs related to a specific account, lease, leaseTemplate, or user.
- ErrorLogs — view all recent errors.
- AccountCleanupLogs — view the logs from a specific cleanup execution.
The logs section will display the compute logs for the solution.
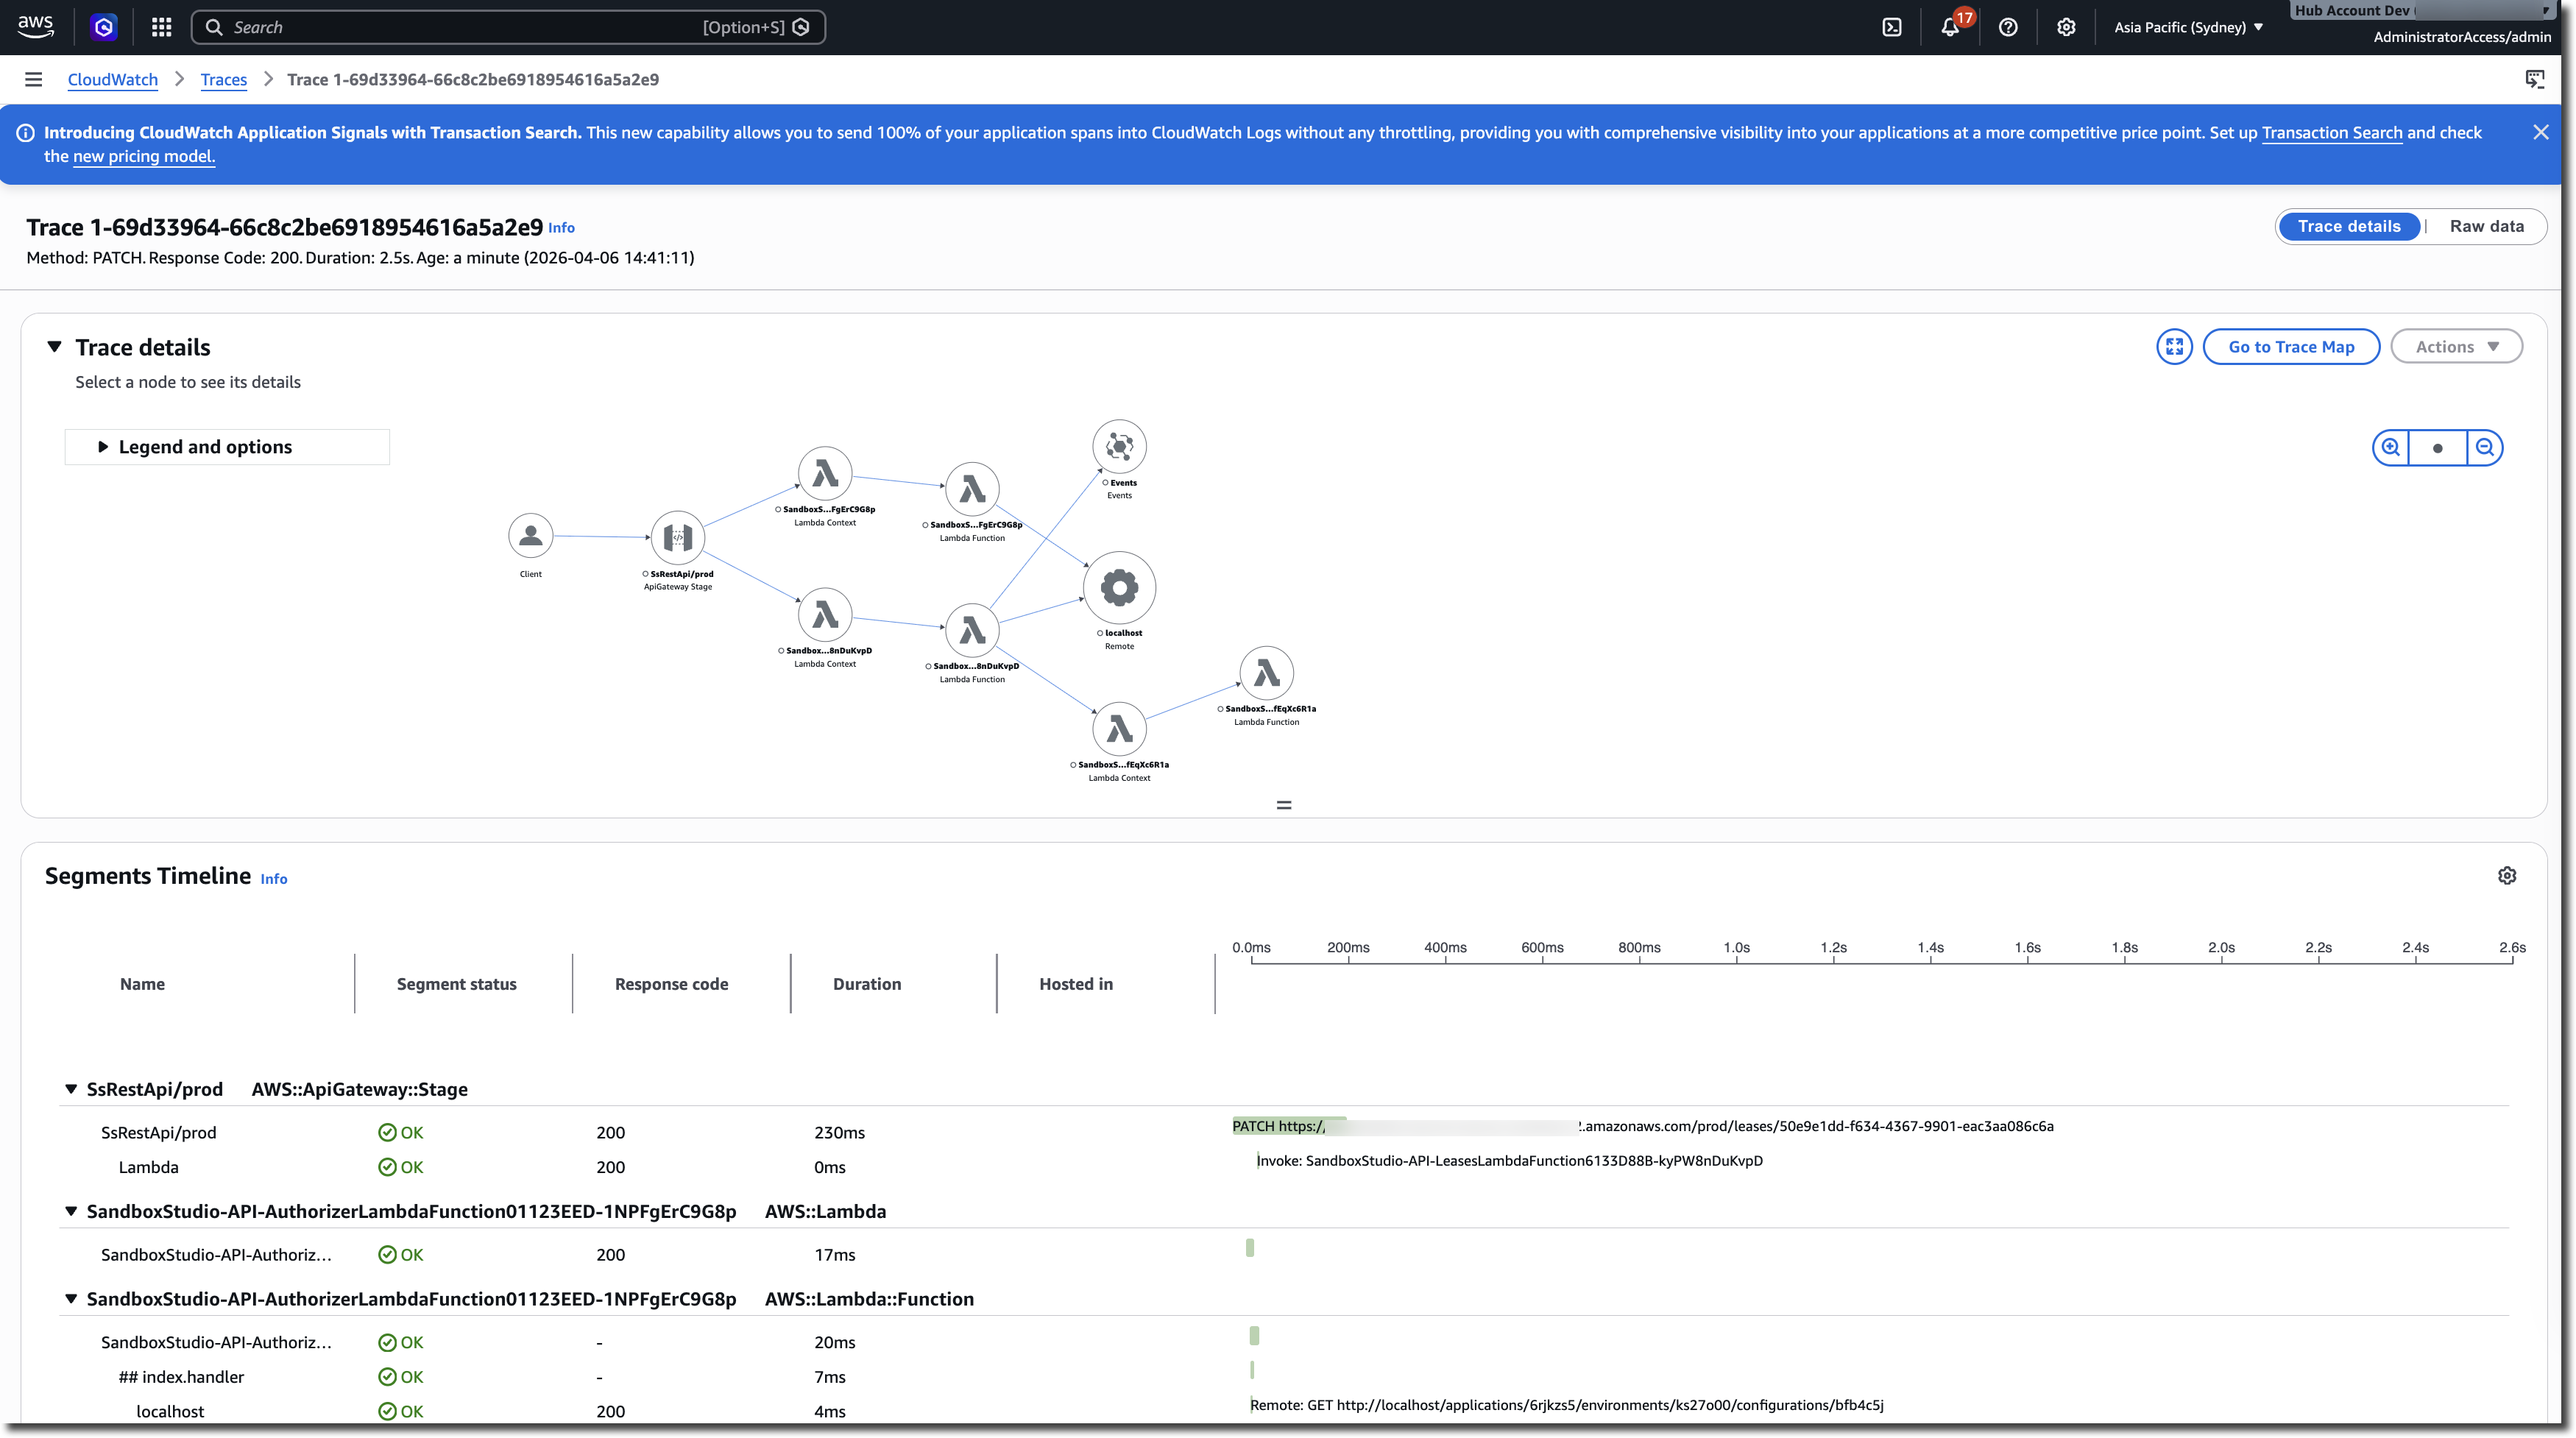
AWS X-Ray
Sandbox Studio includes access to AWS X-Ray for all critical execution paths. This allows you to troubleshoot any failing workflows and identify where the errors are occurring.
Troubleshooting & Support
If you need support, there is a full knowledge base and ticketing site here:
https://support.sandboxstudiosoftware.com/
Below are some common problems identified during installation.
Investigating accounts in Quarantine state
When the Sandbox Studio solution detects an issue with one of its sandbox accounts, the account is moved to a Quarantine state and an email is sent to the solution administrators indicating that action be taken to resolve the account’s quarantine status.
Note: If the account clean-up mechanism fails to automatically delete resources at the end of an active lease, you might have accounts in a Quarantine state. We highly recommend investigating quarantined accounts as quickly as possible, as these accounts can incur costs for resources running inside these accounts.
To resolve the quarantined status:
- Log in to the Web UI as an Administrator, and from the left, under Administration, select AWS Accounts.
-
Verify the accounts in Quarantine Status, and decide whether to clean up the account and return to the account pool, or to eject the account from the solution.
- To clean-up the account and return it to the account pool, select the account, and under Actions, select Retry cleanup.
- To eject the account, select the account, and under Actions, select Eject account. For more information, refer to Uninstall the solution section.
If the account is in quarantine if the retry clean up failed, refer to the Resolving cleanup failures section.
Resolving clean-up failures
If the cleanup process fails to completely clean an account at the end of a lease, Sandbox Studio will move the account into a Quarantine state, and email the Administrators notifying them of the issue.
To resolve an account that has failed clean-up:
-
Log in to the Web UI as an Administrator, and from the left, under Administration, select AWS Accounts.
-
Confirm the account that has failed the clean-up process. You can preview the error by hovering your mouse over the "Clean-up error" text

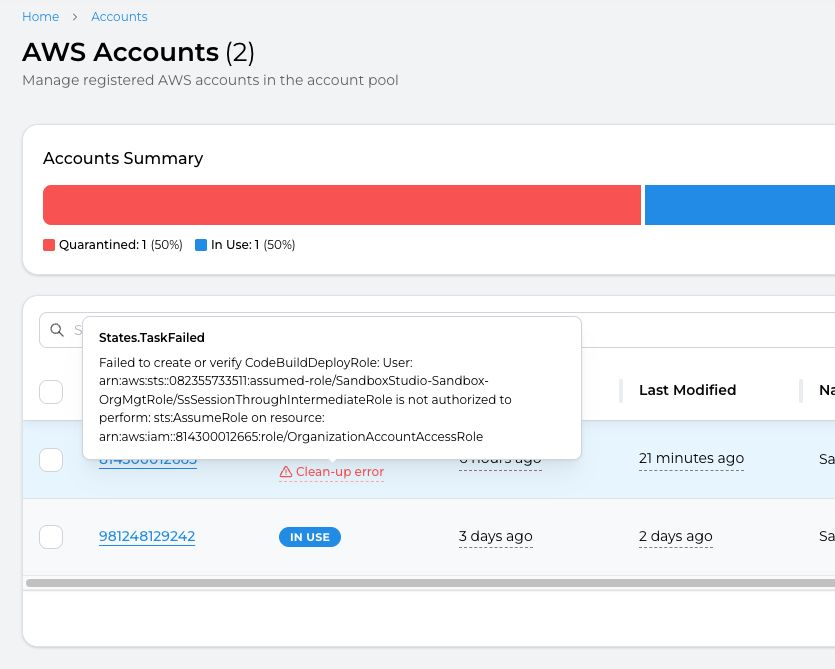
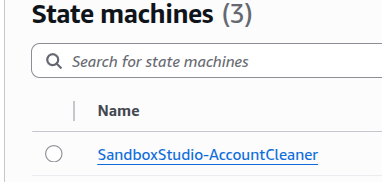
For a detailed view of the error, you need to access the AWS Console and look at the "AccountCleaner" step functions
See log details:
-
Log in to the AWS Console using the Hub account, and navigate to the CloudWatch > Logs Insights page.
-
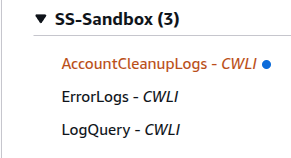
From the right pane, under Sample queries, select the SS-Sandbox group, and from the dropdown, choose the
AccountCleanupLogssaved query, and Apply.
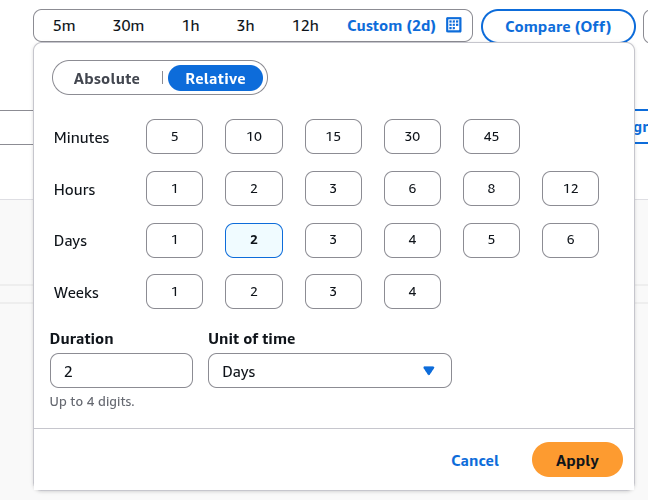
3. Change the time frame to match the execution you want to get the logs for:
4. Update the query to copy the last cleanup process ID:
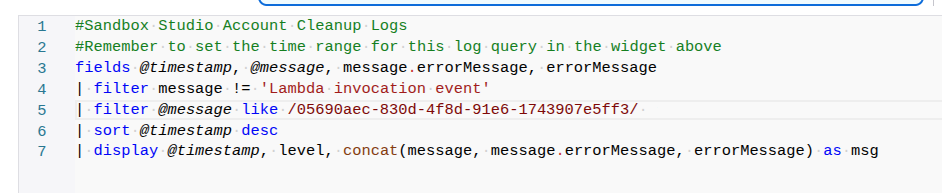
You can get the cleanup process ID from the 'Last Cleanup ReferenceID'.
Select Run query to see related events. The log information is displayed under the Logs tab.
Maintenance
Backup of the solution
The following elements need to be backed up on a regular basis:
1. Sandbox Studio Database (RDS)
Sandbox Studio stores its data into a relational database hosted on Amazon RDS. As a precaution, backup this database regularly.
This database is named sandbox-studio-rds and is hosted in the Hub Account.
2. Launch Templates configuration (S3)
For Launch Templates (Creating resources on new sandbox accounts), Sandbox Studio will save buildspec files into Amazon S3. This S3 bucket needs to be backed up regularly.
You can find this S3 bucket in the Hub Account with the name: sandboxstudio-compute-s3bucketbuildspecfiles<XXXXXXX>
The exact name of the S3 bucket can be found in the SandboxStudio-Compute Cloudformation stack, in the output DeploymentFilesBucketName
3. Configuration (AppConfig)
We also recommand backing up the configurations you define in AppConfig for the following configs:
- GlobalConfig: The core configuration of Sandbox Studio
- NukeConfig: The configuration for AWS Nuke (For account cleanup)
- EmailSettings: The e-mail configuration settings
Updating the solution
Monitor for updates
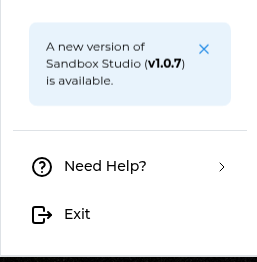
Automatic Update Alerts
When a new version of Sandbox Studio is available, administrators will receive an update notification that appears in their left menu. This notification system is designed to keep administrators informed of significant updates without overwhelming them with minor changes.
Important: Only Major and Minor version updates will trigger this notification. Patch updates will not generate automatic notifications in the left menu.
Administrators have the option to dismiss these update notifications if they choose to postpone the update. Only new major/minor updates will trigger another notification.
Manual Update Check
For administrators who want more control or need to check for patch updates, a manual check option is available:
This manual check provides visibility into all version types and allows administrators to stay completely up-to-date, even with the smaller patch releases that don't trigger automatic notifications.
Understanding Version Numbers
Software versions follow a three-part numbering system: Major.Minor.Patch (for example, 2.5.3)
- Major versions (e.g., 1.0.0 → 2.0.0) - Significant updates that may include substantial new features, architectural changes, or breaking changes that could affect existing functionality. These are the most important updates to review.
- Minor versions (e.g., 2.1.0 → 2.2.0) - Moderate updates that typically add new features or improvements while maintaining backward compatibility. These enhance the software without disrupting existing workflows.
- Patch versions (e.g., 2.1.1 → 2.1.2) - Small updates focused on bug fixes, security patches, and minor improvements. These are routine maintenance updates.
UI Customisation
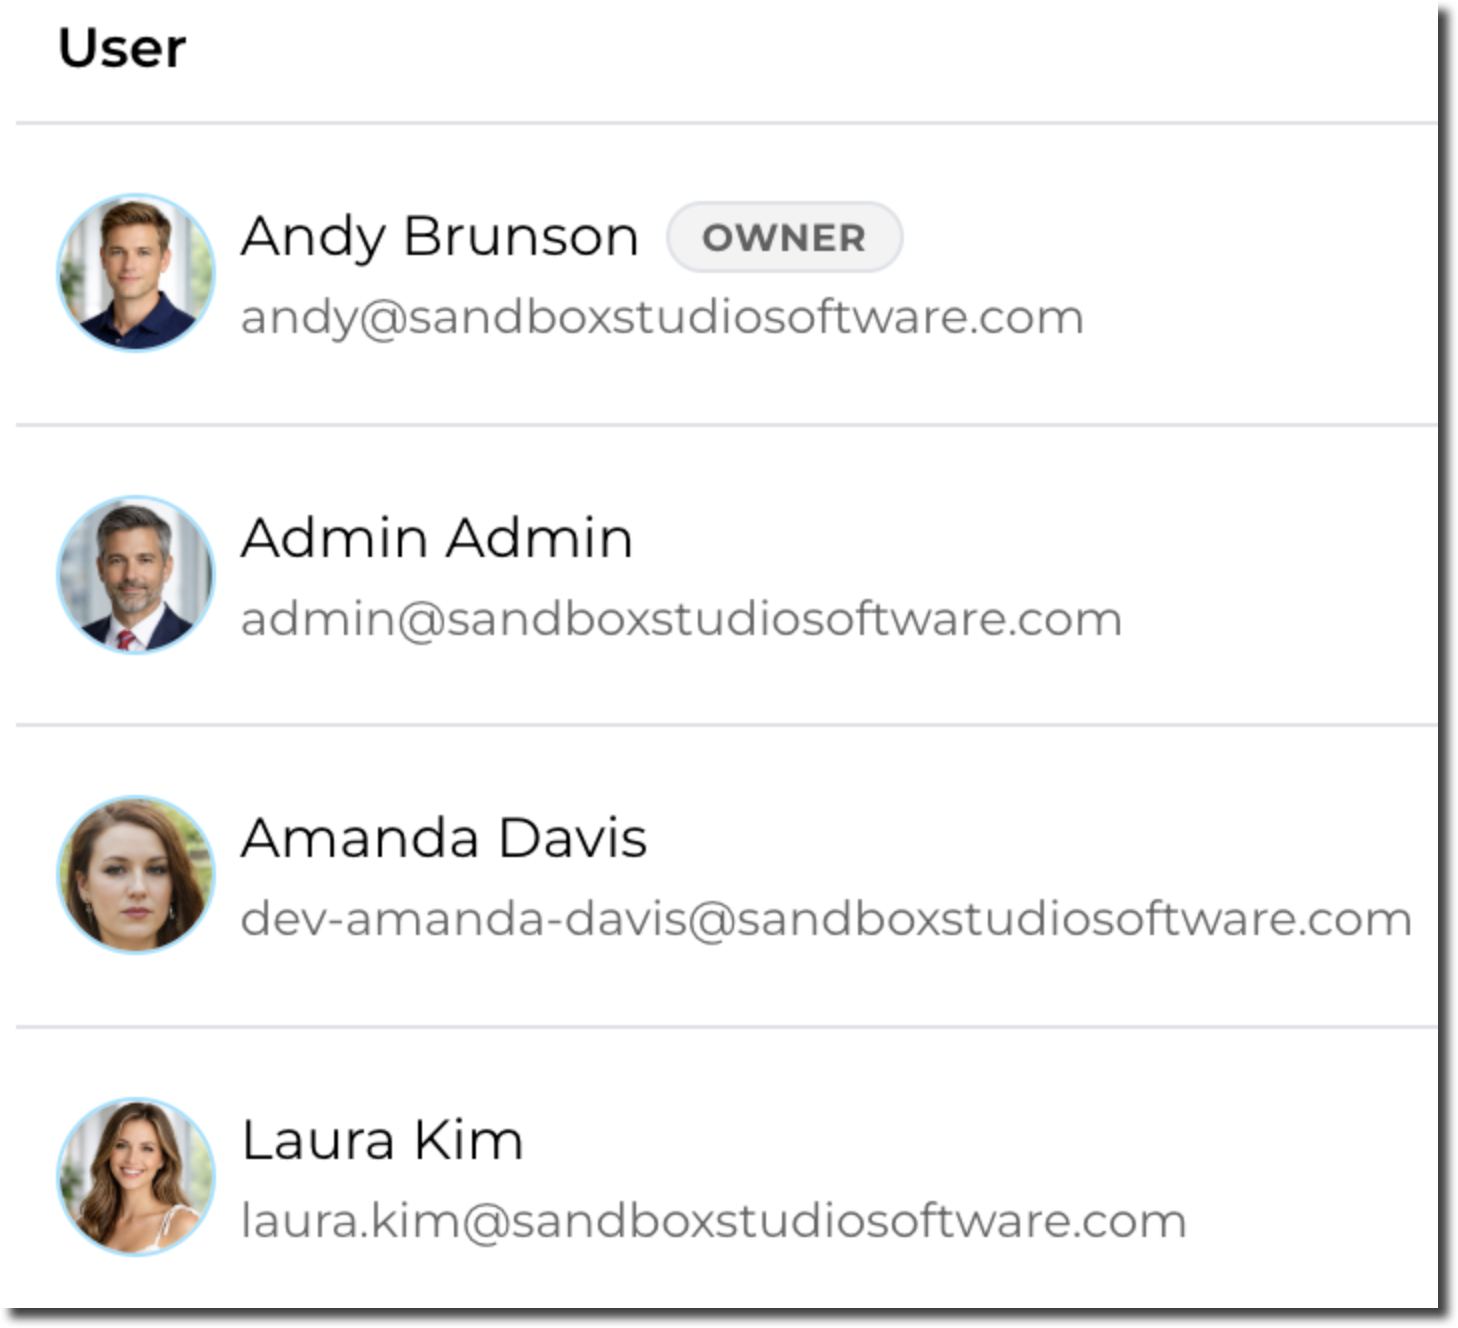
How to display users profile pictures
Starting with version 1.1.0 of Sandbox Studio, users' profile pictures can be displayed in the interface:
IAM Identity Center
IAM IdC has a specific attribute for profile picture URL:
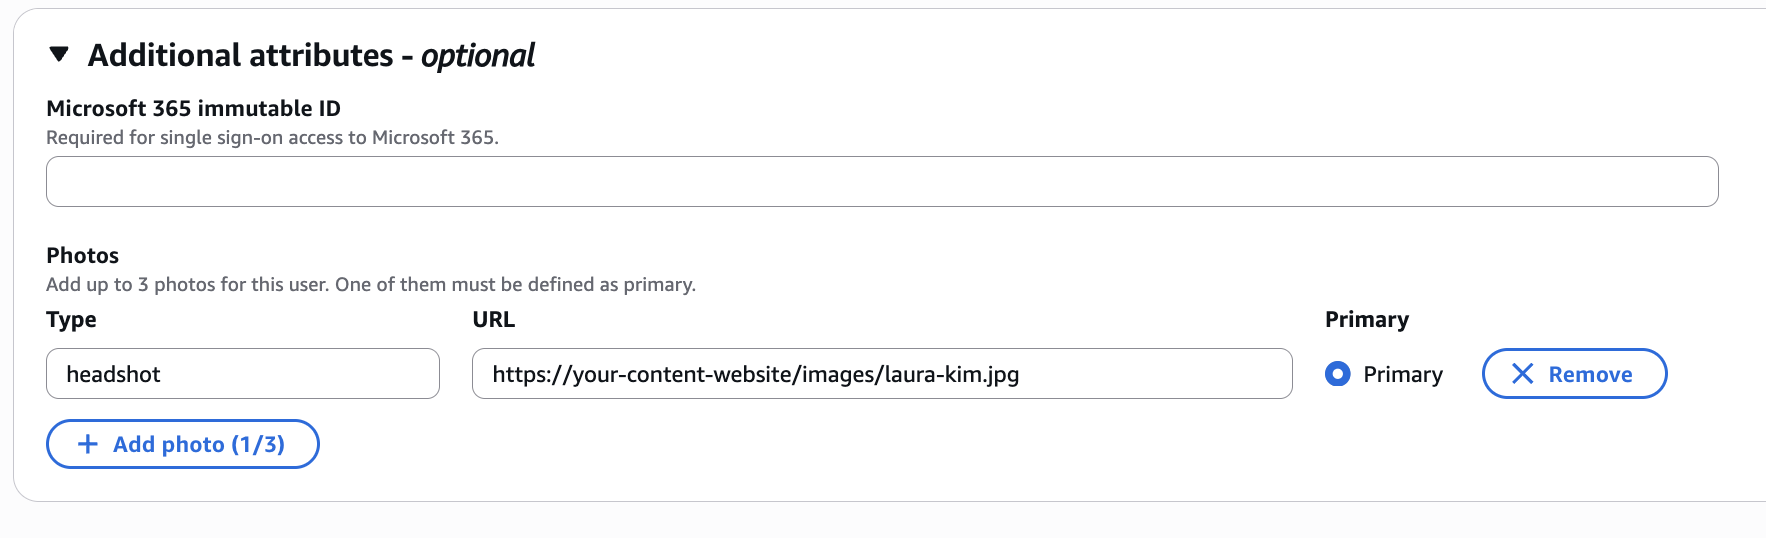
This is the field that you need to map from your IdP in order to show the profile picture.
- "Type" will be ignored by Sandbox Studio.
- The URL will be used to display the image.
- Only the Primary photo will be displayed in Sandbox Studio
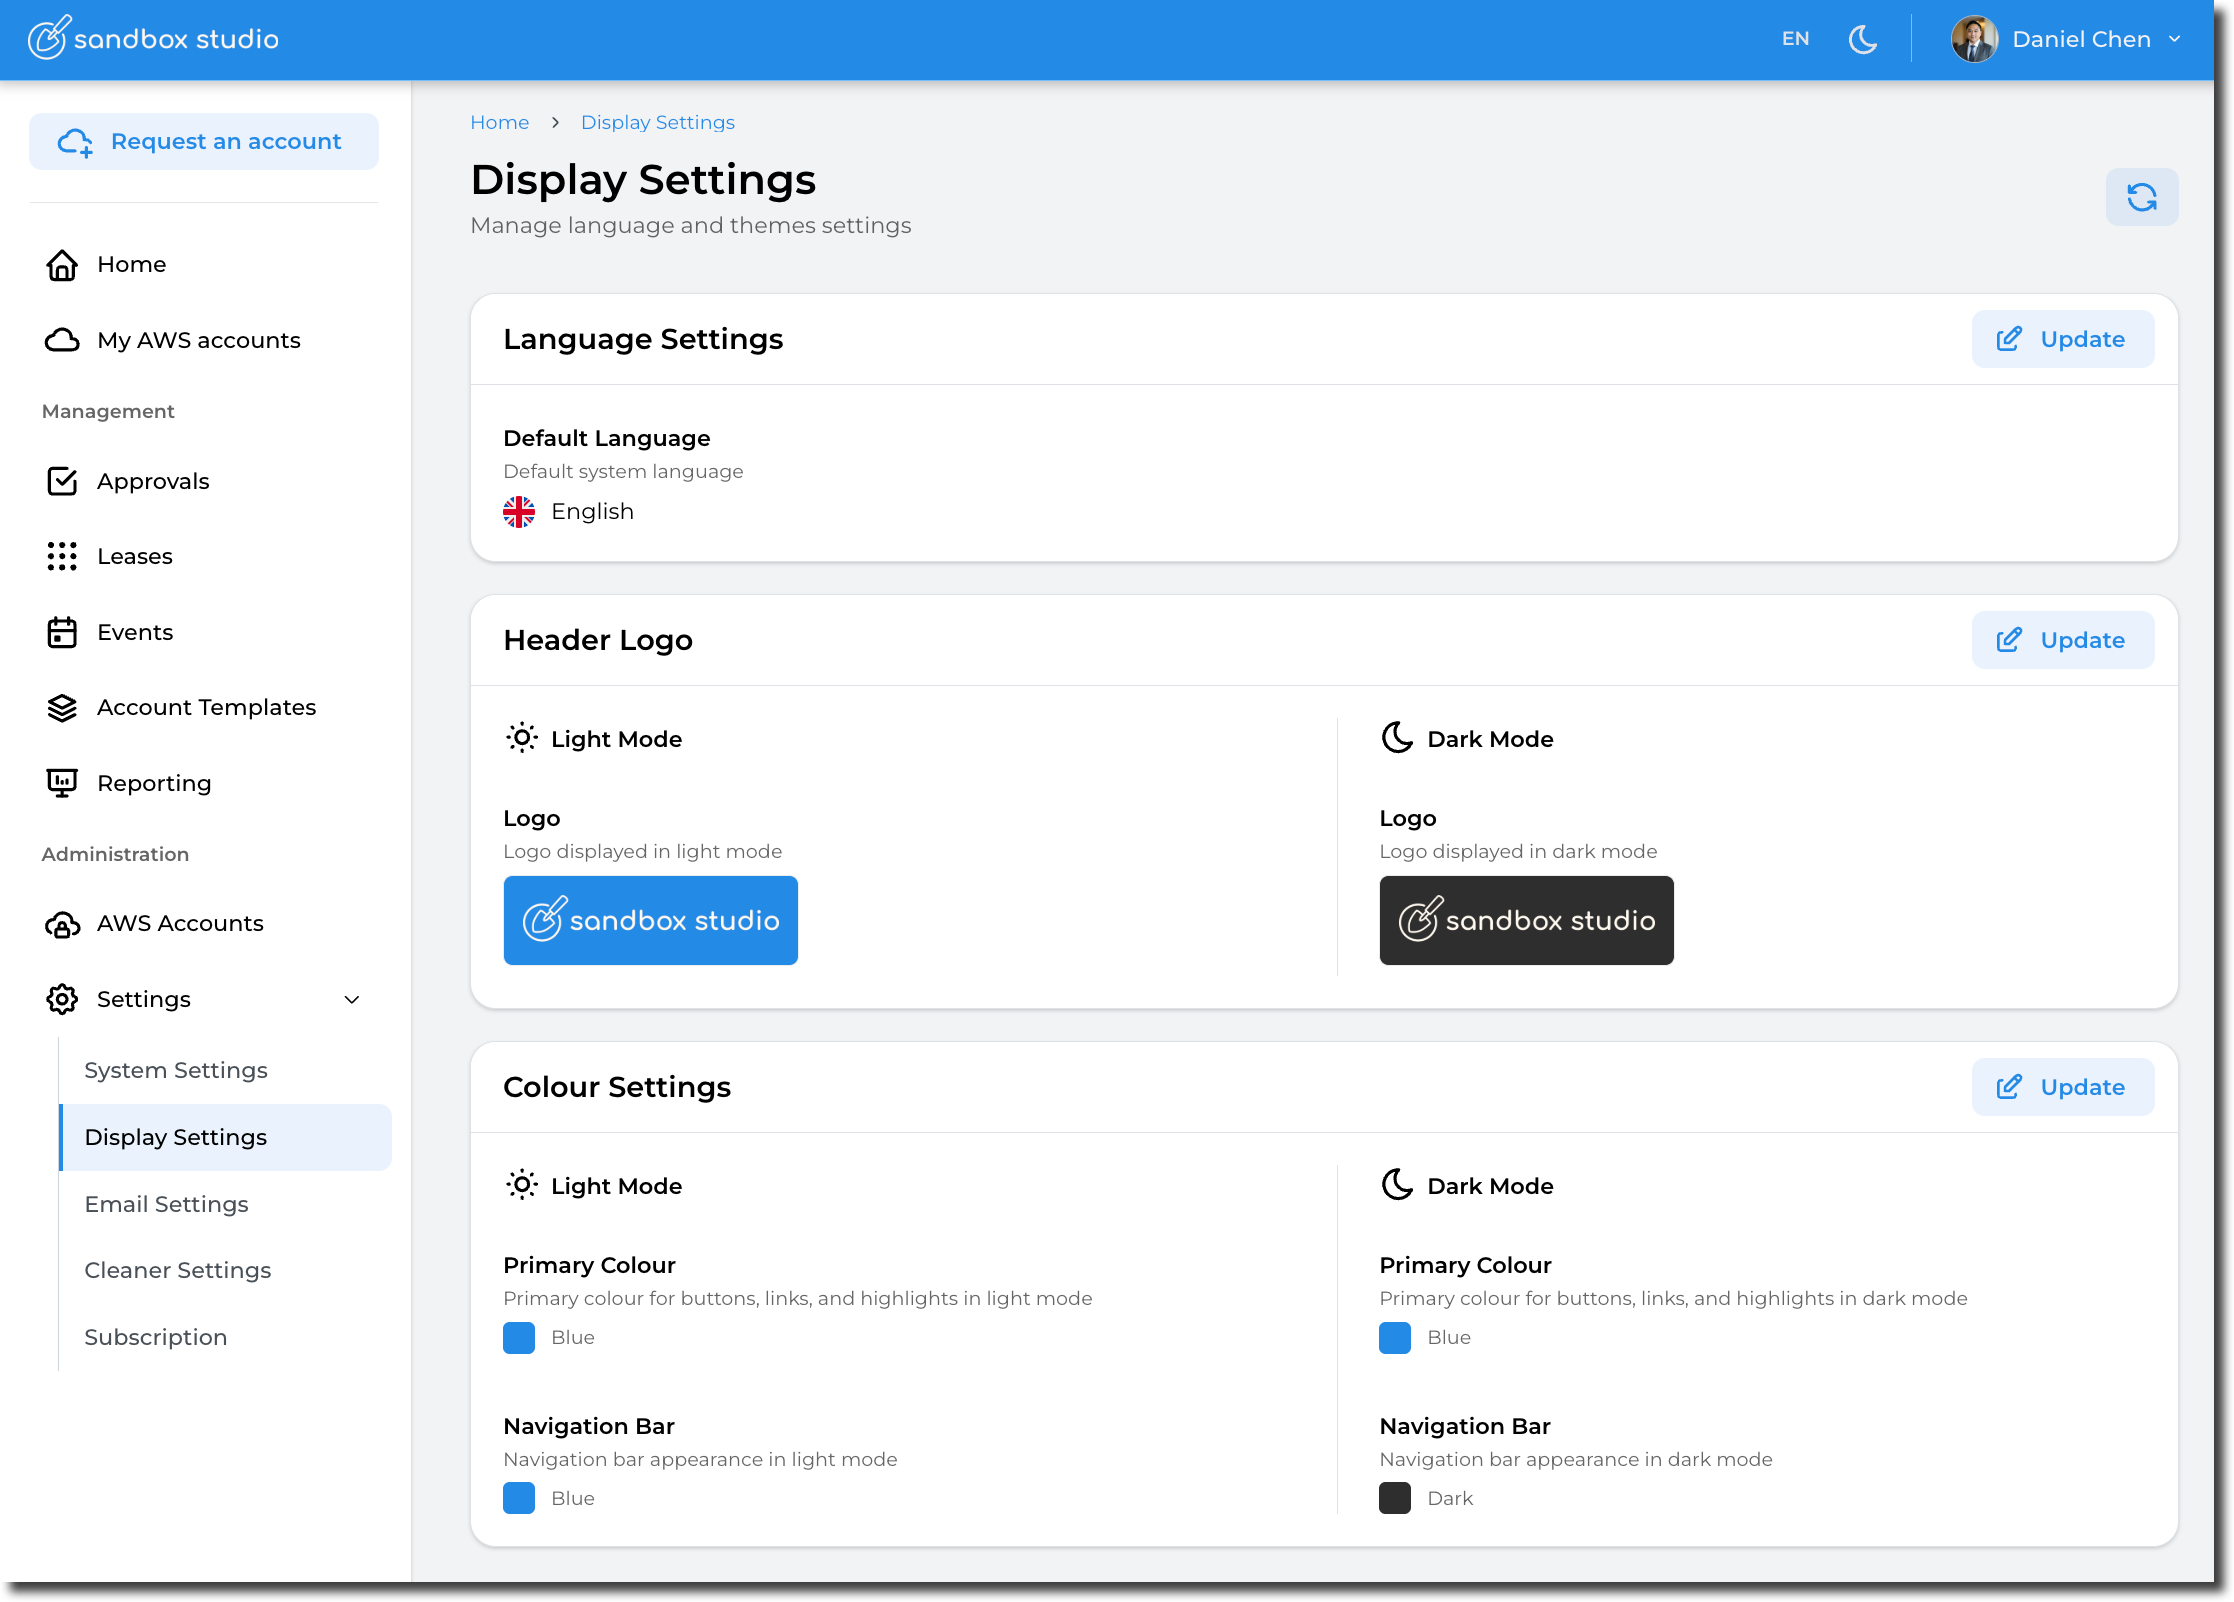
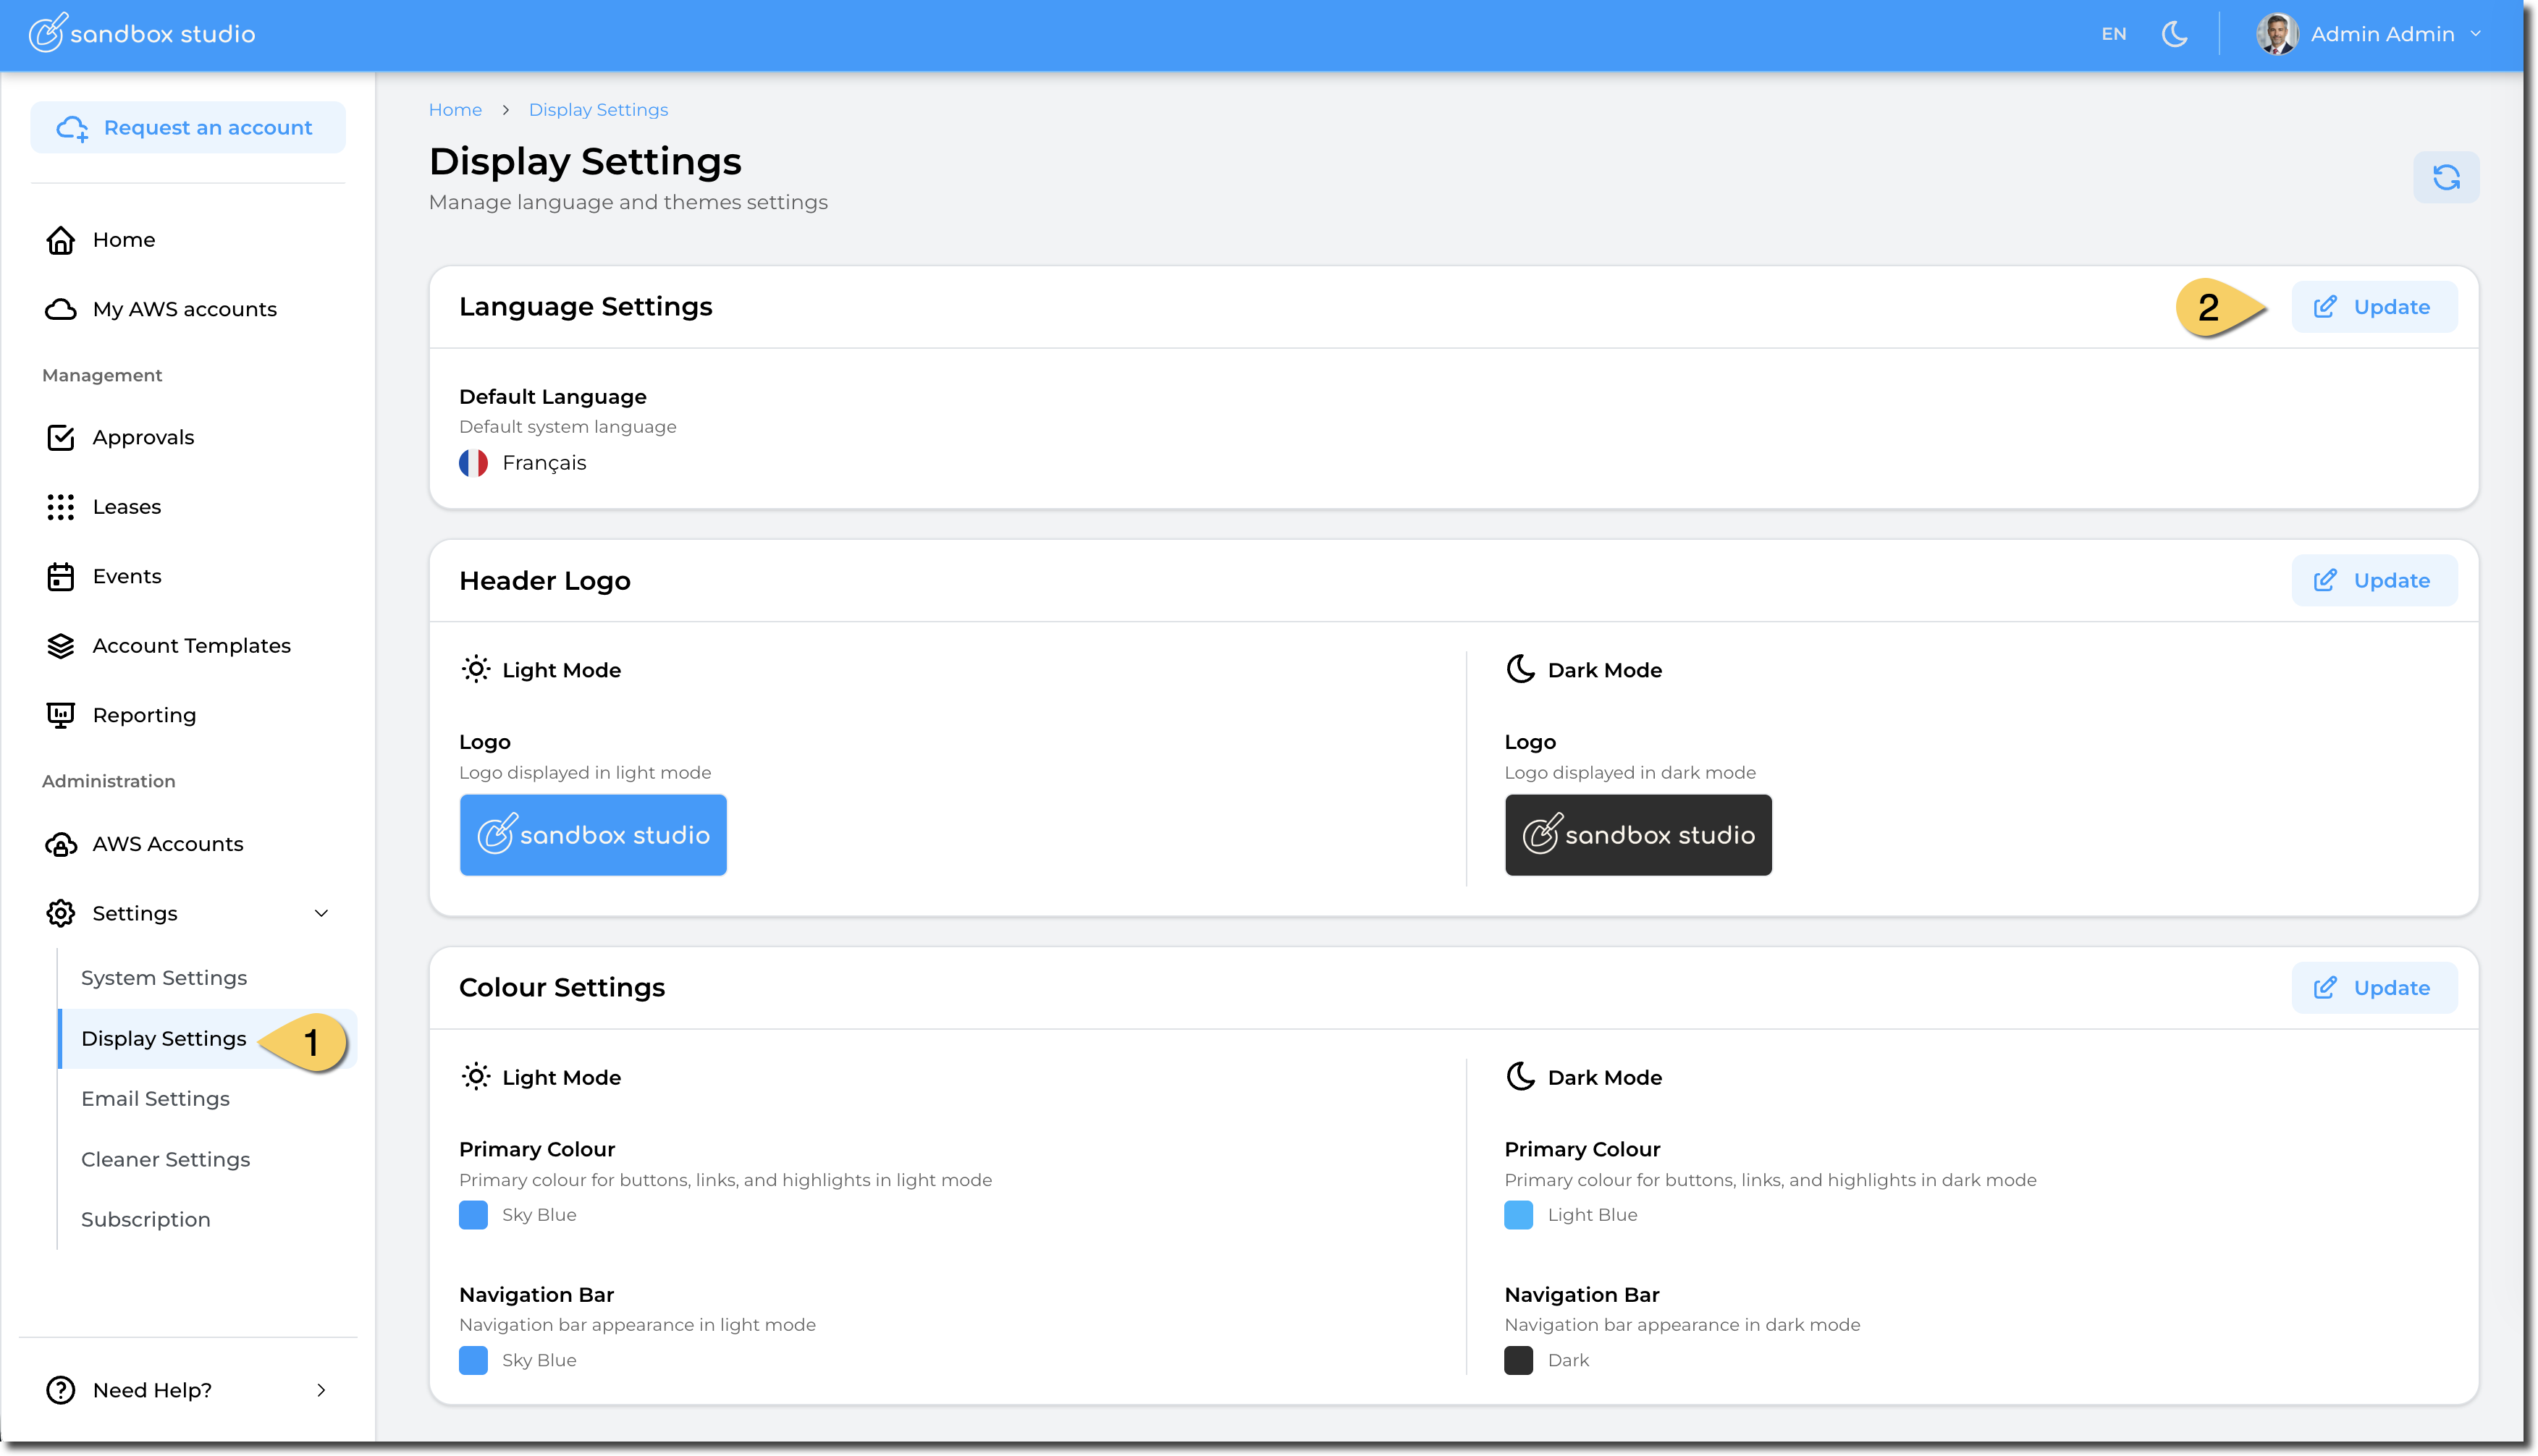
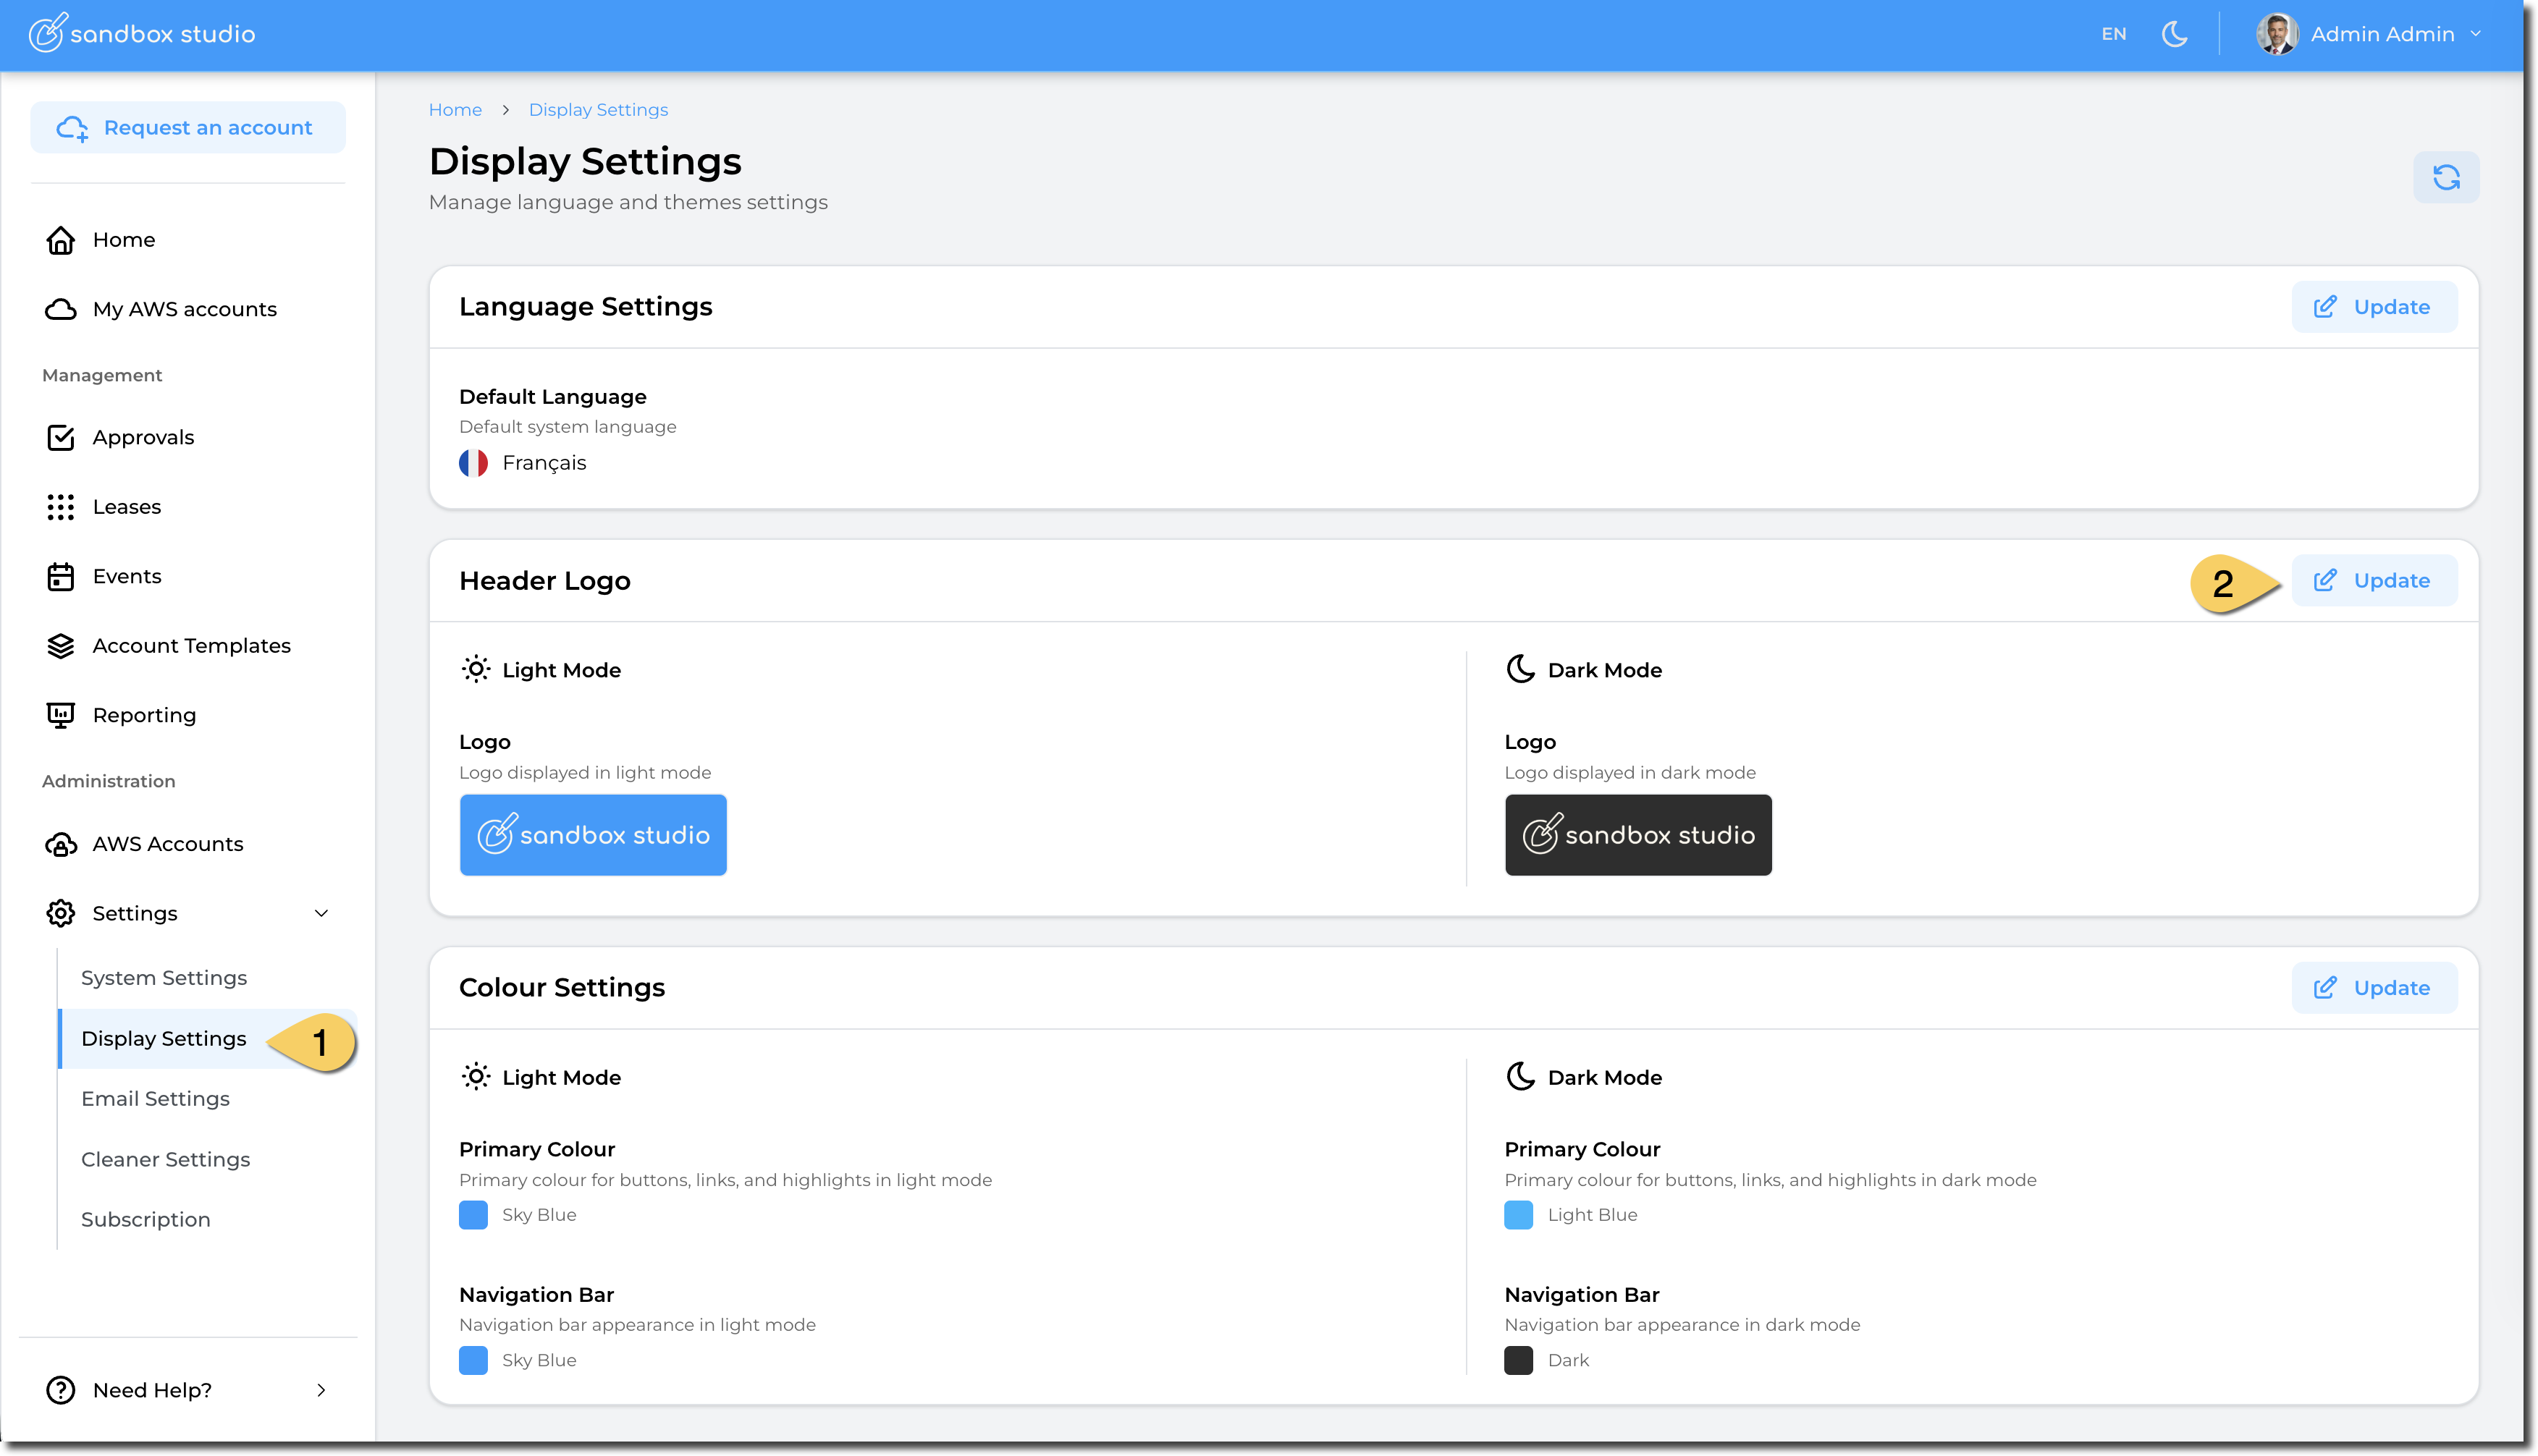
Display Settings - Change default language
To change the default language of your Sandbox Studio installation, go to "Settings" > "Display Settings" (1) and click on "Update" in the "Language Settings" section (2):
Then select the language and "Update":
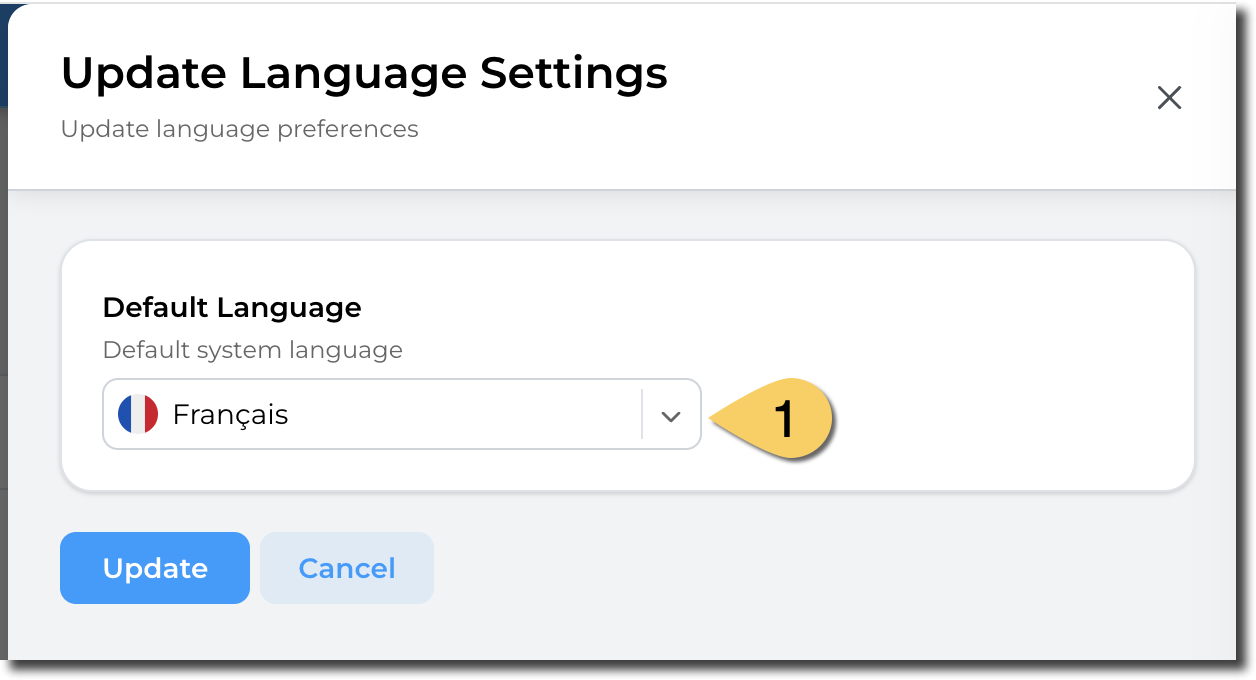
Default language will be used if users have not selected their default language.
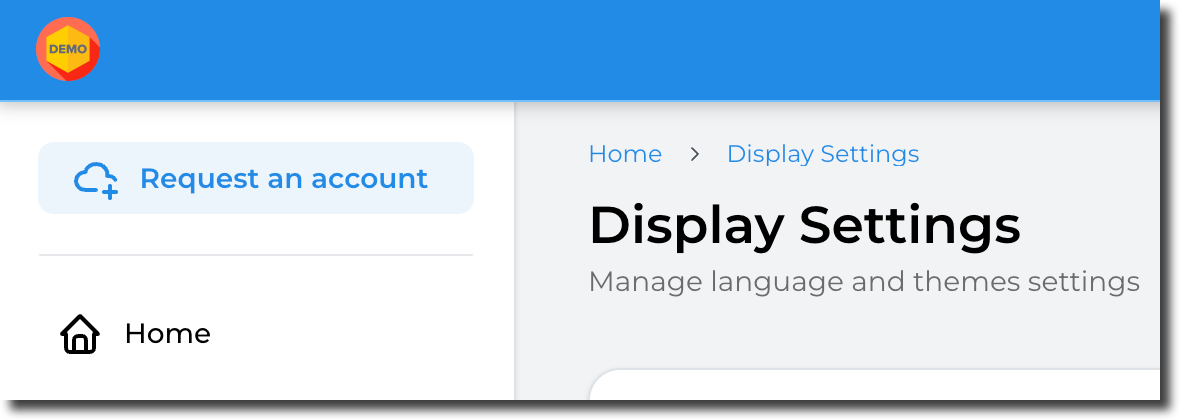
Display Settings - Change header logo
To change the default language of your Sandbox Studio installation, go to "Settings" > "Display Settings" (1) and click on "Update" in the "Header Logo" section (2):
You can now select your custom header image:
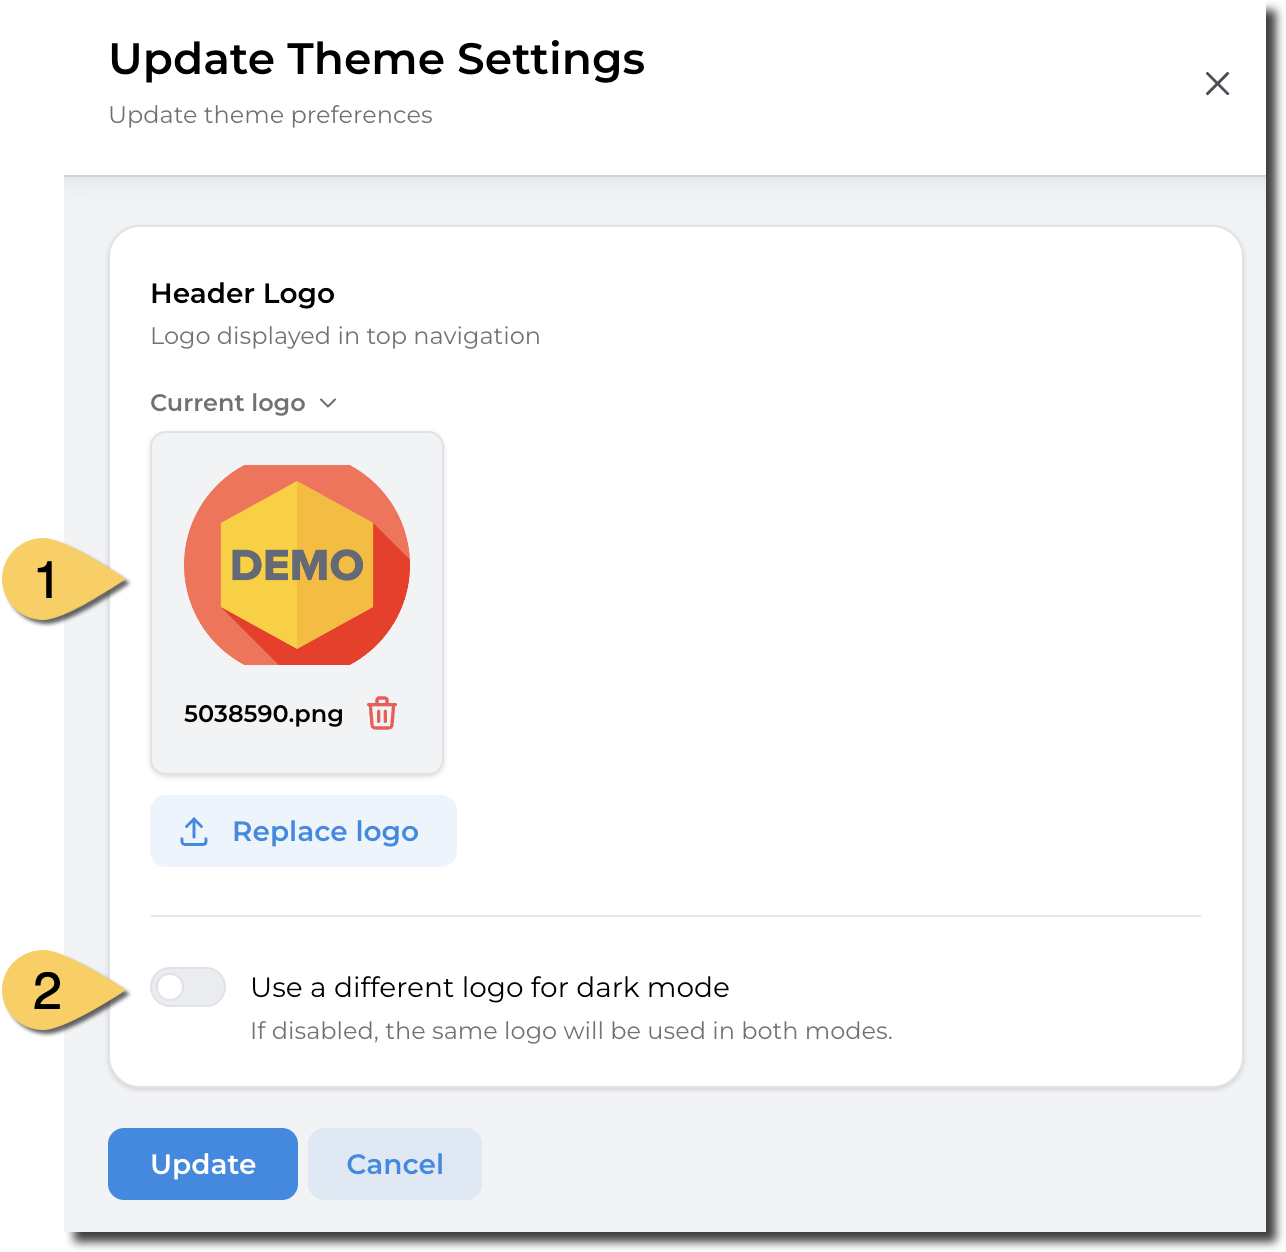
- Upload your image file. We recommend using transparent background so the logo displays flawlessly.
- You can choose to have a different logo for dark mode. If this option is left unticked, the same logo as the first one is used.
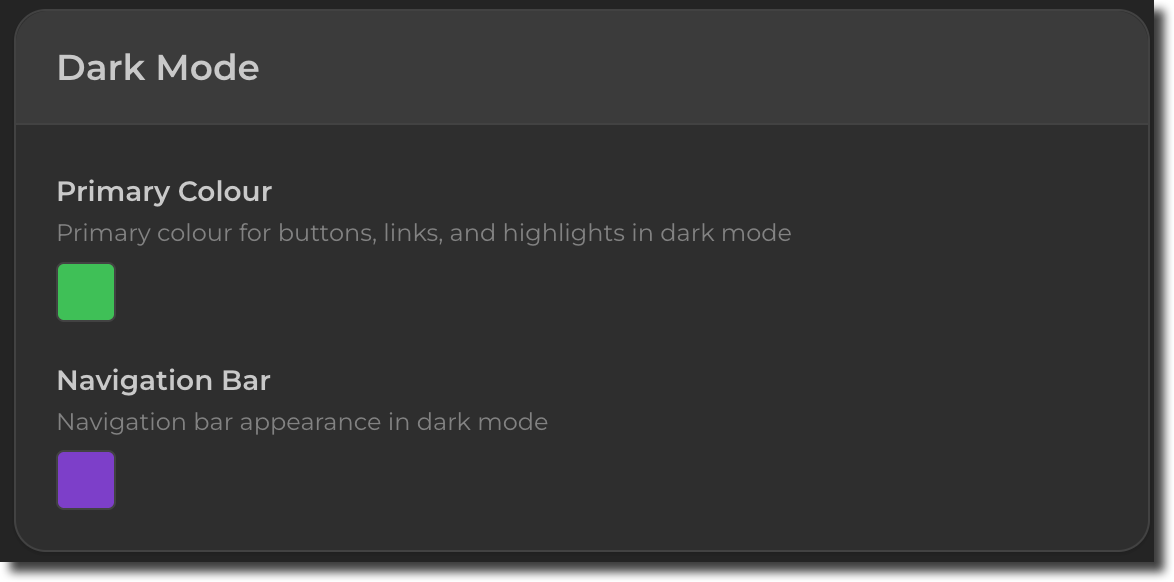
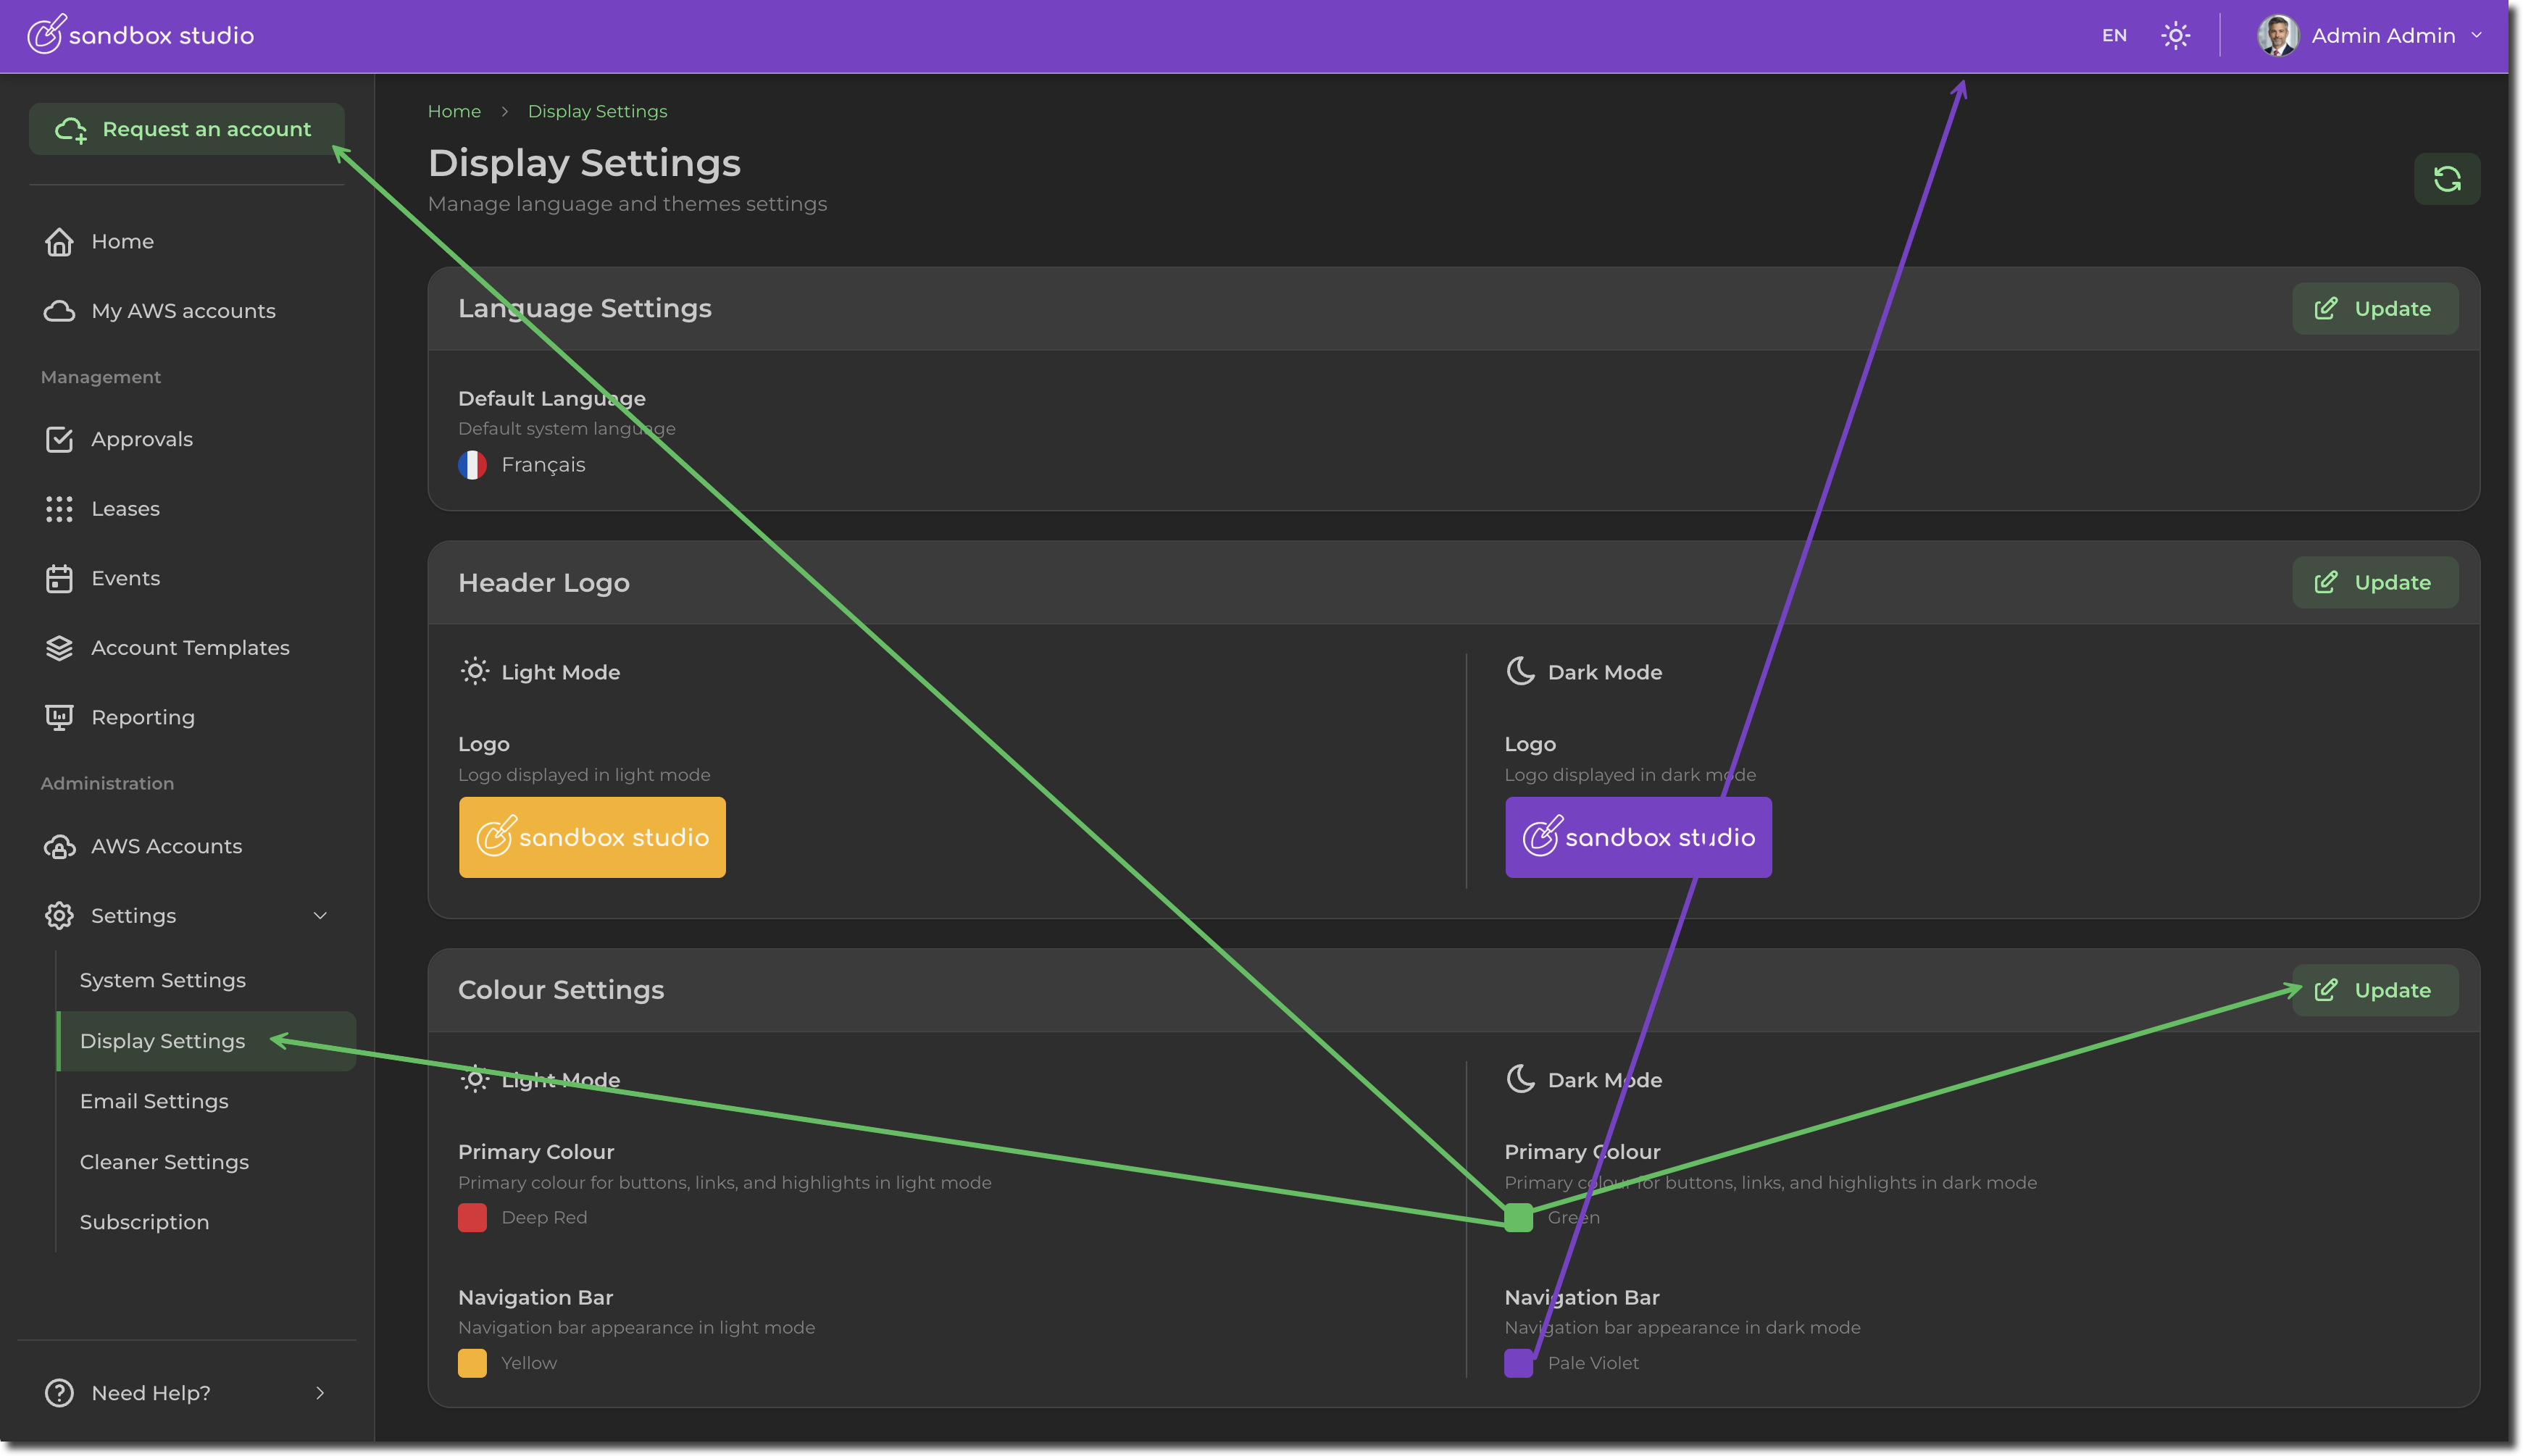
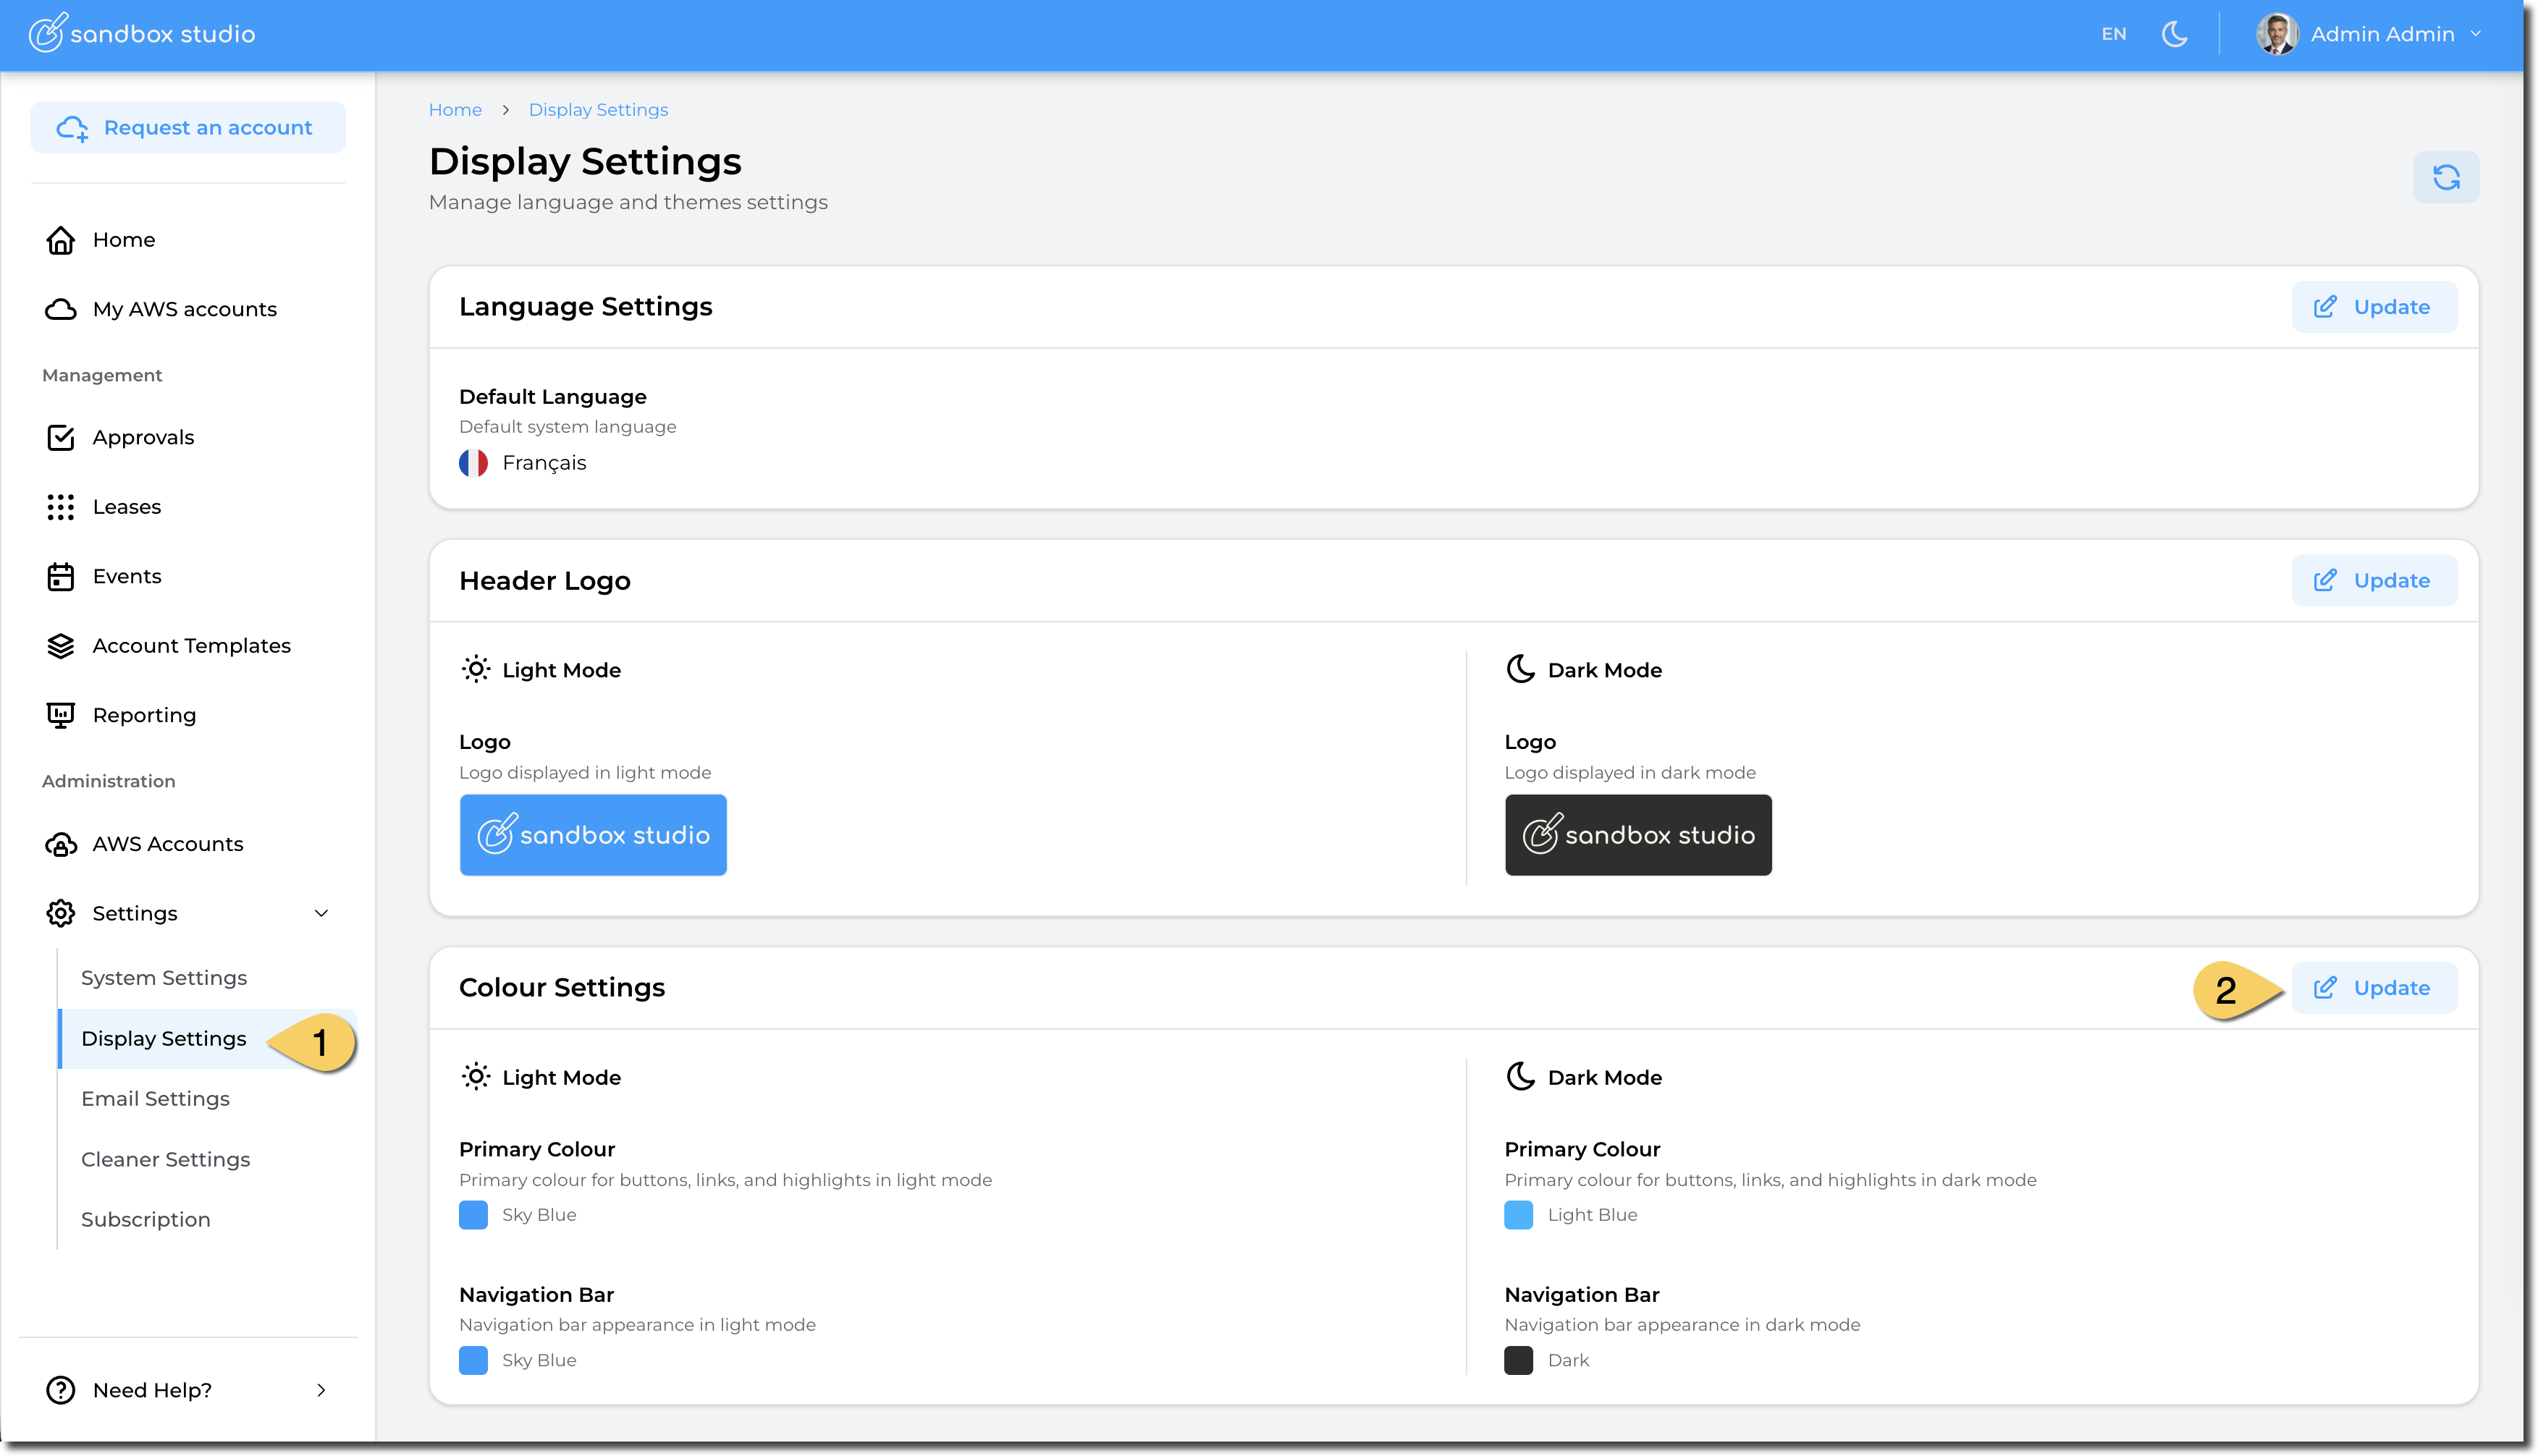
Display Settings - Change theme colour
To change the theme colour of your Sandbox Studio installation, go to "Settings" > "Display Settings" (1) and click on "Update" in the "Colour Settings" section (2):
You can now select your custom colours:
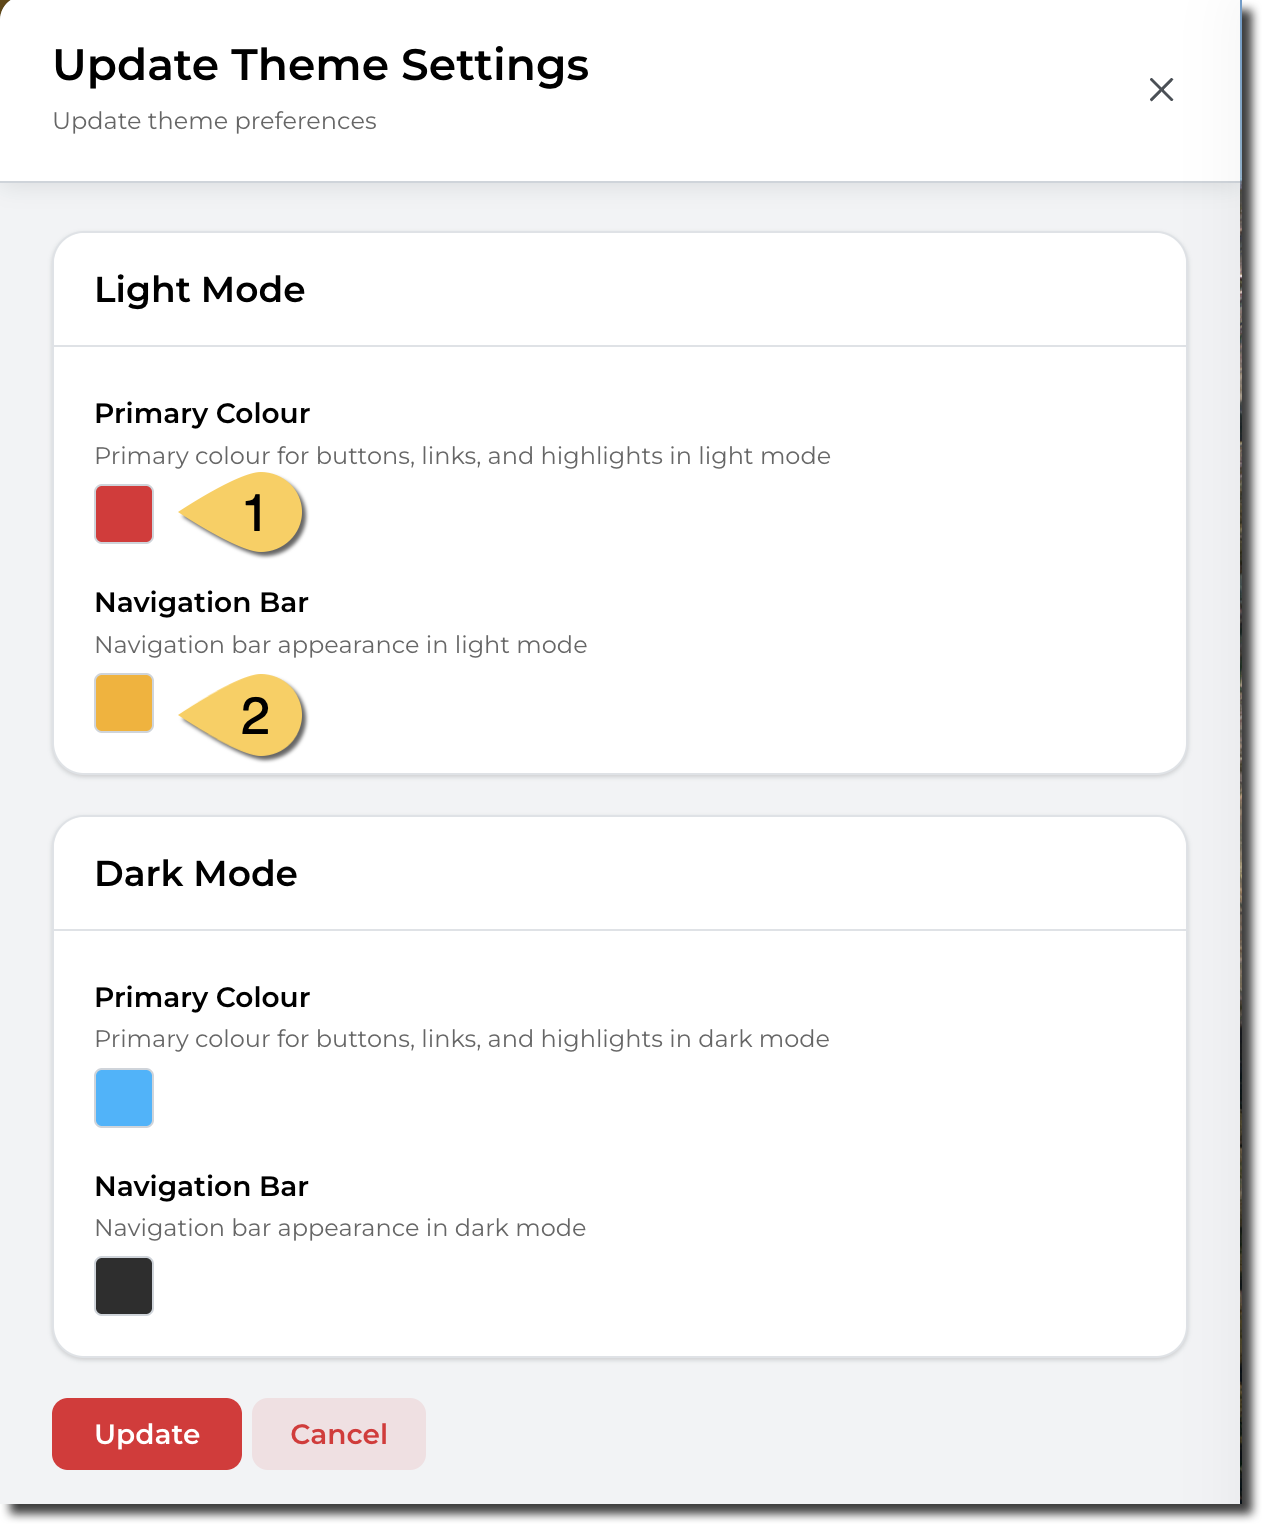
- Primary Colour. This colour is used for buttons, menu items, etc.
- Navigation Bar. This colour is used for the top bar of Sandbox Studio
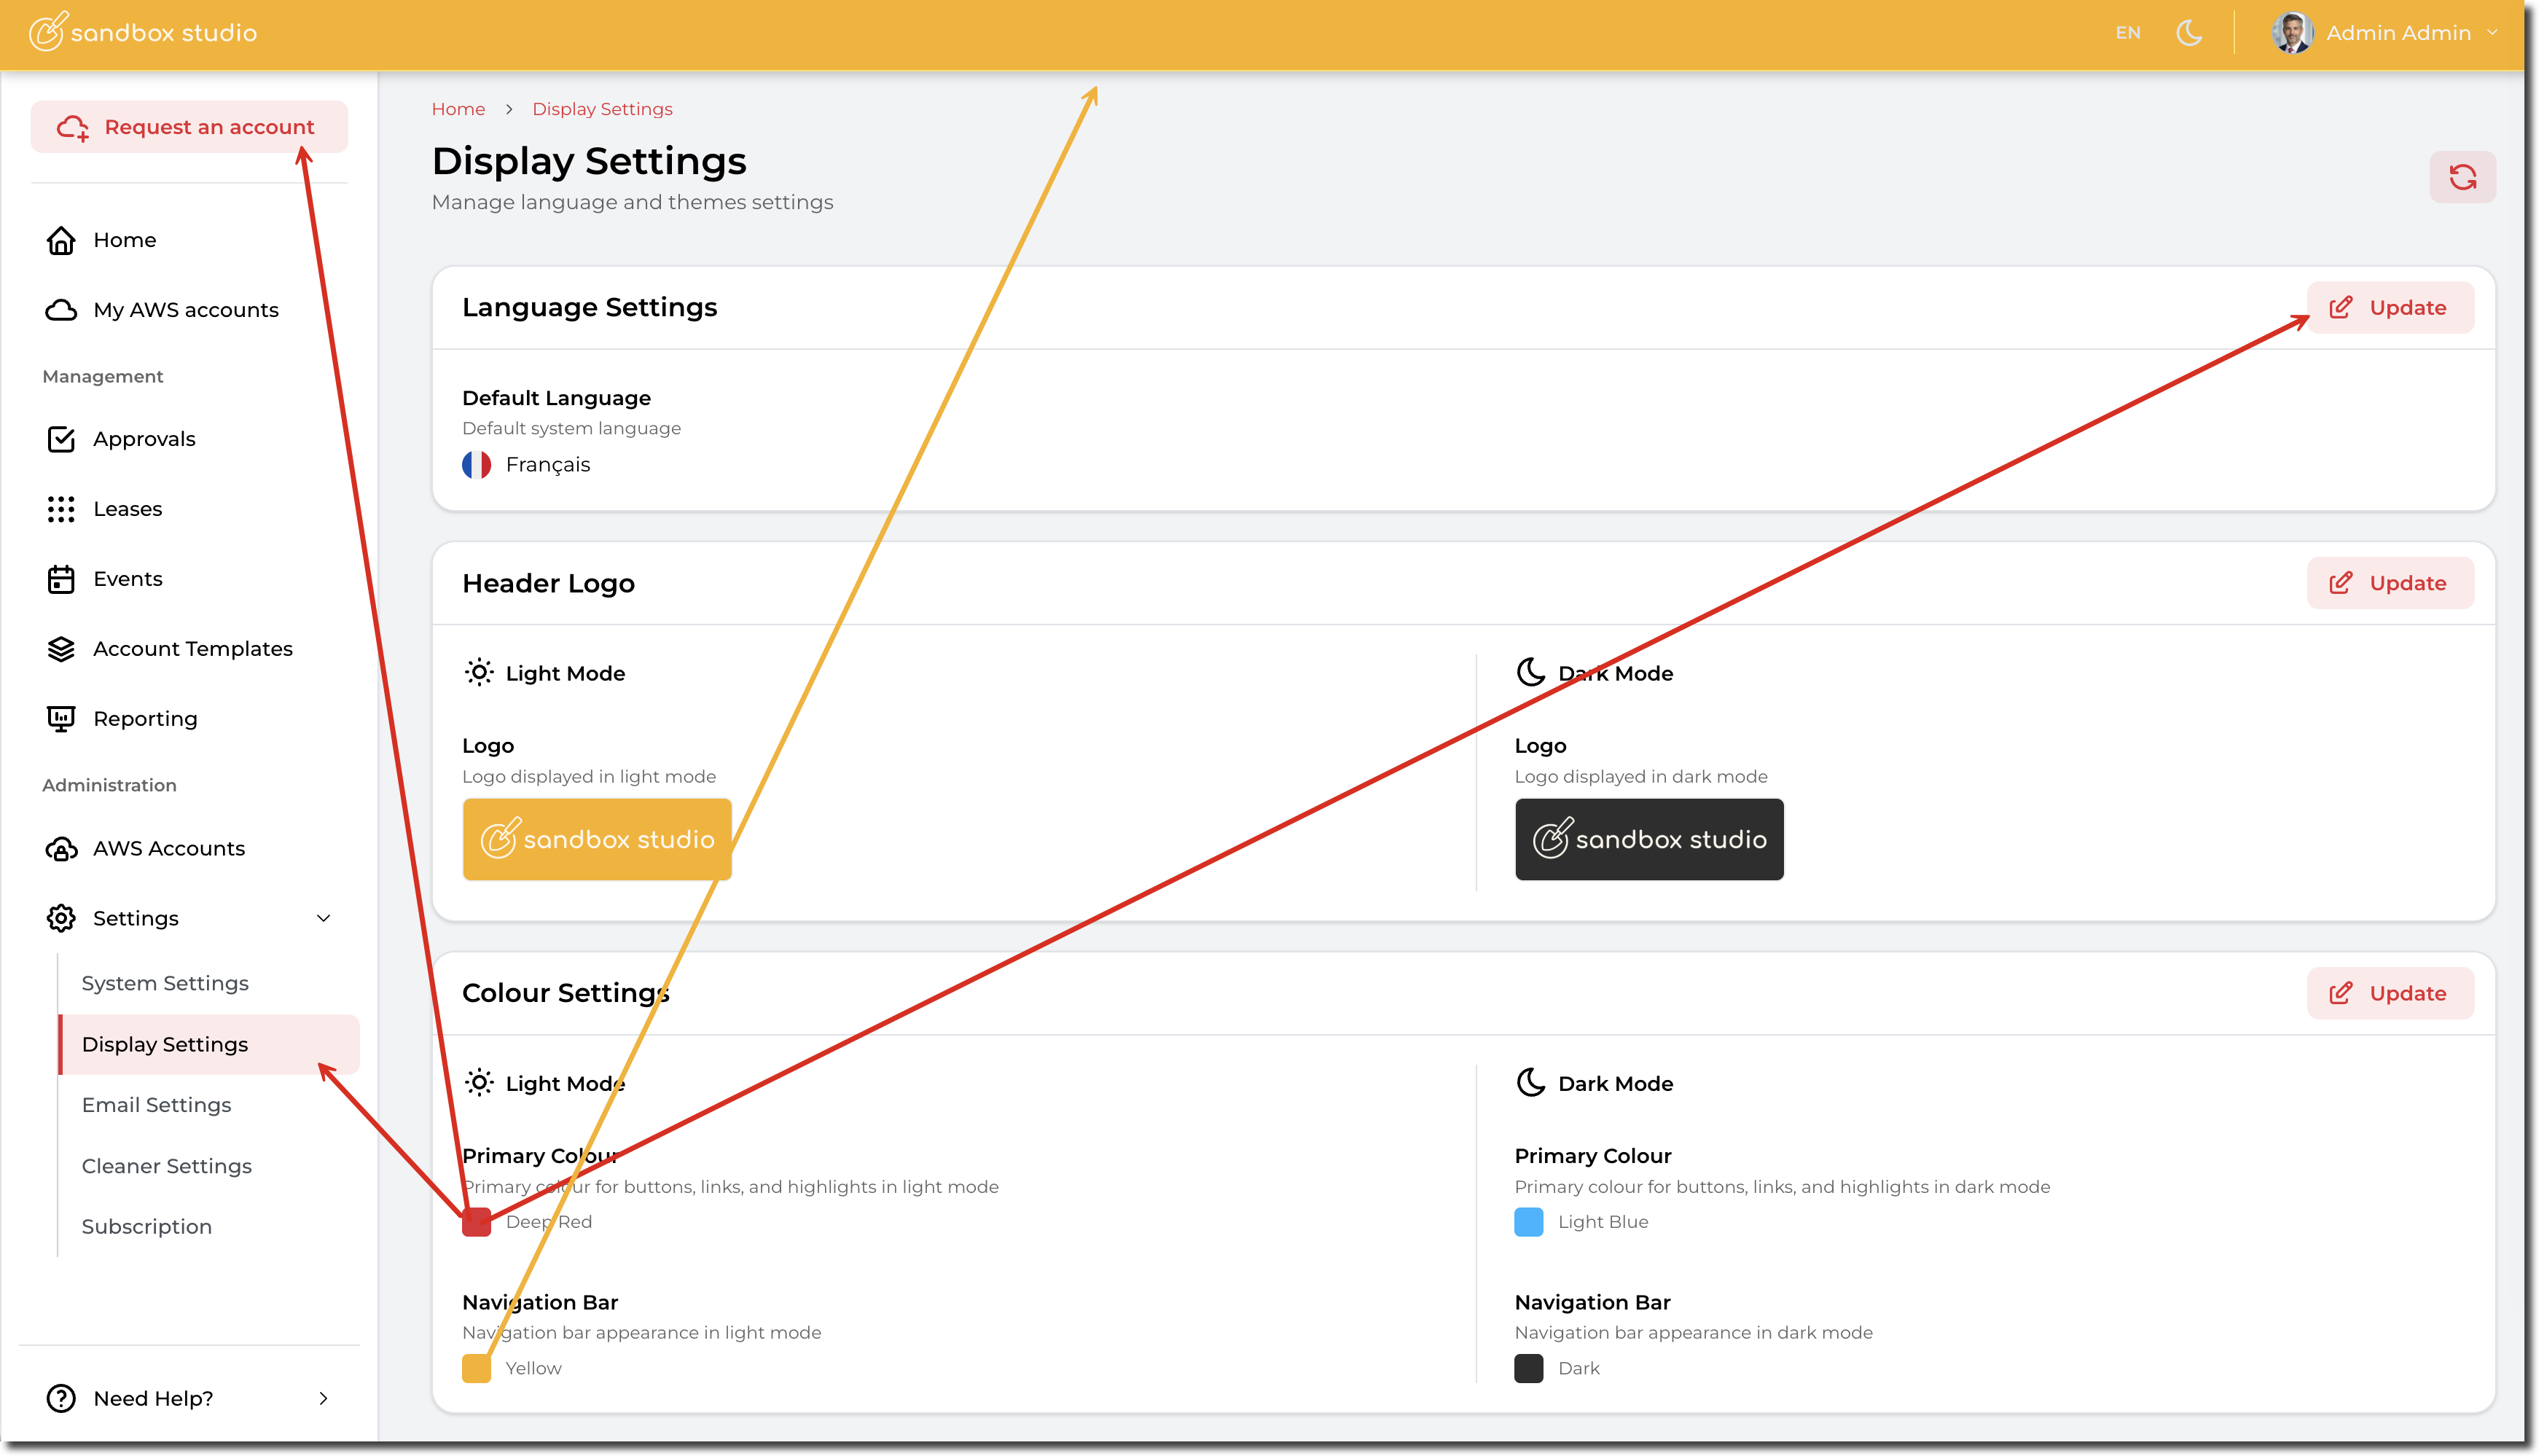
You can also change the colours that display for the dark mode. For instance: